1-10
13
Getting Started
Notes on CONTROL connector
The CONTROL connector uses the special type of the stereo miniplug shown in Figure 1 below.
Note that the connector of the video equipment or video cables may differ from the CONTROL
terminal.
In addition to the special miniplug, you can also use a stereo miniplug or monaural miniplug
shown in Figures 2 and 3. If you use the monaural miniplug, note that the display mode will be
fixed to 3D stereoscopic mode because the GND and 2D/3D stereoscopic control signals are not
separated.
Figure 1 Special type stereo miniplug
Figure 2 Stereo miniplug
Figure 3 Monaural miniplug
(Fixed to 3D stereoscopic mode)
Note
When you want to display 3D stereoscopic pictures in PC mode, the RGB signal in the frame sequential
format must be supplied to the Personal LCD Display. The frame sequential signal switches the frame
pictures for the right and left eyes alternately for each frame.
Since the RGB signal output from the PC does not include frame identification information such as the
ODD/EVEN information of the video signal, the system cannot distinguish which frame is processed
for the right eye and for the left eye. To distinguish frames, the Personal LCD Display uses a frame
control pulse synchronized with the frame transition.
continued
GND
2D/3D stereoscopic control
signal
Frame control pulse
GND
2D/3D stereoscopic control
signal
Frame control pulse
GND
Frame control pulse
14
-US
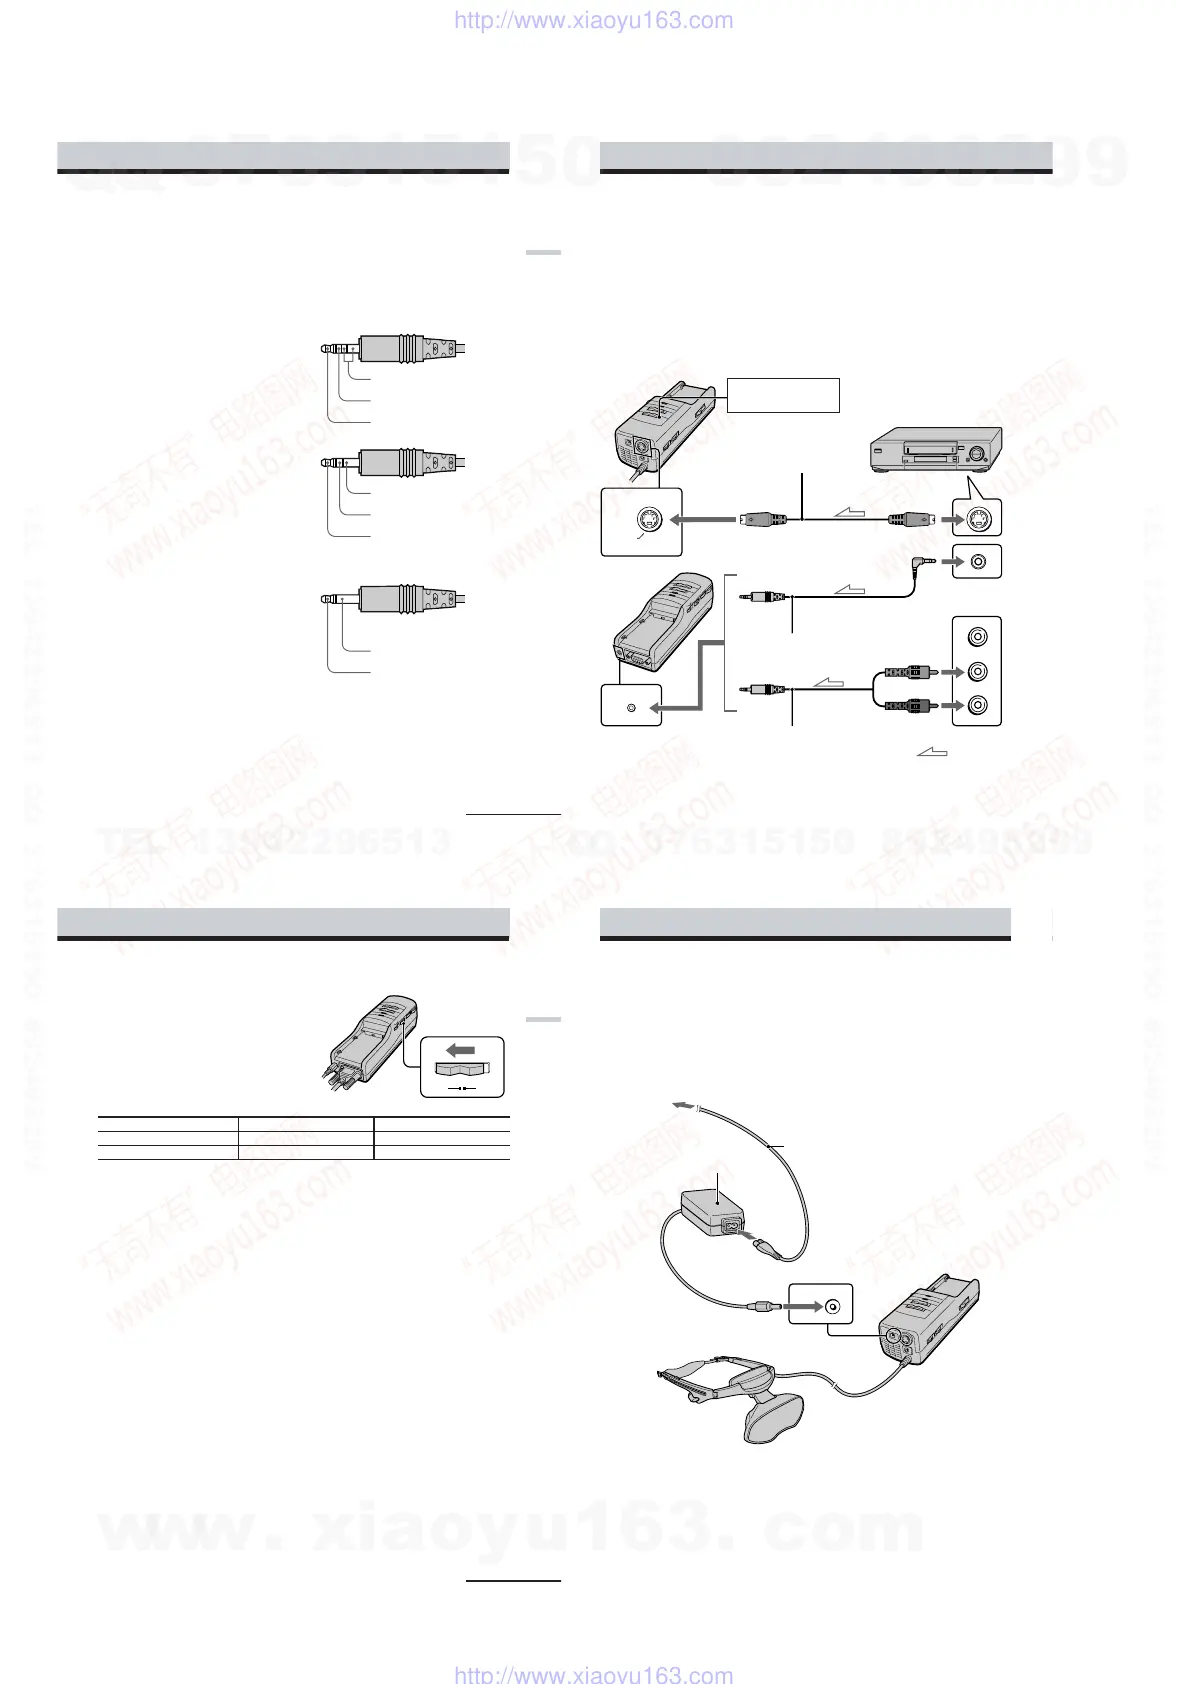
S VIDEO
AUDIO
VCR, Laser disc player, etc.
S-video cable
Audio cable
(stereo miniplug)
Power supply box
Audio R (red)
Audio L (white)
to audio/video outputs
to S VIDEO connector
to S-video output
to audio output
Set the PC-VIDEO switch
to “VIDEO.”
Audio cable
(stereo miniplug)
: Signal flow
Connecting video equipment (3D stereoscopic picture)
Connect a VCR, laser disc player, or camcorder to the power supply box using a commercially
available audio/video cable as shown below. When you connect the Personal LCD Display to
the video equipment, set the PC-VIDEO switch on the power supply box to “VIDEO.”
Note
Do not use audio, audio/video, or S-video connecting cables, which are 9.8 feet (3 m) or longer. The
performance may be reduced.
You can use only the S-Video connector to enjoy the 3D stereoscopic picture from the video
equipment. You cannot input the composite video signal to the Personal LCD Display by using
the special type stereo miniplug, likewise with the LDI-100B series.
Connecting the Personal LCD Display (continued)
to AUDIO connector
The S-Video connector of the Personal LCD Display is designed only for supplying the field
sequential 3D stereoscopic picture signal. If a normal 2D video signal is supplied, the Personal
LCD Display simply displays normal 2D pictures on each LCD panel in the field sequential
method, but 3D stereoscopic pictures will not appear.
15
-US
Getting Started
Setting the POLARITY switch
You can enjoy 3D stereoscopic pictures only
when the following signal is supplied: field
sequential signals that completely separate
the pictures for the right and left eyes using
the ODD and EVEN sequential fields.
You can also set which field is for right (or
left) eye by setting the POLARITY switch.
POLARITY switch A POLARITY switch B
ODD field For the left eye For the right eye
EVEN field For the right eye For the left eye
Note
To enjoy 3D stereoscopic pictures in VIDEO mode, you do not have to supply the control signal to the
CONTROL connector.
continued
AB
POLARITY
16
-US
DC IN 8.4V
Connecting the power source
Connect the AC power adapter AC-PLM3 (supplied) to the DC IN connector on the power
supply box. Then, connect the AC power cord (supplied) to the AC power adapter and to a wall
outlet. Do not connect the power source until all other connections are complete.
Display unit
AC power adapter
AC-PLM3 (supplied)
to wall outlet
Power supply box
to DC IN connector
AC power cord (supplied)
Connecting the Personal LCD Display (continued)
w
w
w
.
x
i
a
o
y
u
1
6
3
.
c
o
m
Q
Q
3
7
6
3
1
5
1
5
0
9
9
2
8
9
4
2
9
8
T
E
L
1
3
9
4
2
2
9
6
5
1
3
9
9
2
8
9
4
2
9
8
0
5
1
5
1
3
6
7
3
Q
Q
TEL 13942296513 QQ 376315150 892498299
TEL 13942296513 QQ 376315150 892498299
http://www.xiaoyu163.com
http://www.xiaoyu163.com