4. Press the [V3] knob.
5. The "For Services" menu is displayed.
6. Select "Transition Calibration" with the [V1] knob.
7. Turn the fader lever fully to the rear side.
8. Press the [V3] knob.
9. Turn the fader lever fully to the front side.
10. Press the [V4] knob.
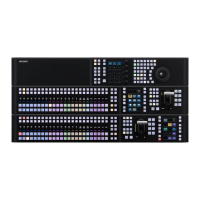
SETUP button
Fader lever
V1 knob V3 knob
V4 knob
11. Turn off and on the power of the unit.
12. Check that the unit works normally.
13. Check that the transition functions correctly using the fader lever.
Adjusting the video clock
After any of the following parts has been replaced, the video clock must be adjusted.
• MIX-54 board
• IC1200, IC4203, IC4211, or X4200 on the MIX-54 board
1. Set the system format of the unit to "480i59." (Refer to the Operating Instructions.)
2. Press the SETUP button beside the menu display of the unit.
3. Select "System" with the [V1] knob and press the [V1] knob.
4. Turn the [V1] knob to move the cursor to "Back" at the bottom of the item list.
5. Press the [V3] knob.
6. The "For Services" menu is displayed.
7. Select "Video Clock Adjust" with the [V1] knob.
8. Connect the frequency counter to MULTI VIEWER of SDI-OUT.
9. Adjust the frequency counter to 13.5 MHz ±20 Hz with the [V3] knob.
10. Press the [V3] knob to memorize the adjustment result.
11. Turn off the power of the unit.
12. Disconnect the frequency counter.
MCS-8M
1-27