SPRADA filter manual changes 4/16/07 11:25 AM Page 10
Com
posite
C M Y CM MY CY CMY K
9
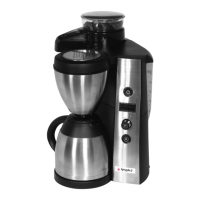
5.0 PREPARING THE COFFEE MACHINE:
5.1 UNPACKING:
5.1 a) Carefully remove the machine and all accessories from the packaging, keeping the packaging
for possible future transporting and storing.
5.1 b) Remove protective cover on top of the grinder.
5.1 c) Read the warning label on top of the water container lid (Fig 1,E) and remove the label.
5.1 d) Open the water container lid and remove the Cover Lid, the Goldtone Filter and the Filter
Holder Insert (Fig 1 I, E, F, G, H).
5.1 e) Now remove the transport protective tape (it wraps from the inside of the filter holder
into the water tank) (Fig 2).
5.1 f) Remove the Stainless Steel Carafe from the pedestal, replace the Filter Holder Insert
(Fig. 4) and insert the Goldtone Filter. Make sure to place the Cover Lid correctly on top
of the Filter Holder Insert (Fig. 5).
IMPORTANT: After reading these instructions, brew 3 to 4 cups of water to flush out the
internals of the system. This process is only necessary once upon first use.
5.2 SETTING THE REAL-TIME CLOCK:
5.2 a) Plug in the machine and switch it ON – Important: The actual time must be programmed
before you can operate the coffee maker. If you do no set the real-time clock, the LCD
display (K) will show “TIME <AM>” and it is not possible to turn on the coffee maker.
5.2 b) Rotate the P-button (L) to select either AM or PM.
5.2 c) Push the P-button: LCD Display shows TIME <HRS 12>.
5.2 d) Rotate the P-button to select the hours, example: TIME <HRS 3>.
5.2 e) Push the P-button: LCD Display shows TIME <MIN 00>.
5.2 f) Rotate the P-button to select the minutes, example: TIME <MIN 16>.
5.2 g) The Display now shows TIME 3:16 AM – This is the time that has been set. P-button
needs to be depressed to confirm the selection - If it is not pressed within the next THREE
seconds, the settings 3:16 AM/10c MEDIUM will display. These are the default factory
grinder setting.