Do you have a question about the Stanley MC521 and is the answer not in the manual?
Provides descriptive information, wiring, and tune-in instructions for the MC521 controller.
Details the MC521 control box's applicability to Magic-Swing, Magic-Force, and Bifold operators.
Explains features like Magic-Touch, Reverse On Obstruction, Safety Check, Emergency Breakout, and others.
Ensures Magic-Touch time delay is greater than 5 seconds for ANSI A156.19 compliance.
Stipulates that all ANSI/BHMA and UL requirements must be met before door operation.
Explains how to evaluate door system power requirements, including dedicated power sources.
Provides step-by-step instructions for connecting main power wiring to the header.
Detailed steps for connecting breakout status signal wiring for Magic-Swing operators.
Caution against arcing by ensuring the breakout status switch is always connected.
Verification steps for breakout status/breakout cam settings using a multimeter.
Illustrates breakout status and breakout cam settings for Magic-Swing operators.
Instructions for connecting breakout status signal wiring for Magic-Force operators.
Steps to set the power switch to OFF and verify breakout cam settings.
Diagrams illustrating breakout status and breakout cam settings for Magic-Force operators.
Details initial cam settings and verification for both right and left-hand Magic-Force operators.
Continuity checks for breakout status switch using a multimeter between TB3 terminals 9 and 10.
Instructions for connecting the switch module harness and wiring the auxiliary position switch.
Illustrates the wiring for the auxiliary position switch on the Magic-Force operator.
Instructions for determining and wiring operator handing for Magic-Force operators.
Instructions for wiring the ON/OFF/HOLD OPEN switch and the power switch.
Guide for connecting door activation or safety devices using wiring diagrams.
Instructions for connecting Sentrex components and their wire colors.
Details requirements and connections for the Bodyguard and Superscan systems.
Instructions for wiring the optional cycle counter.
Diagram illustrating the wiring connections for the cycle counter.
Steps to set the ON/OFF/HOLD OPEN and POWER switches before tuning.
Step-by-step guide for tuning the MC521 controller using the Palm Pilot application.
Warning to ensure the door path is clear and initial steps for selecting Tool Box and Restart FIS.
Chooses the door type, motor configuration, and handing, then presses 'Begin FIS'.
Steps for configuring door settings and initiating the auto-configure sequence.
The door performs a learn sequence; sensors are inactive during this phase.
Selects 'Configure Door' for making additional changes to settings.
Enters the 'Trouble Shoot' menu and accesses additional functions via 'More>'.
Views the I/O grid to verify sensors and inputs and clones settings between controllers.
Fetches settings from one controller and pushes them to another, noting compatibility.
Displays and reviews a summary of current settings for Motor 1 and Motor 2.
Explains how to change INDEX and VALUE using the ENTER, UP, and DOWN buttons.
Describes how the display indicates STATUS CODE and how to access the door cycle counter.
Provides a step-by-step guide for the First Install Sequence (FIS) using pushbuttons.
Details FIS steps for Motor 2 handing, accepting FIS, and making Safety Logic changes.
Lists the available MC521 operational modes, such as Dura-Glide, Magic-Swing, and Magic-Force.
Provides descriptions for various INDEX values used in the controller settings.
Defines configuration codes for Motor 1, including defaults for low and full energy.
Defines configuration codes for Motor 2, including defaults for low and full energy.
Lists and describes the meaning of various status codes displayed by the controller.
Verifies ANSI/UL requirements and guides adjustments for speeds, forces, and time delay.
Cautions against high stall speed and reinforces Magic-Touch time delay requirements.
Covers adjusting breakout cams and ensuring all settings are stored after power cycling.
Details the description and part number for various spare parts.
Illustrates the wiring connections for a single door breakout status setup.
Shows the wiring configuration for dual-door breakout status systems.
Illustrates the wiring connections for the left-hand Magic-Force operator.
Illustrates the wiring connections for the right-hand Magic-Force operator.
Wiring diagram for the left-hand operator including the power close option.
Wiring diagram for the right-hand operator including the power close option.
Illustrates connections for the motor and encoder for Magic-Swing operators.
Shows connections for the controller, PDA, and associated components.
Illustrates connections for Sentrex, Cycle Counter, Bodyguard Data, and rocker switch wiring.
Shows connections for stall, safety sensors, push plate, holding beam, and common terminals.
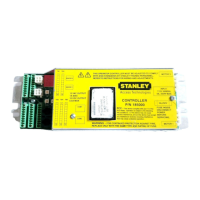
Diagram of the controller's front and rear panels showing connectors, displays, and switches.
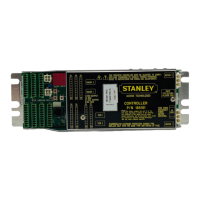
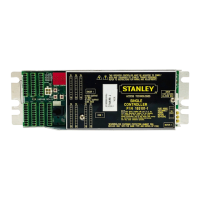
Close-up view of the terminal block layout on the controller.
Detailed breakdown of each control/indicator item and its function.
Critical installation aspects for full/standard power swinging and folding doors.
Critical installation aspects for low energy swinging door systems.
Requirements for power operated door systems to comply with UL 325 standards.
Mandatory grounding, permanent wiring, and Knowing Act switch installation for safety.
Details entrapment criteria for swinging doors, including forces, times, and weights.
Details entrapment criteria for folding doors, including forces, times, and weights.
Lists terminal and pin states for external cycle counter, bodyguard data, and bodyguard.
Details the states of the function switch on TB2 for Hold, Off, and Auto On.
Describes the states (detecting, triggered, no breakout) for various inputs.
| Brand | Stanley |
|---|---|
| Model | MC521 |
| Category | Control Unit |
| Language | English |