0478 404 8800 A - EN
16
7.1 Installation instructions
● Perform all the operations described on
a clean, flat, level and firm surface.
● Observe installation positions – always
ensure that the machine is standing
stably and securely.
● Strictly observe instructions for cable
installation. In particular, fasten all
cables to the handlebar using cable
ties in order to prevent damage to the
machine (e.g. when folding down the
handlebar) or possible malfunctions.
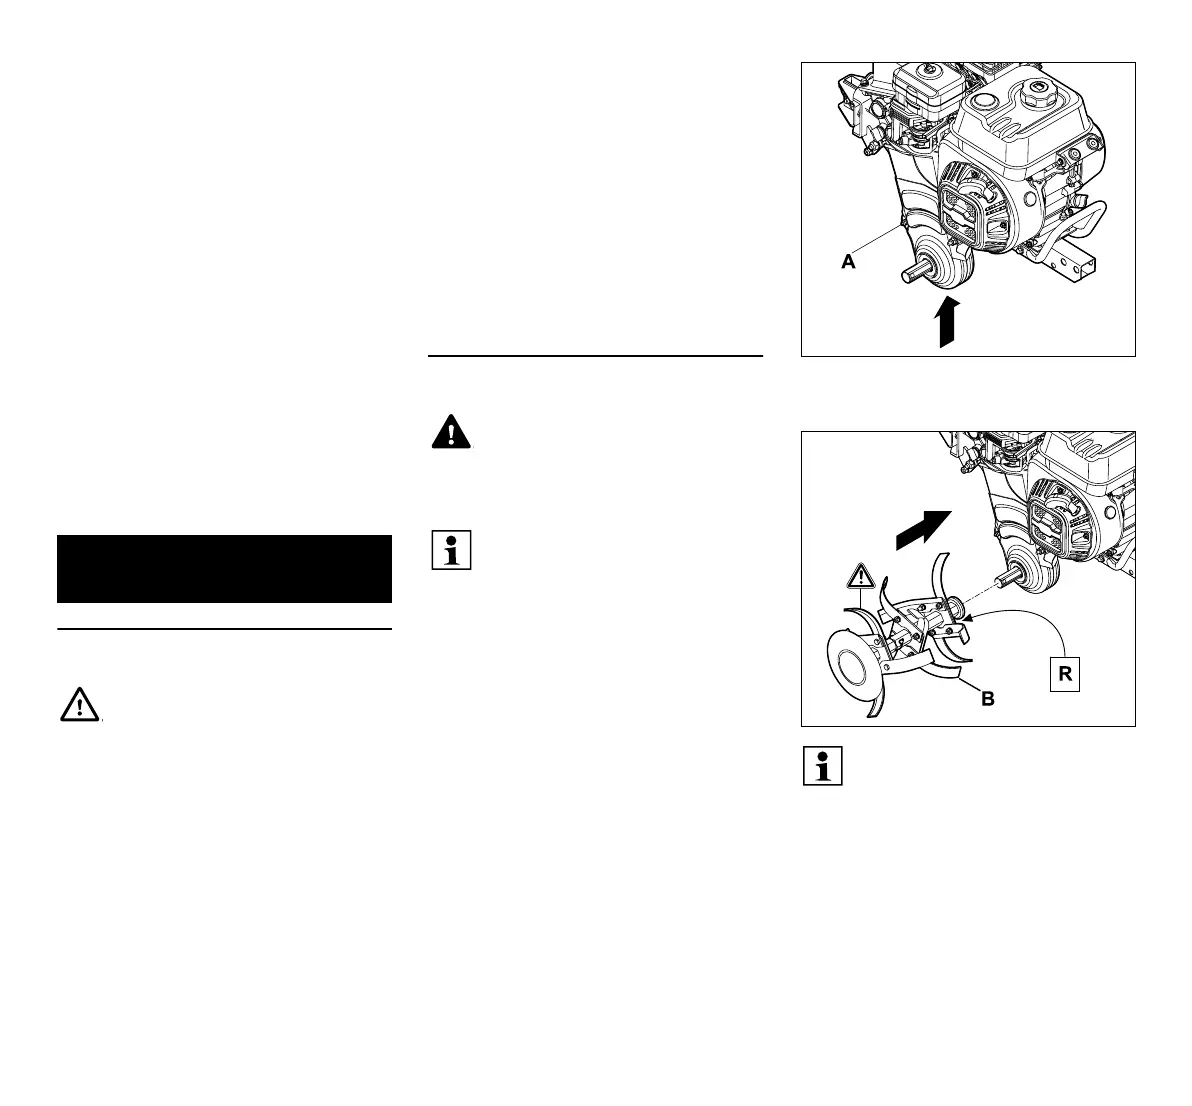
7.2 Installing the right hoe
● Lift basic unit (A) with the help of a
second person.
● Position hoe (B) so that the bores in the
shaft mount and the drive shaft align.
● Push hoe (B) onto the drive shaft.
M Axle mount 2
N Guard plate holder, right 1
O Guard plate holder, left 1
P Guard plate holder 1
Q Cable tie 7
R Folding retainer 4
S Screw clamp 2
T Lock nut 15
U Washer 15
V Bolt, M8 x 90 1
W Bolt, M8 x 65 1
X Bolt, M8 x 20 8
Y Bolt, M8 x 16 1
Z Bolt, M5 x 12 3
x Instruction manual 1
x Engine instruction manual 1
x Installation tool 1
7. Preparing the machine for
operation
Risk of injury!
Observe the safety instructions in
the "For your safety" section. (Ö 4.)
In particular, detach the spark plug
socket and always wear thick
gloves when carrying out any work
on the hoes and wheels.
Observe the specified torque!
Drive cables and throttle cable are
already installed and attached.
Incorrectly installed cables
(e.g. incorrect routing or attaching
to the wrong drive lever) may
cause malfunctions.
Item Designation Qty.
Risk of injury!
Hoes and running wheels must
always be installed in pairs. Never
install a hoe on one side and a
running wheel on the other side.
Strictly observe the installation
instructions. In particular, observe
the installation sequence and install
the hoe and folding retainer
completely as described. When
installing the folding retainer, strictly
observe the correct direction of
insertion and positioning of the
securing clip, as shown. In the case
of incorrect or rotated installation,
the folding retainer may come loose
and be lost.
For good working results, the
cutting edges of the hoes must
point forwards (not towards the
handlebar) – observe arrow
markings.
The hoe is marked with a sticker
(R - right).
 Loading...