4
PART 2 • English
Accessories:
1 x Remote control
2 x AAA Batteries
1 x HDMI cable
2.0 YOUR RECEIVER
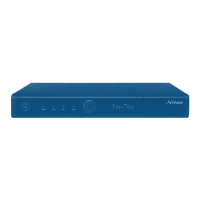
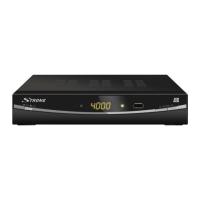
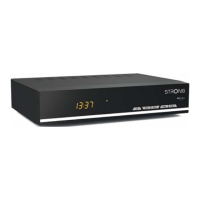
2.1 Front Panel
Fig. 1
1. STANDBY/ON: Set receiver to Standby or ON mode.
2. MENU: Access to the Main menu
3. BACK: Viewing mode: remove appearing messages.
In Menu mode: go to previous screen or menu.
4. OK: Viewing mode: enter the channel list; another pressing on selected channel will
switch back to viewing mode.
In Menu mode: enter selected submenus and confirm settings.
5. INFO: Shows current channel information
6.
tupq: Viewing mode: used to switch channel up/down or de-/increase the volume.
In Menu mode: buttons are used for navigation
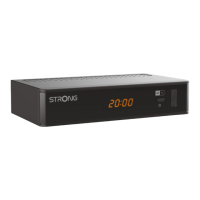
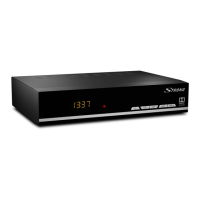
2.2 Rear Panel
Fig. 1
1. SAT IN: To connect satellite antenna cable.
2. HDMI: To connect to HDMI connector of your TV set.
3. ETHERNET: For service use only.
4. TV SCART: For connection of Scart cable to your TV set.
5. AUDIO OUT L/R: Audio output.
6. OPTICAL AUDIO OUT: Digital optical audio output to connect to your amplifier or sound system.
7. RS-232: For service use only.
8. POWER CABLE: To connect to power source in range of 220 - 240 V AC, 50 Hz.
2.3 Remote Control Unit
Fig. 3
1. MUTE: To mute the Audio output
2. STANDBY/ON: Switch to Standby or ON
3. DIGIAKTIF: Used to show technical channel info (in viewing mode)
4. MODE: Direct access to games menu (in viewing mode)
5. MEDIA: Direct access to the media browser (in viewing mode)
6. TV/RADIO: Switch between TV, Radio and All channel list mode (in viewing mode)
7. FAV: Access the FAV list (preconditioned FAV list is defined)
8. LANG: Select available audio languages (in viewing mode)
9. SUBT: Select available subtitle languages (in viewing mode)
10. OPTS: Access to the Main menu
11. GUIDE: Access the Electronic Program Guide
12. INFO: Shows current channel information
13.
pqtu: Viewing mode: used to switch channel up/down or de- /increase the volume.
In Menu mode: buttons are used for navigation
14. OK: Viewing mode: enter the channel list; another pressing on selected channel will switch to
viewing mode again.
In Menu mode: enter selected submenus and confirm settings.
15. P<P: To switch between 2 previously watched channels
16. BACK: Viewing mode: Remove appearing messages.
In Menu mode: to go to previous screen or menu.
17. PR -/+: Used to switch through the channels (in viewing mode)
18. VOL -/+: Used to decrease or increase the volume
19. COLORED BUTTONS: Used for teletext functions.
In Menu mode: RED/GREEN used to scroll lists and YELLOW/BLUE for special described functions.
20. NUMERIC BUTTONS: used to insert numbers.
In Menu mode: used to insert numbers or letters
21. AV: No function
22. TXT: To show the teletext