48
Chapter 3: Maintenance and Component Installation
3.8 Power Supply
The chassis features redundant power supplies. The system will continue to operate if one
module fails, however it should be replaced as soon as convenient. The power supply modules
are hot-swappable, meaning they can be changed without powering down the system. New
units can be ordered directly from Supermicro or authorized distributors.
These power supplies are auto-switching capable. This feature enables them to automatically
sense the input voltage and operate at a 100-127Vac or 200-240Vac, 50-60Hz
Power Supply LEDs
On the rear of the power supply module, an LED displays the status.
• Solid Green: When illuminated, indicates that the power supply is on.
• Blinking Green: When blinking, indicates that the power supply is plugged in and turned
• Blinking Amber: When blinking, indicates that the power supply has a warning condition
and continues to operate.
• Solid Amber: When illuminated, indicates that the power supply is plugged in, and is in
an abnormal state. The system might need service. Please contact Supermicro technical
support.
Changing the Power Supply Module:
1. Determine which of the two modules has failed and unplug its AC power cord.
2. On the back of the module, push the release tab sideways.
3. Pull the module out using the handle.
4. Push a new module into the power bay until it clicks. Replace with the same model.
5. Plug the AC power cord back into the module.
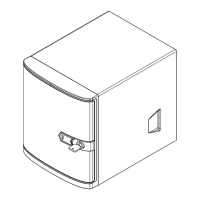
Figure 3-11. Replacing the Power Supply
Release Tab
PWS1
PWS2

 Loading...