SET UP
INSTALLATION
CAUTION: Do not place the Tissue-Tek
®
TEC™ 5
Embedding System where it would be subjected
to direct sunlight and/or direct heat, an open
flame source, excessive humidity or air current,
excessive particulate matter, or electrical noise
(such as from refrigerators, centrifuges, ultra-
sonic cleaners and microwave ovens).
1. Select a level surface near one properly ground-
ed electrical outlet in a well-ventilated area of
minimum humidity.
CAUTION: Make sure the electrical outlet
supplies the proper voltage (within ± 10%).
Refer to the rating label on the Embedding
Module.
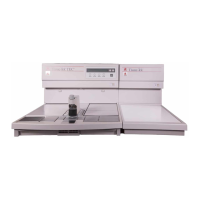
2. Place the Embedding Module next to the Cryo
Module. It is not necessary to leave any space
between the two modules.
NOTE: The working area of each module is of
the same height. This allows you to place the
modules next to each other, in any order, to
accommodate your choice of “right-to-left” or
“left-to-right” work flow.
3. Check to make sure the power switches on the
front panel of the Embedding Module and the
Cryo Module are set to OFF (O).
4. Connect the Cryo Module to the Embedding
Module using the provided cable. The end of
this cable having the right-angle connector is
plugged into the Cryo Module. The end of this
cable having the straight connector is plugged
into the Embedding Module.
5. Connect the Cryo Module and Embedding
Module power cords into properly grounded out-
lets. The power cord with the right angle con-
nector plugs into the Cryo Module.
6. Connect the Foot Pedal (sold seperately, refer to
section 8) to the back of the Embedding Module.
7. Move the modules into place on the designated
work space.
CAUTION: For cooling purposes, allow at
least 76 mm (3 in) of space between the wall
(or other surface) and the back panel of each
module.
Section 3