EasyManua.ls Logo

TouchTunes Ovation Jukebox User Manual

TouchTunes Ovation Jukebox
12 pages
To Next Page IconTo Next Page
Page #1 background imageLoading...
Page #1 background image
1 of 12
About this guide
This guide explains how to install and activate the Ovation Digital
Jukebox. Ovation is different from conventional jukeboxes, both in the
way it operates and in the way it is installed. It is therefore strongly
recommended that you review this guide thoroughly before you begin.
For detailed information on planning your installation, refer to the Ovation
Operator’s Manual on the TouchTunes web site.
Service and support
For service and support issues, call the TouchTunes 24/7 Service Hotline
at 888-711-5853. You must provide the Jukebox ID number to obtain
service. This number can be found underneath the front of Ovation or
inside to the right of the fan.
Components
Ovation ships in several boxes. If any component appears to be damaged,
do not attempt to use or install the system. Notify TouchTunes or your
local distributor immediately.
Verify that you have received the following components:
Dimensions and weight
Important safety information
Read all safety instructions before installing this product.
Keep all instructions for future reference.
Heed all warnings.
Follow all instructions.
Ovation Jukebox
Quick Start Guide
September 2006
900169-001
Ovation
1 Ovation Digital Jukebox with power line installed
1 Ovation wall bracket
1 Parts kit containing:
1 Remote control (part #: 700031-001)
1 Remote control mounting bracket (part #: 400188-001)
2 AAA batteries
2 Keys (ilco #549)
1 Female RCA to DIN Adapter (part #: 300141-012)
1 Male RCA to DIN Adapter (part #: 300143-012)
2 Wall bracket screws
3 Terminal connectors (four-position Euroblock - part #:
1000000-001). Two for connecting external speakers
and one for connecting an optional microphone.
Hard drive (shipped separately)
Height Width Depth Weight
Crated 41” 32” 18” 142 lbs.
Uncrated 37 1/4” 27 1/4” 11 1/4” 125 lbs.
CAUTION: Ovation components are heavy and represent a
serious safety hazard if their mounting system should fail.
Therefore, installation should only be performed by an
experienced installer or licensed contractor that is familiar with
standard rigging, mounting, and hanging practices, as
recognized by a licensed engineer or governmental agency in
your area.
CAUTION: Ovation mounting components are ETL listed and
CSA approved only when used as specified in this guide. Any
other use or modification of the mounting components is
expressly prohibited, as this may present an unacceptable risk
of structural failure.
CAUTION: Do not install Ovation near any heat sources, such
as radiators, heat registers, stoves, or other apparatus
(including amplifiers) that produce heat.
CAUTION: Do not defeat the safety purposes of the grounding-
type plug. A grounding-type plug has two blades and a third
grounding prong. The wider blade or the third grounding
prong are provided for your safety. If the provided plug does
not fit in your outlet, consult an electrician for replacement of
the obsolete outlet.
CAUTION: See product enclosure for safety related markings
and refer to the Ovation Operator’s Manual on the TouchTunes
web site for additional safety information.
CAUTION: Dispose of used batteries in accordance with the
regulations in your area. Do not incinerate.
CAUTION: The lights inside Ovation contain mercury. Disposal
of this material may be regulated in your area due to
environmental considerations. For disposal or recycling
information, please contact your local authorities or the
Electronic Industries Alliance at www.eiae.org.
CAUTION: Unplug this apparatus when unused for long
periods of time.
Question and Answer IconNeed help?

Do you have a question about the TouchTunes Ovation Jukebox and is the answer not in the manual?

TouchTunes Ovation Jukebox Specifications

General IconGeneral
BrandTouchTunes
ModelOvation Jukebox
CategoryJukebox
LanguageEnglish

Summary

About this guide

Service and support

Components

Dimensions and weight

Important safety information

Important concepts

Wiring overview

Diagram and explanation of how the jukebox connects to power and phone lines.

Jukebox registration

Process for activating the jukebox using its registration number for unauthorized use prevention.

Nightly communications

Details the jukebox's nightly call to the server for income, song updates, and new music.

Failure to communicate

Explains the consequences and warnings when the jukebox cannot connect to the server.

Installing the phone line

Recommended parts and tools

Lists necessary items for installing the phone line connection for the jukebox.

Installation tips

Provides advice for running and connecting the phone line to minimize noise issues.

Running a new phone cable

Guidance on installing new phone cable from the demarcation point to the jukebox location.

Ovation components

Mounting Bracket

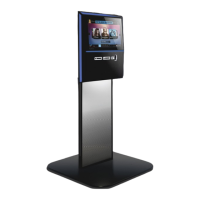
Details the physical bracket for mounting the jukebox and its specifications.

Rear panel

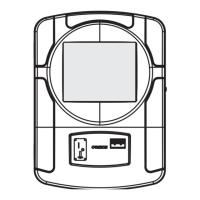
Describes the connections and controls located on the rear of the jukebox unit.

Inside Ovation

Highlights key internal components and features of the jukebox.

Connector Panels

Details the various input/output ports and connectors on the jukebox.

Installation procedure

Attach the wall bracket

Instructions for mounting the wall bracket at the specified height.

Hang the jukebox on the wall bracket

Guidance on securely hanging the jukebox onto the installed wall bracket.

Install the hard drive

Procedure for inserting the hard drive into its designated slot.

Connect the phone line

Steps for connecting the phone line to the jukebox.

Connect external speakers

Instructions for connecting external speakers to the jukebox audio outputs.

Connect the power cord

Details on plugging the jukebox into a power outlet.

Turn on the power

Action to power up the jukebox system.

Starting Ovation

Startup

Initial power-on sequence and display of startup messages.

Calibrate the touchscreen

Procedure for calibrating the touchscreen for accurate input.

Initialize screen

The initial setup screen after subsystems are initialized.

Provide phone and calling information

Configuration of phone settings, calling windows, and location details.

Specify the registration password

Monitor the call to the TouchTunes server

Test and set sound levels

Open the Sound Mixer screen

Accessing the sound mixer interface from the Operator menu.

Run the sound test

Performing audio tests and adjusting volume levels for different sources.

When you are done

Returning to the Operator menu after sound level adjustments.

Activate the Operator Menu

Define pricing

Open the Credit Settings screen

Accessing the credit settings interface to manage pricing and credits.

Set pricing levels

Defining different pricing schemes based on time or day.

When you are done

Saving pricing changes or returning to the Operator menu.

Define music settings

Open the Music Settings screen

Accessing the music settings interface for configuring music playback.

Adjust play queue options

Configuring options like OVERPLAY and RANDOM MODE for song playback.

Configure Attract mode

Setting up the mode that plays songs when the jukebox is idle.

Configure the Vote for download feature

Enabling customer voting for new song downloads.

Enable the remote control

Set the remote control ID

Procedure to set a unique identification code for the remote control.

Open the Systems Settings screen

Navigating to the system settings menu to configure the remote.

Enable the remote control

Activating and learning the remote control for jukebox operation.

Explain operation to location staff

Coin and bill mechanism

Explaining how to use the coin and bill acceptors.

Power

Instructions on using the power and Night Mode buttons.

Volume buttons

Showing the backup volume controls on the rear of the unit.

Customer interface

Explaining song selection, credit settings, and special features.

Songs

Information on song addition, play modes, and nightly calls.

Attract mode/background music

Explaining the operation and schedule for attract mode and background music.

Remote control

Details on the remote's RF capabilities and range.

Related product manuals