Home
Travis Industries
Indoor Fireplace
616 GSR2 Insert
Page 22 (Vent Connector Attachment)
Travis Industries 616 GSR2 Insert - Vent Connector Attachment; Detaching and Preparing Connector
50 pages
Manual
Save Page as PDF
To Next Page
To Next Page
To Previous Page
To Previous Page
Loading...
22
Finalizing the Installation
© Travis Industries
4140808
100-01298
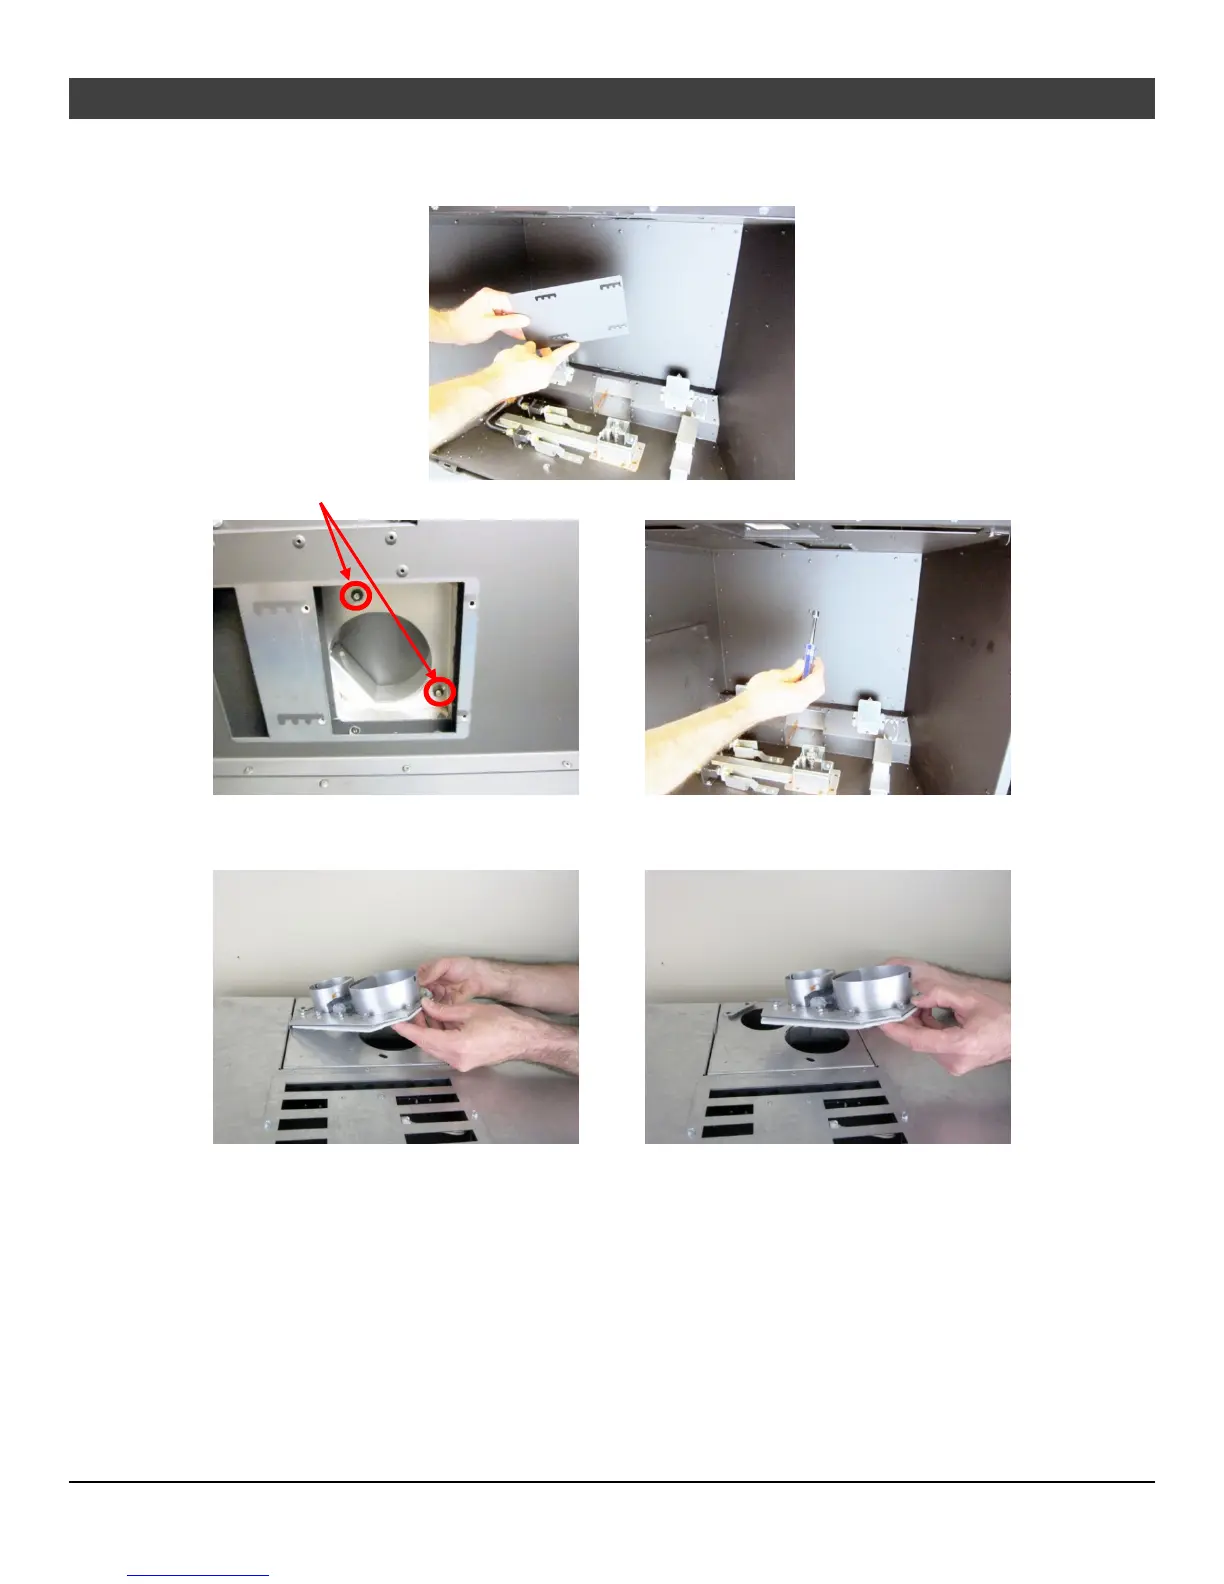
Vent Connector Attachment
1.
Remove the exhaust restri
ctor
to access the vent connector.
2.
Remove these 2 nuts using a 3/8” nutdriver.
3.
Tilt and remove the vent connector.
21
23
Table of Contents
Main Page
Introduction
2
Important Information
2
Listing Details
2
Table of Contents
3
Features
6
Installation Options
6
Heating Specifications
6
Dimensions
6
Electrical Specifications (for Blowers)
6
Fuel
6
Installation Warnings
7
Packing List
7
Additional Items Required
7
Order of Installation
7
Fireplace Requirements
8
Fireplace Clearances to Gas Insert
8
Factory-Built (Metal) Wood-Burning Fireplace Requirements
9
Hearth Requirements
9
Clearances
10
Mantel Clearances
10
Leveling Bolts
11
Electrical Requirements
12
Re-Routing the Power Cord to the Front of the Insert
12
Gas Line Requirements
13
Gas Inlet Pressure
13
Directions for Connecting a Gas Pressure Test Gauge
13
Gas Line Installation
14
Vent Requirements
15
Altitude Considerations
15
Exhaust Restrictor
16
Adjusting the Exhaust Restrictor
17
Diffuser Adjustment
18
Adjusting the Diffuser
18
Vent Installation
19
Vent Location
20
Vent Configurations
20
Vent Attachment - Tight Installations
21
Vent Connector Attachment
22
Glass Frame Removal and Installation
25
Steps for Finalizing the Installation
26
Air Shutter Adjustment
27
Burner Removal
28
Before You Begin
30
Remote Control Warnings
30
Verify the Switch Is on "REMOTE
31
Synchronize the Transmitter to the IFC
31
Clearing the System Memory
31
Remote Set-Up
31
Starting the Heater for the First Time
32
Location of Controls
32
Direct Operation
32
Continuous/Intermittent Pilot Switch
33
Switching from Intermittent (IPI) to Continuous Pilot (CPI)
33
Remote Operation
34
Display Overview
34
Listen for the "Beep
34
Manual On-Off / Smart Thermostat / Standard Thermostat
35
Mode Controls (Flame, Blower, Light, Comfort Control)
36
Flame Height
36
Blower Speed
36
Mode Controls (Continued)
37
Accent Light
37
Comfort Control (Rear Burner)
37
Display Fahrenheit or Celsius
37
Low Battery Indicator
38
Transmitter Batteries
38
IFC Batteries
38
Battery Replacement
38
Battery Installation
38
Transmitter Battery Installation
38
Power Outages
38
Child-Proof Feature
39
Normal Operating Sounds
39
Normal Operating Odors
39
Maintaining Your Heater's Appearance
40
Accent Light Replacement
40
Lower Accent Lights
40
Upper Accent Lights
40
Yearly Service Procedure
42
Troubleshooting Table
43
Wiring Diagram
44
Replacement Parts
44
Safety Label
45
Burner Assembly
46
Gas Control Assembly
46
Firebox Assembly
46
Conditions & Exclusions
46
If Warranty Service Is Needed
46
LP Conversion Instructions
47
Related product manuals
Travis Industries 6015 HO GSR2
54 pages
Travis Industries 564 DF GSR2
28 pages
430 Ember-Glo GSR2
74 pages
Travis Industries 864 TRV
32 pages
Travis Industries DVL GSR
52 pages
Travis Industries 864 HO GS
32 pages
Travis Industries 864 HO NB
60 pages
Travis Industries 864 TRV GS2
72 pages
Travis Industries ProBuilder 42
62 pages
GREEN SMART 864
72 pages
Avalon 796 top flue
68 pages
Large Flush Wood Insert
42 pages