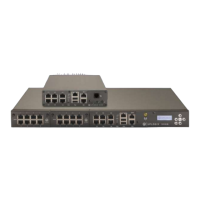
Installation Guide for Uplogix Local Managers 19
Installing or replacing an expansion card
Use the following procedure to install or replace an expansion card.
Caution: Always power off the Local Manager before installing or removing expansion
cards.
If you purchase an additional expansion card for the Uplogix 5000 Local Manager, install it as
follows:
1. Power off the Local Manager.
2. Using a #2 Philips screwdriver, loosen the module screws securing the blank faceplate
or the option card to be replaced and remove it.
3. Slide the new or replacement option card into place. Ensure the two module retention
screws are threaded into the faceplate of the card. The screws will align to holes in the
chassis if the screws are slightly backed out of the front panel.
Note: Installing the option card with the screws fully engaged makes it difficult to
install the card properly.
4. Look inside the chassis and find two tabs close to the front of the option slot and two
located further back. Place the rear edge of the card on the two front tabs, tilt the card
up and slide it back so the card edges slide below the two rear tabs. Gently push the
card back until the card seats in the connector on the backplane.
Caution: If it is difficult to slide the card or if the card resists being
properly seated, the card is probably not installed correctly. Remove the
card and start over. Very little force is required to install the cards.
5. Tighten the module retention screws to ensure that the internal connector seats
properly.
Caution: Over tightening the screws may strip the threads and is not
required; finger tight is sufficient. As you install the retention screws, you
may encounter some resistance. If needed, use a #2 Philips screwdriver
to overcome this resistance but use care not to cross thread or strip the
screw.
6. If you are installing a 16 port serial card, attach the supplied octopus cable to the
connector on the front of the card.