Do you have a question about the VEVOR LB175A and is the answer not in the manual?
Provides email address and operating hours for customer assistance and inquiries.
Lists the ice machine models (LB175A, LB210A, LB300A) covered in this installation and maintenance manual.
Emphasizes the importance of adhering to safety tips to prevent personal injury and equipment damage.
Explains the meaning of 'Warning', 'Note', and 'Important' indicators used for safety information.
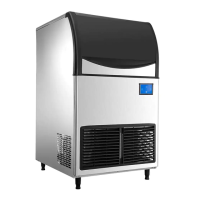
Highlights patented controls, ease of operation, accurate performance, and quality components.
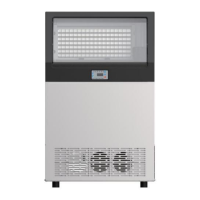
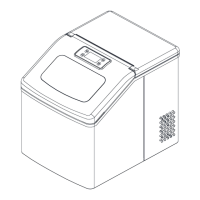
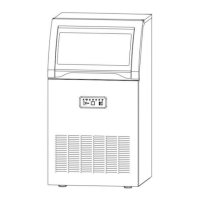
Illustrates the ice machine's shape and identifies its external parts with numbered labels.
Presents a table of dimensions for LB175A, LB210A, and LB300A models.
Details checking condition, opening package, checking accessories, and removing protective film.
Recommends avoiding heat sources, direct sunlight, and specifies ambient/water temperature ranges.
Advises placing the ice maker near a drinkable water supply within one meter.
Explains how to use adjustable feet to level the machine using a horizontal ruler.
Warns against using cushioning objects and stresses stable contact for vibration prevention.
Stresses not blocking ventilation and avoiding sub-zero temperatures to prevent line failures.
Guides on connecting to potable water, avoiding hot water, pressure range, and faucet installation.
Covers wrapping drain hoses for insulation, separating hoses, and required drop per meter.
Instructions for ensuring purged water flows into the drain and checking drain capacity.
States power supply voltage, frequency, and capacity must match the nameplate.
Allows ±10% voltage fluctuation and requires separate circuit breakers.
Emphasizes reliable grounding and compliance with national/regional wiring regulations.
Instructs to clean shell, liner, and ice scoop with a wet cloth or sponge.
Warns against using banana water, oxalic acid, or corrosive detergents.
Lists checks for leveling, transportation seals, water/electricity connection, and voltage.
Verifies ambient temperature (10-38°C) and water inlet temperature (5-32°C).
Confirms the ice maker and refrigerator are cleaned before operation.
Explanation of the touch screen interface and its various control buttons.
Step-by-step guide for powering the ice maker on and off.
Describes the automatic preparation sequence before ice production begins.
How to modify the ice-making time to control ice thickness.
Procedure to manually trigger a deicing cycle.
Steps to initiate a manual cleaning process via the control panel.
How to program the ice maker to start at a specific future time.
Guide to entering and using the setup menu for parameter adjustments.
Explanation of the ice melting phase and the subsequent deicing process.
Details the operational sequence during ice production, including component control.
How the machine identifies when the ice bin is full and stops production.
Essential checks for water supply, inlet valve, and general system readiness.
Guidance on situations requiring operational inspections, like initial setup or after long periods.
Strict cautions against improper cleaning methods and materials to prevent damage.
Advice on keeping the environment clean and performing shell cleaning with mild agents.
Importance of cleaning air filters to maintain condenser efficiency and prevent clogging.
Instructions for removing the top cover and back panel for internal access.
How to clean the evaporator using scale remover or vinegar with brushes.
Method for cleaning plastic components around the evaporator with nylon brushes.
Guidance on cleaning the sink using soft materials and scale remover.
Steps for accessing and cleaning the flume, including pump box and ice storage barrel.
Warning to disconnect power and handle sharp edges carefully during cleaning.
Steps for cleaning ventilation filters and condenser fins using brushes.
Reminder to correctly reinstall the top cover and back plate after maintenance.
User responsibility for operation, checking water source, and environment.
Key points: do not mix solutions, avoid sharp objects, recommended frequency.
Requirement for protective equipment and performing tasks during power failure.
Steps to start the cleaning cycle, including forced deicing and ice removal.
Details the automatic rinsing, draining, and completion stages of the cleaning process.
Instructions for unplugging the machine and removing specific components like the pump.
Steps for mixing warm water with the specified cleaning agent.
Guidance on soaking parts and cleaning surfaces with brushes or cloths.
Methods for cleaning plastic parts, evaporator, and sink with brushes and water.
Mixing warm water with the specified disinfectant for the disinfection phase.
Spraying or wiping disinfectant onto all parts that contact ice.
Steps for rinsing after disinfection and flushing the evaporator.
Instructions for reassembly, starting ice making, and discarding initial ice.
Procedure for detaching and removing water inlet and outlet pipes.
Note on correct alignment for pipe hole and mandrel hole during reassembly.
Instructions for disassembling and reassembling the baffle using a screwdriver.
Steps to prepare the ice maker for storage or freezing temperatures to prevent damage.
Checks for water supply, power, temperature, and ice bin status to diagnose issues.
Information on how to contact service providers for assistance.
A visual representation of the ice maker's electrical system and component interconnections.
An illustration showing all parts of the ice maker disassembled and numbered.
A list correlating part serial numbers with their names for different models.
Diagram of the refrigeration components including ice, solenoid valve, compressor, and condenser.
A table listing refrigeration components and their quantities for each model.
Illustration of the water flow and circulation path within the ice maker.
A table detailing water circulation system parts and their quantities per model.
Diagram showing the electrical control system components and their wiring.
A table listing electric control system parts and their quantities for each model.
| Model | LB175A |
|---|---|
| Material | Stainless Steel |
| Warranty | 1 year |
| Ice Storage Capacity | 33 lbs |
| Power Supply/Voltage | 110V/60Hz |
| Water Supply | Manual |
| Ice Production Capacity | 175 lbs/24h (80 kg/24h) |