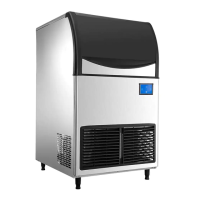
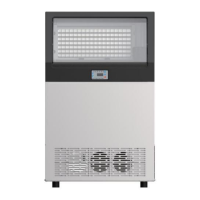
This document provides installation, maintenance, and operation instructions for VEVOR Ice-Making Machines, specifically models LB360TA, LB400TA, LB440TA, and LB550TA.
Function Description
The VEVOR Ice-Making Machine is designed to produce ice blocks. It operates through a cycle that includes water filling, ice formation, and ice dropping. The machine features an automatic stop function when the ice cabinet is full and can restart automatically once ice is removed. It also includes an auto-clean function to simplify maintenance.
Important Technical Specifications
Models: LB360TA, LB400TA, LB440TA, LB550TA
Power:
- LB360TA: 700W
- LB400TA: 800W
- LB440TA: 1000W
- LB550TA: 1000W
Max Ice Production Capacity:
- LB360TA: ≥360 (units not specified, likely kg/24h)
- LB400TA: ≥400 (units not specified, likely kg/24h)
- LB440TA: ≥440 (units not specified, likely kg/24h)
- LB550TA: ≥500 (units not specified, likely kg/24h)
Number of Ice Cells:
- LB360TA: 12*13=156 PCS
- LB400TA: 12*13=156 PCS
- LB440TA: 13*14=182 PCS
- LB550TA: 13*14=182 PCS
Input: AC115V 60Hz
Ice Size: 22*22*22mm
Ice Storage Capacity:
- Theoretical: 150Kg
- Automatic ice filling: 100Kg
Operator Schema: Touch Screen
Screen Size: 3.5-inch resistive display
Climate Type: SN, N, ST
Operating Environment:
- Environment Temperature (SN, N): 10℃~38℃
- Environment Humidity: Relative humidity ≤90%
Water Source Requirements:
- Suitable for sanitary standards (drinking water).
- Inlet water temperature: 0.6~32℃
- Pressure: 0.138~0.552MPa
Refrigerant: R290/R600a (flammable, environmentally friendly)
Dimensions (mm):
| Model |
A |
B |
C |
D |
E |
F |
G |
| LB360TA |
560 |
585 |
910 |
100 |
1570 |
615 |
837 |
| LB400TA |
560 |
585 |
910 |
100 |
1570 |
615 |
837 |
| LB440TA |
560 |
585 |
910 |
100 |
1570 |
615 |
837 |
| LB550TA |
560 |
585 |
910 |
100 |
1570 |
615 |
837 |
Usage Features
Installation:
- The machine should be placed in an appropriate location, ensuring a distance of over 20 cm between air outlets and the wall for good ventilation.
- It must be kept dry and clean and away from heat sources.
- A grounded 3-prong outlet is required; adapters or extension cords should not be used. A separate circuit is recommended.
- Water supply and discharge pipes must be connected correctly. The water discharge pipe's lowest point must be above the highest point of the sewer to prevent backflow.
- The main body must be level, adjustable via two legs.
- For models LB360T, LB440T, LB400TA, LB550TA, the decorative panel must be removed to turn on the power.
Operation Process:
- Start-up: Turn on the water faucet, power, and water supply valve. Fill the sink with water, then turn off the faucet.
- Ice-make Process: The water pump starts, water flows over the ice model, and ice forms. Ice drops when the thickness sensor detects the regulated thickness.
- Ice-drop Process: The water pump stops, the water supply valve opens, and water enters the sink. The heating valve turns on, leading refrigerant gas into the ice model to melt the ice root. After about 2 minutes, ice blocks drop into the cabinet, hitting the retaining board (inductive switch) to complete one cycle.
- Auto-stop: When the ice cabinet is full, falling ice blocks will lock the retaining board and evaporator, preventing the board from returning to its original position. The machine stops automatically. Once ice is removed, the retaining board returns, and the machine restarts.
- Running Check:
- If water supply is interrupted, the machine enters standby. It will resume normal operation once water supply is restored and restarted.
- The condenser fan motor operates intermittently based on condenser surface temperature to save power.
- At lower ambient temperatures, the ice-drop process may be delayed. If this occurs three times consecutively, the machine stops, and indicator lights flicker. Restarting the machine will normalize operation. It is advised not to use the machine in low ambient temperatures.
LCD Full Page Display:
The display shows various indicators for operation status, including:
- Comp. (Compressor)
- Hot (Heating)
- Pump (Water Pump)
- Water (Water supply)
- Fan (Condenser Fan)
- Drain (Drainage)
- Pressure (Refrigerant Pressure)
- Ice flip (Ice dropping status)
- Ice TH (Ice Thickness)
- Harvest overtime
- Freeze overtime
- Condenser sensor
- Evaporator sensor
- Ice High TH
- High pressure
- Water pressure
- Water temp.
- Water shortage
Buttons on Display Board:
- Boot / Shutdown: Press for 3 seconds to turn off (when on) or turn on (when off).
- Mode Button: Switches the ice-making program.
- Clean / Set Button: Initiates cleaning (when off).
- +/Reservation Button: Adjusts ice thickness, used during pressure equilibrium, ice making, ice unload, and ice full status. Increases values by 1 with a click, or continuously with a long press. Also sets reservation time when off.
- -/Light Button: Decreases values by 1 with a click, or continuously with a long press.
Fault Codes:
- E-01: Ice full button fault (skate board not in position or damaged).
- E-02: Ice making overtime (ice thickness not detected 5 times continuously).
- E-03: Unload ice overtime (ice full button action not detected within 6 minutes, or unload ice 3 times continuously).
- E-04: High temperature fault (condensation temperature higher than setting).
- E-05: Lack of water.
- E-06: High pressure.
- E-07: Condensation sensor fault.
- Instruction: In "lack-water protection" condition, the machine restarts automatically when the sink is filled. For other faults, press the start button or cycle power after 45 minutes.
Maintenance Features
Safety Precautions:
- Read the manual carefully before use.
- Ensure proper grounding.
- Never clean with flammable fluids.
- Disconnect power before cleaning or maintenance.
- Do not connect/disconnect the plug with wet hands.
- Do not attempt repairs unless specifically instructed; refer to a qualified technician.
- Keep out of reach of children.
- If disposing of an old machine, remove the door and shelves to prevent child entrapment.
- Operate only by professionals or trained personnel.
- Ensure power consistency with the nameplate (±10% rated voltage).
- Damaged supply cords must be replaced by the manufacturer or qualified persons.
- Do not wet electrical parts.
- This appliance can be used by children aged 8+ and persons with reduced capabilities if supervised and instructed.
Flammable Refrigerant (R290/R600a):
- Ensure the refrigerant circuit tubing is not damaged during transport and installation.
- Avoid damaging tubing or increasing leak risk when handling.
- Avoid sharp objects near appliances.
- In case of damage or leak, disconnect power, avoid open flames, ventilate the room, and notify Customer Service.
- The refrigerant quantity is listed on the Rating Plate.
- A fire warning symbol (yellow or orange) is located on the rear panel or compressor. Keep away from fire sources during use, service, and disposal.
Daily Cleaning and Maintenance:
- Clearance of Side Panels and Inner Container:
- Before cleaning, remove ice blocks, cut off power and water supply.
- Clean with clean water (neutral detergent optional) and wipe with a soft towel.
- Do not spray water directly onto the machine. Avoid alkaline detergents, perfumed soap, lapping powder, boiling water, bananas oil, tolperison, and most organic solvents.
- Dust Removal of the Condenser:
- Clean condenser fins every three months.
- Open the ventilation fence, use a dust collector or brush to clean dust.
- Do not use sharp iron tools or damage radiating fins.
- Cleaning the Spray Water Pipe:
- Clean once every half year.
- Open the front cover, remove the spray pipe, scour off scum until all holes are unblocked, then reinstall.
- Automatic Cleaning of the Ice Maker:
- While making ice, press the "clean" key on the electrical box (rear panel).
- The refrigeration system stops, and the machine enters a 3-step auto-wash process (wash, potch, drain) for about 30 minutes.
- A little neutral detergent can be added for better cleaning.
- After washing, the machine automatically returns to ice-make condition.
- Cleaning Split Type Commercial Ice Maker and Auto-Clean Series Ice Maker:
- Press the "AN(MODE)" button on the PC board to stop the current process and move to the next.
- Working process: power supply → filling → balance → pre-cooling → refrigerating → collecting ice → ice is full.
- Switch on Power Source and Clean: The machine usually stays connected to power. Upon first connection, a 5-minute cleaning process occurs (water supply, water pump works, drain-valve opens, pressure balances). This happens once every 30 ice-make cycles. A draining process also occurs after every four ice-make cycles.
- Float Ball Check: After washing, ensure the float ball is at the bottom for normal operation. If it's at the upper position and the machine stops, it indicates problems with the water level sensor, water pump, or drain valve.
- Water-Filter Core: This is a consumable item not covered by warranty. Contact the marketing department for replacement.
- Long-Term Storage: If not used for a long time, turn off the power switch, unplug the machine, cut off power and water supply. Remove ice blocks, wipe water from the inner cabinet, open the door, and dry the cabinet.