0478 403 9800 H - EN
30
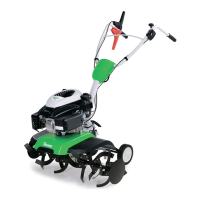
● Position handlebar (B) centrally:
The collar of washer (Q) must be
located in the central depression of
slot (3).
● 4 Press tension lever (N) downwards
with the hand and clamp the handlebar.
If the force required for clamping is too
large or if adequate clamping cannot be
achieved, screw the tension lever
further out or in.
● Check clamping:
Following clamping, the handlebar must
be securely attached to the basic unit.
For this purpose, washer (Q) is flush
with the surface and the collar of the
washer is in the slot.
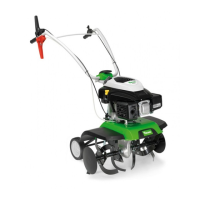
7.5 Folding up the handlebar
● Fold up the upper handlebar (1)
in the direction of the arrow until
it fully engages.
● Adjust the height of the handlebar.
(Ö 11.2)
7.6 Installing the self-propulsion
levers
● Observe the installation
instructions. (Ö 7.1)
● Insert the black self-propulsion lever (K)
with the integrated screw (1) from
above into the bore on the upper
handlebar.
● HB 445:
Screw on lock nut (S) and tighten to
7-9Nm. Fit cover(V).
● HB 445 R, HB 560, HB 585, HB 685:
Position the red self-propulsion
lever (L) so that the screw of the black
lever can be screwed into the nut
integrated in the red lever.
Press the red self-propulsion lever (L)
upwards against the handlebar. Screw
in screw (1) and tighten to 7 - 9 Nm.
7.7 Routing the drive cables
● Observe the installation
instructions. (Ö 7.1)
● Unwind the drive cable (forwards) (1)
and route upwards as follows:
A Route the cable between the engine
and handlebar (2).
B Guide the cable upwards behind
handlebar (2).
C Guide the cable along upper
handlebar (3).
D Route the cable under crossbar (4)
of the upper handlebar.
● HB 445 R, HB 560, HB 585, HB 685:
Route the drive cable (reverse) (5) on
the right side of the engine below relay
lever (6). Guide the cable upwards
along the handlebar as with the drive
cable (forwards).
7.8 Attaching the drive cables
● Observe the installation
instructions. (Ö 7.1)
Drive cable (forwards):
● Insert toggle (1) of the drive cable with
black cap (2) into black self-propulsion
lever (K).
● Guide toggle (1) through opening (3) of
lever (4). Use suitable pliers if
necessary.
● Using suitable pliers, pull toggle (1) and
engage it in lever (4) as shown.
● Press cap (2) onto self-propulsion
lever (4) and allow it to engage.
● Operation checks:
Actuate self-propulsion lever. (Ö 8.2)
The self-propulsion lever must be easy
to operate.
Drive cable (reverse)
HB 445 R, HB 560, HB 585, HB 685:
● Insert toggle of the drive cable with red
cap into the red self-propulsion lever.
● Further installation is identical to that of
the drive cable (forwards).
Avoid damage to the machine!
Only operate tension lever (N) with
the hand – never with the foot.
6
7
8
9
Ташев-Галвинг ООД
www.tashev-galving.com
 Loading...