ENNO
35
SVDASLSKTRHUSRHRBGUKETMKAZ
0478 403 9800 H - EN
Possible combinations
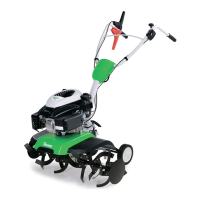
HB 445, HB 445 R:
– 2 hoes:
one single-row hoe per drive shaft
– 4 hoes:
two single-row hoes per drive shaft
Possible combinations
HB 560:
– 2 hoes:
one dual-row hoe per drive shaft
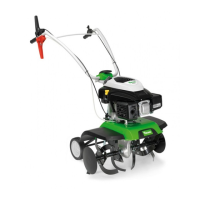
Possible combinations
HB 585, HB 685:
– 2 hoes:
one dual-row hoe per drive shaft
– 4 hoes:
one dual-row hoe and one single-row
hoe per drive shaft
10.4 Ideal body position when
working
The ideal body position helps to
reduce fatigue during working.
For this purpose, the machine settings
(handlebar height adjustment, brake spur
adjustment) should be selected so that a
straight posture (back) can be maintained
during the entire operating period.
Ideal body position:
– straight back
– straight legs
– lower arms bent slightly downwards
11.1 Preparatory measures
● Check engine oil level and refill tank.
(Ö 7.15)
11.2 Height adjustment of the
upper handlebar
The upper handlebar can be
adjusted to three positions.
● Fold out the transport chassis. (Ö 11.4)
● Firmly grasp upper handlebar (1) at
handle (2) with one hand and hold.
● With the other hand, pull release
lever (3) towards the rear and hold.
● Set upper handlebar (1) to the required
position.
● Release the release lever (3) and
ensure that the upper handlebar is fully
engaged and fastened.
● Fold in the transport chassis if
necessary. (Ö 11.4)
11.3 Lateral adjustment of the
handlebar
The handlebar can be adjusted
laterally to three positions.
● Fold out the transport chassis. (Ö 11.4)
● Pull the tension lever (1) upwards with
the hand.
● Move the handlebar (2) into the
required position. Ensure that the
disc (3) is located in one of the three
notched positions.
● Press tension lever (1) downwards with
the hand and clamp the handlebar. If
the force required for clamping is too
large or if adequate clamping cannot be
achieved, screw the tension lever
further out or in. (Ö 7.4)
● Check the handlebar for secure
seating.
● Fold in the transport chassis if
necessary. (Ö 11.4)
11.4 Folding the transport
chassis in and out
With the aid of the transport chassis,
the tiller can be transported by pushing or
pulling.
22
11. Operating the machine
Risk of injury!
Please observe the safety
instructions in the "For your safety"
section (Ö 4.) and familiarise
yourself with the controls of the
tiller. (Ö 8.)
23
24
Avoid damage to the machine!
Only operate tension lever (1) with
the hand – never with the foot.
Danger of pinching hands and
fingers!
When folding the transport chassis
in and out, always only hold using
one hand, as it can fold downwards
under its own weight after the
locking pin has been pulled out.
25
Ташев-Галвинг ООД
www.tashev-galving.com
 Loading...