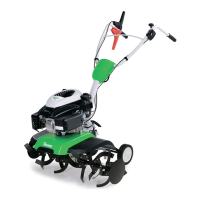
ENNO
31
SVDASLSKTRHUSRHRBGUKETMKAZ
0478 403 9800 H - EN
7.9 Routing and installing the
throttle cable
● Observe the installation
instructions. (Ö 7.1)
● Unwind throttle cable (1) and route as
follows:
A Guide the throttle cable upwards
behind handlebar (2).
B Guide the throttle cable along upper
handlebar (3).
C Route the throttle cable under
crossbar (4) of the upper handlebar.
● Insert screw (T) into bore (5) of the
throttle cable housing. Fit the throttle
cable housing with inserted screw onto
the upper handlebar from the outside
and hold. Screw on lock nut (U) and
tighten to 7 - 9 Nm.
7.10 Fastening the cables to the
handlebar
● Observe the installation
instructions. (Ö 7.1)
● HB 445:
Fasten drive cable (1) to the right side
of the upper handlebar using a cable
tie (Z).
● HB 445R, HB 560, HB 585, HB 685:
Fasten both drive cables (1, 2) to the
right side of the upper handlebar using
a cable tie (Z).
● Fasten throttle cable (3) to the left side
of the upper handlebar using a cable
tie (Z).
● Check for secure seating of the cable
ties. Cut off the excess length of the
cable ties.
7.11 Installing impact protectors
● Check pre-installed screws (1) in
impact protectors (E, F) - do not
fully unscrew.
● Place the tiller in the cleaning position.
(Ö 12.2)
● Insert the three pre-installed screws (1)
of left impact protector (F) into the three
bores (2) in the cover plate.
● Push left impact protector (F) forwards
and hold.
● Screw in screws (1) and tighten to
10 - 12 Nm.
● Check for secure seating of impact
protector (F) and then install right
impact protector (E) in the same way.
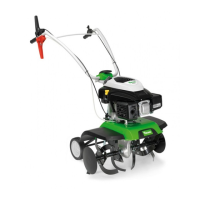
7.12 Mounting the hoes: HB 445,
HB 445 R
● Place the tiller in the cleaning
position. (Ö 12.2)
Definition of hoes:
–Hoe(1):
same sized outer diameter of shaft
mount (2).
–Hoe(3):
different outer diameters of shaft
mount (4).
1
● Push protection ring (P) up to the stop
on drive shaft (5). The recesses in the
protection ring must engage on the
three locating lugs of the gearbox
housing (6).
● Position hoe (1) so that the shorter
shaft mount (2) faces the gearbox
housing and cutting edges (7) point
forwards. Arrows (8) on the hoe and the
arrow on gearbox housing (9) must
point in the same direction.
● Push hoe (1) onto drive shaft (5).
● Turn hoe (1) so that the bores in the
shaft mount and the drive shaft align.
2
● Insert folding retainer (W) through the
bores and close the securing clip.
3
● Position hoe (3) so that the smaller
outer diameter of shaft mount (4) faces
the already mounted hoe (1) and
cutting edges (7) point forwards.
Arrows (8) on the hoe and the arrow on
gearbox housing (9) must point in the
same direction.
● Push hoe (3) into the already mounted
hoe (1).
● Turn hoe (3) so that the bores in both
hoes align.
10
11
Strictly observe the assembly
instructions. In particular, observe
the installation sequence and install
protection rings, hoes and folding
retainers completely as described.
When installing the folding retainer,
strictly observe the correct direction
of insertion and positioning of the
securing clip, as shown. In the case
of incorrect or rotated installation,
the folding retainer may come loose
and be lost.
For good working results, the
cutting edges of the hoes must
point forwards (not towards the
handlebar) – observe arrow
markings.
12
13
Ташев-Галвинг ООД
www.tashev-galving.com
 Loading...