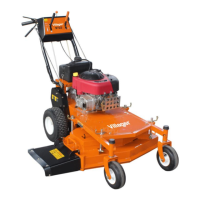
This document describes the Villager Villy 3740 E and Villy 4340 E cordless lawn mowers.
Function Description
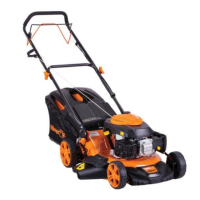
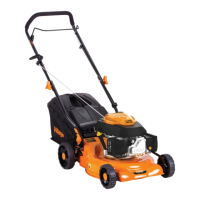
The cordless lawnmower features a cutting tool that rotates parallel to the cutting level. It is equipped with a high-performance electric motor, a robust plastic housing, a collision guard, and a grass collection box. The cutting height is adjustable to six levels, and the mower has smooth-running wheels for easy maneuverability.
Operating Parts (refer to illustrations for visual guidance):
- Upper bar
- Tightening levers for fastening the upper bar
- Lower bar
- Impact protection
- Tightening levers for fastening the lower bar
- Carrying handle
- Lever for cutting height adjustment
- Cover
- Rechargeable batteries
9a. Release button on rechargeable battery
- Ignition key
- Wheels
- Appliance housing
- Grass collection box
13a. Plastic tabs (for grass collection box)
13b. Grass collection box rods
13c. Handle for grass collection box
- Cable holder
- Machine cable
- Release button
- Start handle
- Mulch kit
18a. Bracket on mulch kit
- Charger
- Button for the charge status display
- Battery charge level indicator
- Blade
- Blade bolt
- Motor spindle
Important Technical Specifications
| Model |
Villy 3740 E |
Villy 4340 E |
| Rated voltage |
36 V (2x18 V) |
36 V (2x18 V) |
| Idle speed |
2900 min⁻¹ |
2900 min⁻¹ |
| Cutting circle |
370 mm |
430 mm |
| Cut height |
25/35/45/55/65/75 mm |
25/35/45/55/65/75 mm |
| Protection class |
III |
III |
| Protection type |
IPX1 |
IPX1 |
| Weight (without battery and charger) |
16 kg |
18 kg |
| Grass collection box volume |
35 l |
55 l |
| Sound pressure level LpA |
71.3 dB(A), KpA=3 dB(A) |
76.2 dB(A), KpA=3 dB(A) |
| Sound power level (LWA) measured |
84.1 dB(A), KWA=1.81 dB(A) |
87 dB(A), KWA=2.33 dB(A) |
| Sound power level (LWA) guaranteed |
86 dB(A) |
89 dB(A) |
| Vibration ah (left hand) |
0.59 m/s²; K=1.5 m/s² |
0.56 m/s²; K=1.5 m/s² |
| Vibration ah (right hand) |
|
0.64 m/s²; K=1.5 m/s² |
Noise and vibration values are determined according to the standards and regulations mentioned in the declaration of conformity. The stated vibration emission value is measured in accordance with a standard testing procedure and may be used to compare one power tool to another. It can also be used for a preliminary exposure assessment.
Warning: The vibration emission value may differ during actual use depending on the manner in which the power tool is used. To minimize exposure to vibrations, wear gloves and limit working hours. All parts of the operating cycle, including idle times, should be considered.
Usage Features
Intended Purpose: This device is intended only for cutting lawns and grassed areas in residential applications. It is designed for DIY use and not for heavy commercial use. Any other use not expressly permitted may damage the device or pose a serious hazard. The device is for adult use; children and unfamiliar persons should not use it. Use in rain or damp environments is prohibited.
Safety Information:
- Never allow children or unfamiliar persons to use the device.
- Do not use the device near people, children, or pets.
- The operator is responsible for any accidents or damage to third parties.
- Before use, inspect the terrain and remove stones, sticks, wires, or other foreign objects.
- Wear suitable work clothing, sturdy non-slip shoes, and long, robust trousers. Never use barefoot or with open sandals. Avoid loose clothing.
- Visually inspect the device before each use. Do not use if safety equipment, cutting unit parts, or bolts are missing, worn, or damaged. Replace damaged tools and bolts as a set to prevent imbalance.
- Be careful with devices having multiple cutting tools, as one blade's movement can cause others to rotate.
- Only use manufacturer-supplied and recommended spare parts and accessories.
- Replace worn or damaged information signs.
Working with the Equipment:
- Caution! Do not place feet or hands near or under rotating parts. Risk of injury!
- Switch on the motor as directed, ensuring feet are at a safe distance from cutting tools.
- Do not use in rain, poor weather, damp environments, or on wet lawns.
- Work only in daylight or with sufficient illumination.
- Do not operate if tired, lacking concentration, or under the influence of alcohol or medication. Take regular breaks.
- Always ensure secure positioning, especially on slopes. Move crosswise on slopes, never up or down. Be extra careful when changing direction on slopes. Avoid overly steep slopes.
- Operate at walking speed. Be cautious when turning, pulling, or moving backward.
- Start the device carefully as per instructions, ensuring feet are at a sufficient distance from rotating blades.
- Do not tilt the device when starting, unless necessary for high grass. In such cases, tilt by pushing down the grip handle to slightly raise the front wheels. Ensure both hands are in the working position before placing the device back on the ground.
- Never work without the grass collection box or impact protection. Keep away from the ejector opening.
- Do not start the motor when standing in front of the discharge chute.
- Caution! Danger! The blade continues to run after switching off. Risk of injury.
- Do not lift or transport the device while the motor is running. Turn it off for transport, when traversing non-lawn surfaces, or when moving it to/from the mowing area.
- Keep the grass ejector opening clean and free of debris. Remove cut material only when the device is at a standstill.
- Never leave the device unattended.
- Do not use a damaged, incomplete, or modified device. Do not use if protective equipment or shielding is damaged or missing.
- Do not overload the device. Operate within the specified power range and do not modify motor settings. Do not use low-performance machines for heavy work or for unintended purposes.
- Do not use near flammable liquids or gases. Risk of fire or explosion.
- Switch off, remove the safety key, and remove the battery. Ensure all movable parts are stationary:
- When leaving unattended.
- Before removing obstructions or blockages from the discharge chute.
- Before inspection, cleaning, or any work on the apparatus.
- If a foreign object is hit. Inspect for damage and repair before restarting.
- If the apparatus vibrates excessively, immediate inspection is required.
- Ensure all nuts, bolts, and screws are properly tightened.
- Inspect for damage and carry out necessary repairs.
- Do not bring feet or hands near rotating parts. Never stand in front of the grass ejector opening.
- Always pull the circuit breaker/ignition key when:
- Leaving the apparatus unattended.
- Clearing blockages.
- Inspecting, cleaning, or working on the apparatus.
- After a collision with a foreign object (inspect and repair if necessary).
- If the apparatus vibrates abnormally.
Assembly:
- Only perform work you are capable of. Consult an expert or service center if in doubt.
- Mounting the lower bar: Fold the lower bar (3) upwards. Turn tightening levers (5) clockwise to fasten. Lock levers by pressing them towards the bar. Adjust tightness as needed.
- Mounting the upper bar: Fasten the upper bar (1) with screws (2b), washers (2a), and tightening levers (2) to the lower bar (3). The release button (16) should be on the right in the mowing direction (two positions possible). Turn levers (2) clockwise to fasten. Lock levers by pressing them towards the bar. Adjust tightness as needed. To save space, release levers (2+5) and fold both bars (1, 3) together, ensuring cables are not pinched.
- Mounting the grass collection box: Clip the handle (13c) into the upper side of the box (13). Place plastic tabs (13a) over the rods (13b).
- Mulch kit: Remove the grass collection box if used. Lift impact protection (4). Slide mulch kit (18) into place until the bracket (18a) snaps. To remove, push the bracket (18a) and pull out the mulch kit (18).
Operation:
- Caution! Adjustments must only be made when the motor is switched off and the blade is stationary. Risk of personal injury.
- Switch off the apparatus, remove the ignition key (10), and wait for blades to stop.
- Mounting/removing the grass collection box: To mount, lift impact protection (4) and suspend the box (13) from both receptors. Fold impact protection (4) over the box (13) to secure it. To remove, lift impact protection (4) and remove the box (13). Fold impact protection (4) back over the housing (12).
- Warning! Do not operate without impact protection or grass collection box. Risk of injury.
- Filling level indicator: An indicator (26) on the side of the grass collection box (13) shows if it's open (empty) or closed (full).
- Setting the cutting height: The apparatus has 6 positions (25/35/45/55/65/75 mm). Hold the carrying handle (6) and lift/push the device. Grip the lever (7) and move it to the desired height. For ornamental lawns, 25-45 mm is correct; for utility lawns, 45-65 mm. Choose a high cutting height for the first mow of the season.
- Inserting/removing the rechargeable battery: The mower uses Villager 18V batteries only. Never use non-rechargeable batteries. Batteries can leak if mishandled. Avoid contact with fluid; if contact occurs, rinse with water and seek medical attention if in eyes. Leaking fluid can cause skin irritation or burns. To remove, press the release button (9a) and pull out the battery (9). To insert, push the battery (9) along the guide rail until it clicks.
- Switching on and off: Place on a level surface. Lift cover (8) and insert charged batteries (9) along guides until they click. Insert ignition key (10) into the corresponding opening (it only fits one way). Ensure no objects are touching the blade before starting. To switch on, press and hold the release button (16) while pressing the starting lever (17). Release the release button. To switch off, release the starting lever (17). The motor starts with a delay due to the intelligent energy management system.
- Caution! After switching off, the blade continues to turn for several seconds. Do not touch the moving blade. Risk of injury.
- Checking the charge status of the battery: The indicator (21) shows the charge state of the battery (9). Press the button (20) to display the charge level via LED lights: 3 LEDs (red, orange, green) = charged; 2 LEDs (red, orange) = partially charged; 1 LED (red) = needs charging.
- Working with the device: Observe noise protection rules. Regular mowing stimulates grass growth and suppresses weeds, leading to a denser, more even lawn. First cut in April when grass is 70-80 mm high. Mow at least once a week during the main growing season. Move at walking speed in straight lines, overlapping by a few centimeters for best results. Adjust cutting height to avoid overloading the motor. Mow crosswise on slopes, never up or down. Be careful when moving backward or pulling the device. Clean after each use.
Maintenance Features
Maintenance and Storage:
- Allow the motor to cool before storing indoors.
- During blade maintenance, be aware that blades can still rotate even if power is off.
- Ensure all nuts, bolts, and screws are properly tightened, and the device is in safe working order.
- Do not attempt repairs yourself unless professionally trained. All work not specified in these instructions should be done by authorized service centers.
- Store the device in a dry place, out of reach of children.
- Handle with care. Keep tools sharp and clean for better, safer operation. Follow maintenance instructions.
- Wear safety gloves when replacing cutting equipment.
- Regularly check the grass collection unit for wear, tear, and deformation. Replace worn or damaged parts for safety. When installing blades, ensure fingers are not caught between rotating and stationary parts.
- Only use manufacturer-approved replacement cutting tools.
Electrical Safety:
- The charger plug must fit the socket and not be modified. Do not use adapters with earthed electric tools. Unmodified plugs and matching sockets reduce electric shock risk.
- Avoid body contact with earthed surfaces (pipes, radiators, cookers, refrigerators) to reduce electric shock risk.
- Do not expose electric tools to rain or wet conditions. Water penetration increases electric shock risk.
- Attention! Observe safety information in the rechargeable battery's operating instructions.
General Cleaning and Maintenance Work:
- Warning! Never spray the device with water. Risk of electric shock.
- Keep the device clean. Use a brush or cloth; do not use cleaning agents or solvents.
- After mowing, remove plant remains from wheels, ventilation openings, ejector opening, and blade area using wood or plastic. Do not use hard or sharp objects.
- Before each use, check for obvious defects (loose, worn, or damaged parts). Ensure all nuts, bolts, and screws are firmly in place.
- Check covers and protective devices for damage and correct fit. Replace if necessary.
Replacing Blades:
- If the blade is blunt, it can be re-sharpened by a specialist. If damaged or unbalanced, it must be replaced.
- Turn the machine over.
- Wear firm gloves and hold the blade (22). Use a spanner to turn the blade bolt (23) counter-clockwise from the motor spindle (24).
- Reassemble the new blade (22) in reverse order. Ensure the blade (22) is positioned correctly and the blade bolt (23) is tightened.
Storage:
- Release tightening levers (2+5) and fold the upper (1) and lower (3) bars together to save space. Ensure cables are not pinched.
- Store in a dry place, out of reach of children.
- Allow the motor to cool before storing indoors.
- Remove rechargeable batteries before long-term storage (e.g., winter).
Troubleshooting:
The manual includes a troubleshooting section with common problems, possible causes, and fault-fixing steps. For example:
- Appliance doesn't start:
- Cause: Rechargeable battery (9) discharged. Fix: Check charge status, charge battery.
- Cause: Rechargeable battery (9) not inserted. Fix: Insert battery.
- Cause: Defective release button (16) or start lever (17). Fix: Repair by customer services.
- Cause: Defective motor. Fix: Repair by customer services.
- Cause: Grass too long. Fix: Set a greater cut height, lift front wheels slightly.
- Motor stops:
- Cause: Blockage by foreign object. Fix: Remove foreign object.
- Result unsatisfactory or motor labours:
- Cause: Cut height too low. Fix: Set a higher cut height.
- Cause: Blade (22) blunt. Fix: Sharpen or replace blade.
- Cause: Blade area blocked. Fix: Clean equipment.
- Cause: Blade (22) assembled incorrectly. Fix: Install blade correctly.
- Blade fails to turn:
- Cause: Blade (22) blocked by grass. Fix: Remove grass.
- Cause: Blade screw (23) loose. Fix: Tighten blade screw.
- Strange noises, rattling or vibrations:
- Cause: Blade screw (23) loose. Fix: Tighten blade screw.
- Cause: Blade (22) damaged. Fix: Replace blade.
Disposal/Environmental Protection:
- Remove the battery from the device and dispose of the battery, device, accessories, and packaging material at dedicated locations for recycling in accordance with environmental protection standards. The device is not household waste.
- Do not dispose of batteries with other household waste, or throw them into fire (danger of explosion) or water. Batteries can harm the environment and human health if hazardous liquids or vapors leak.