13 Cleaning and care
13.1 General
Apart from occasional cleaning and battery replacements, the cable detector requires no servicing�
The battery change is described below�
Regularly check the technical safety of the instrument and measuring leads, e�g� check for damage to the
housing or squashing etc�
13.2 Cleaning
Always observe the following safety instructions before cleaning the device:
Live components may be exposed if covers are opened or parts are removed (unless this can be done
without tools)�
The connected lines must be disconnected from the measuring device and all measuring objects prior to
cleaning or repairing the device� Switch the device off�
Do not use any carbon-containing cleaning agents or petrol, alcohol or the like to clean the product� These could
corrode the surface of the meter. Furthermore, the fumes are hazardous to your health and explosive. Moreover, you
should not use sharp-edged tools, screwdrivers or metal brushes or similar for cleaning�
When cleaning the device or the display and the measuring lines, use a clean, lint-free, antistatic, slightly damp cloth�
Allow the product to dry completely before you use it again to conduct measurements�
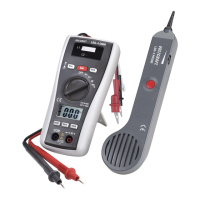
13.3 Inserting and changing the batteries
Operation of the device requires a 9 V battery (e�g� 1604A)� You need to insert a new, charged battery prior to initial
operation or when the battery change symbols appear on the display�
Proceed as follows to insert or change the batteries:
1� Separate the connected measuring lines from the measuring circuit and the measuring device� Switch off the
device�
2� Open the battery compartment on the rear�
3� Replace the at batteries with new one of the same type. Place a new battery into the battery compartment (11 or
17), observing the correct polarity� Observe the correct polarity indicated in the battery compartment�
4� Now, dose the housing carefully�
48