2967530000/00/06.202310
Select an installation site that meets the requirements, see
chapter 2.1. Observe the following additional notes:
– Stable base with a level and even surface (weight and
dimensions, see technical data).
– Electricity connection easily accessible nearby
– Adequate space for ergonomic operation, preferably in
an oce environment
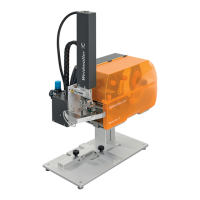
Included in delivery
– Printers
– Mains cable
– USB cable
– Ink ribbon
– DVD with M-Print
®
PRO marking software
– 2 x cardboard roll (ink ribbon unwinding)
– Operating instructions
► Check all components for transport damage.
► Check the delivery for completeness.
Store the original packaging for subsequent
transport.
► Remove the printer from the packaging and set it up on
a level surface.
► Insert the power cable in the mains socket (36, Fig-
ure 3.5).
► Insert the power cable plug in an earthed socket.
Switch on the printer, see chapter 4.2
4.1 Connecting the computer or computer
network
ATTENTION
A lack of or insucient earthing can cause faults
during operation.
► Make sure that all computers connected to the printer
as well as the connecting cables are earthed.
► Connect the printer to a computer or network using a
suitable cable.
4.2 Switch on the printer
► Switch on the printer at the mains switch (33, Figu-
re 3.5).
The printer runs through a system test and then shows the
Ready system status on the display (2, Figure 3.1).
4 Unpacking the device and putting it into operation