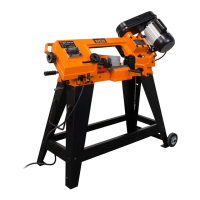
TABLE OF LOOSE PARTS
1. Metal Band Saw
2. Work Stop with Lock Handle
3. Feet (4)
4. Guide Rail with Hex Nut
6
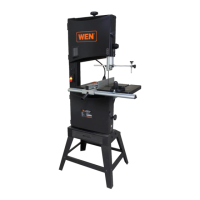
KNOW YOUR BAND SAW
B
ASSEMBLY
Carefully unpack the band saw and all its parts, and compare against the list below. Do not discard the carton or
any packaging until the band saw is completely assembled.
WARNING: If any part is missing or damaged, do not
plug in the band saw until the missing or damaged part is replaced.
2
3
1
4
Blade Tension Adjustment Knob
Run Switch
Vise Handle
Rubber Feet
Work Stop
Miter Locking Handle
Locking Pin
Variable Speed Adjustment Knob
Power Switch
Blade Guide Locking Handle
Circuit Breaker
A
B
C
D
E
F
G
H
I
J
K
A
C
D
E
F
G
H
I
J
K
Refer to the parts and controls in the dia-
gram below. They will be referred to later
in the manual for assembly, adjustment, and
operation instructions.