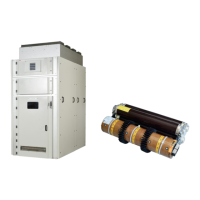
22 36KV I
S
LIMITER PANEL INSTALLATION, OPERATION AND MAINTENANCE MANUAL
It is recommended that the threads or head contact surfaces
of the screws be lightly oiled or greased, to achieve a
precisely defined rated tightening torque.
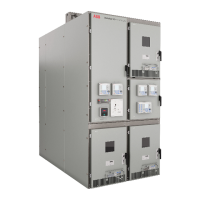
The individual installation stages are as follows:
• Transport the panels to the prepared assembly location
in the order shown on the layout plan
• Remove the LHS & RHS side covers
• Mount the lifting brackets to both side sheet of the panel
as shown in figure 4.3-4.4
• With the help of a crane, lift the panel from the ground at
appropriate height
• Remove the wooden pallet at bottom of the pallet by
unscrewing the nuts & bolts
• Place the panel on foundation frame precisely with the
help of crane
• Once the desired position of panel on foundation frame
is achieved, remove the lifting hook from panel side
sheet
• Weld the panel base to the foundation frame
• Install side covers on both side of the panel
5.4 Fixing I
s
-limiter
TM
inside the
panel
(Figures 3.1a, 3.2, 3.3)
• Open the panel door
• Remove front polycarbonate shield
• Check the position of the rotating lever on the insert
holder & turn the lever in anticlockwise direction to open
the jaws of fixed contact. (both top & bottom)
• Unpack the I
s
-limiter
TM
insert from plastic box
• Check the sticker for R Y B phase identification on the
I
s
-limiter
TM
insert
• Remove & lift the I
s
-limiter
TM
insert & make entry in top &
bottom fixed jaw of the holder assembly
• Push theI
s
-limiter
TM
insert into the holder open jaws at
top & bottom of the holder
• Once the face of the insert touches the back of the
holder, lock the I
s
-limiter
TM
insert at top & bottom of the
jaw contact by turning the knob handle clockwise as
shown in figure 3.3
• Repeat above 6 steps twice, to fix I
s
-limiter
TM
insert of
Y & B phases respectively
CAUTION
Only ever use the correct inserts as specified
for the particular I
s
limiter
TM
insatallation.
Observe the label on the I
s
limiter
TM
switch.
As a general rule, all the I
s
limiter
TM
inserts must
be fitted.
When fitting, ensure that the tripping
contacts(s) 7 (Fig 3.7) of the insert is (are)
precisely positioned on the telescope
contact(s).
5.5 Installation of power cable
and control cable
36kV I
s
-limiter
TM
switchgear can accommodate up to four
numbers of parallel single-core copper cables per phase of
cross section of 400 sq.mm, at incoming as well as outgoing
side, as standard arrangement.
The standard method for terminating power cables in
I
s
limiter
TM
switchgear is shown in Fig.5.1 & 5.2. Power cables
are conveyed below through floor covering gland plate,
which can be adapted to the required cable diameter. Cables
can be securely fastened to the cable holding bracket in the
switchgear by means of using clamps.
Cable termination kits are mounted on cable cores
according to manufacturer's instructions considering
cable termination height, and it also recommended to
maintain uniform lengths of cable ends, including cable
termination kits.
• To facilitate cable connection at incoming side, open
front door of the panel
• Remove the bottom cover at incoming front side of the
panel for entry of cables to incoming side
• Power cables must be inserted, cut to length and
stripped
• Prepare and secure cable sealing ends according to the
manufacturer’s instructions
• Mark the cables with letter stickers “R, Y, B”
appropriately
• Connect the cable to cable connection links for R, Y & B
phases respectively
• Connect the cable sheath to earth
• Connect the cable clamps / glandes to cable at
appropriate locations