Do you have a question about the ABB IRC5P and is the answer not in the manual?
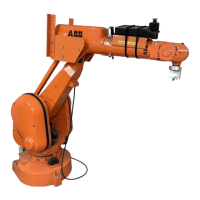
Details the scope of the manual, covering installation, maintenance, and repair of the IRC5P controller.
Outlines when and how this manual should be used for installation, maintenance, and repair tasks.
Specifies the necessary qualifications and knowledge required for the reader of this manual.
Emphasizes the critical importance of observing all safety information before performing any work.
Lists and briefly describes the most relevant hazards associated with robot system operation.
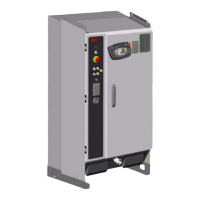
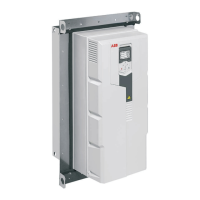
Provides an overview of the control cabinet, pendant, and purge unit designs.
Details the fundamental design aspects of the IRC5P control cabinet and its components.
Describes the switches and indicators found on the control panel for robot operation.
Explains the pendant's role in robot operation, its components, and connection.
Introduces the chapter providing technical specifications for the IRC5P controller, pendant, and purge unit.
Details general specifications, power supply, service connections, inputs/outputs, and dimensions.
Provides technical details for the pendant, including dimensions, weight, and environmental ratings.
Lists the technical specifications for the purge unit used in hazardous environments.
Provides an overview of the installation process for the robot controller and purge unit.
Outlines the main steps for unloading, transporting, installing, and connecting the IRC5P controller and purge unit.
Illustrates the location of connectors and terminal boards for user connections within the controller.
Details the connectors and their functions on the Safety Connection Board (SCB).
Summarizes the various external connections available for the robot controller.
Covers the installation of the control cabinet, purge unit, and system components.
Describes electrical interconnections for different robot types and system configurations.
Details the robot's safety chains, including emergency stop, run chain, and associated standards.
Explains cabin safety chains and interlock functions for personnel and process safety.
Provides information on installing encoders and sync switches for conveyor tracking.
Covers various external connections like Digital I/O, Ethernet, Pendant, and Cooler.
Details procedures for connecting the robot to mains power, transformers, and auxiliary supplies.
Describes final verification steps and checklist completion after installation.
Introduces instructions for scheduled preventive maintenance on the control cabinet.
Provides a chart outlining required maintenance activities, intervals, and references.
Covers general checks, cleaning procedures for the controller and pendant, and cooler maintenance.
Explains how to locate, clean, or replace the drive system cooling unit filter.
Provides guidance on checking the measuring system battery life and replacement timing.
Details procedures for checking and cleaning the cooler's external air circuit components.
Introduces repair activities, safety precautions, and general procedure information.
Details the procedure for removing and refitting the Control Panel Board.
Provides instructions for removing and reinstalling the System LED Board.
Explains how to remove and replace the door fan unit located on the controller's front door.
Guides the replacement of various boards like Axis Computer, PDB, PIB, SIB, MIB, and SCB.
Details the procedure for removing and refitting the Pendant Interface Board assembly.
Explains the procedure for removing and reinstalling I/O units within the controller.
Guides the removal and replacement of the complete computer unit assembly.
Provides instructions for removing and reinstalling the computer unit's mother board.
Explains how to replace PCI boards if they are installed in the computer unit's slots.
Details the procedure for removing and reinstalling a fieldbus adapter.
Describes how to remove and install the compact flash card for the computer unit.
Guides the removal and replacement of the computer fan unit.
Explains how to replace drive units or rectifier units within the Drive System 09.
Details the procedure for replacing components within the Drive System 04 assembly.
Provides instructions for removing and reinstalling the servo fan unit.
Explains how to remove and replace the brake resistor bleeders.
Guides the removal and replacement of the transformer unit.
Details the procedure for removing and reinstalling the choke filter.
Describes how to remove and replace the measuring system battery on the MIB board.
Introduces troubleshooting information, procedures, and descriptions for IRC5P robot systems.
Provides systematic approaches to troubleshooting, including isolation, documentation, and communication checks.
Emphasizes using manual documentation, circuit diagrams, logs, and LED indicators for troubleshooting.
Offers systematic strategies like not replacing units randomly and checking for tools left behind.
Highlights the importance of keeping track of history and checking system status at different stages.
Discusses potential compatibility issues arising from system upgrades or downgrades.
Lists common symptoms of robot system faults, including log messages and operational issues.
Provides detailed troubleshooting steps for various faults like startup failures, controller dead, and pendant issues.
Offers specific troubleshooting guidance for individual units like the pendant, power supply, and I/O units.
Provides an overview and detailed description of the LED indicators on the controller panel.
Discusses component materials for scrapping and environmental considerations.
Provides warnings and instructions to be observed before disassembling robot parts.
Gives guidance on the proper disposal and recycling of oil and grease.
Highlights special care needed when removing balancing systems with preloaded springs.
States that this chapter includes information complementing the main product manual.
Provides information on selecting, laying, and classifying cables based on signal type.
Describes different connection types like screw terminals, spring terminals, and industrial connectors.
Explains grounding, bonding, and screen connection methods to prevent noise and ensure proper operation.
Provides tables for recommended tightening torques for various screw types and connections.
| Controller Type | IRC5P |
|---|---|
| Programming Language | RAPID |
| Communication Interfaces | Ethernet, DeviceNet, PROFIBUS, PROFINET |
| Protection Class | IP54 |
| Memory | 512 MB |
| Maximum Axes | 12 |
| Application | Industrial Robotics |
| Power Supply | 200-600 VAC |
| Number of axes | Up to 12 |
| Safety | SafeMove |
| Operating Temperature | 0°C to +45°C |