EasyManua.ls Logo

ABB VortexMaster FSV430 User Manual

ABB VortexMaster FSV430
64 pages
To Next Page IconTo Next Page
Page #1 background imageLoading...
Page #1 background image
Commissioning and safety instruction CI/FSV/FSS/430/450-EN Rev. G
VortexMaster FSV430, FSV450
SwirlMaster FSS430, FSS450
Vortex and Swirl flowmeter
Measurement made easy

Table of Contents

Other manuals for ABB VortexMaster FSV430

Question and Answer IconNeed help?

Do you have a question about the ABB VortexMaster FSV430 and is the answer not in the manual?

ABB VortexMaster FSV430 Specifications

General IconGeneral
TypeVortex flowmeter
Measurement PrincipleVortex shedding
Housing MaterialAluminum or Stainless Steel
MaterialStainless steel, Hastelloy
ApplicationLiquid, gas, and steam measurement
Nominal Diameter15 mm to 150 mm
Accuracy±0.75% of reading
Output Signal4 to 20 mA
Communication ProtocolsHART
Process ConnectionFlanged, threaded
ApprovalsATEX, IECEx

Summary

1 Safety

1.1 General Information and Instructions

General safety and handling instructions for the product.

1.2 Warnings

Explains hazard signal words (DANGER, WARNING, CAUTION, NOTICE).

1.3 Intended Use

Defines the specific intended applications for the device.

2 Use in Potentially Explosive Atmospheres

2.1 Obligations of the Owner

Owner's responsibilities for devices in potentially explosive atmospheres.

2.1.1 Ex-Marking

Requirements for Ex-marking on the device name plate.

2.1.2 ATEX, IECEX, NEPSI

Installation and personnel requirements for explosive atmospheres.

2.2 Assembly and Operating Instructions

2.2.1 Protection Against Electrostatic Discharges

Instructions to prevent hazards from electrostatic discharge.

2.2.2 Opening and Closing the Housing

Procedures for safely opening and closing the device housing.

2.2.3 Temperature Resistance for Connecting Cables

2.2.4 Cable Entries

Information on cable entry types, usage in zones, and fittings.

2.2.5 Electrical Connections

2.3 Zone 2, 22 Type of Protection "Non-Sparking"

2.3.1 Ex-Marking

Details Ex-marking for Zone 2, 22 protection.

2.3.2 Electrical Data

2.3.3 Temperature Data

2.4 Zone 0, 1, 20, 21 Type of Protection "Intrinsically Safe"

2.4.1 Ex-Marking

Details Ex-marking for intrinsically safe protection in Zones 0, 1, 20, 21.

2.4.2 Electrical and Temperature Data

2.4.3 Limit Value Tables

2.5 Zone 1, 21 - Type of Protection "Flameproof (Enclosure)"

2.5.1 Ex-Marking

Details Ex-marking for flameproof enclosure protection in Zones 1, 21.

2.5.2 Electrical and Temperature Data

2.5.3 Repair

3 Product Identification

3.1 Name Plate

Details the information found on the device's name plate.

4 Transport and Storage

4.1 Inspection

Procedures for inspecting the device upon receipt.

4.2 Transport

Safety instructions and guidelines for transporting the device.

4.3 Storing the Device

Guidelines for proper storage conditions of the device.

5 Installation

5.1 Installation Conditions

General conditions and requirements for installing the device.

5.1.1 General Information

General guidelines for installing the flowmeter.

5.1.2 Inlet and Outlet Sections

Recommended pipe sections for proper installation.

5.1.3 Avoiding Cavitation

5.1.4 Installation at High Measuring Medium Temperatures

5.1.5 Installation for External Pressure and Temperature Measurement

5.1.6 Installation of Final Controlling Equipment

5.1.7 Sensor Insulation

5.1.8 Use of Trace Heating

5.2 Environmental Conditions

5.2.1 FSV430, FSV450

Environmental conditions for FSV430/FSV450, including temperature and humidity.

5.2.2 FSS430, FSS450

5.3 Material Load

5.3.1 FSV430, FSV450

Material load information for FSV430/FSV450.

5.3.2 FSS430, FSS450

5.4 Installing the Sensor

5.4.1 Centering the Wafer Type Design

Procedure for centering wafer type sensor designs.

5.4.2 Adjusting the Transmitter Position

How to rotate and adjust the transmitter housing.

Rotating the LCD Indicator

5.5 Opening and Closing the Housing

5.6 Electrical Connections

5.6.1 Installing the Connecting Cables

Instructions for installing connecting cables with drip loops.

5.6.2 Cable Entries

5.6.3 Grounding

5.6.4 Devices with HART Communication

Current output / HART output

Connection details for HART communication outputs.

5.6.5 Devices with Modbus Communication

Modbus interface

Configuration and connection details for Modbus interface.

5.6.6 Electrical Data for Inputs and Outputs

Power Supply

Electrical specifications for the power supply.

Analog input 4 ... 20 mA

HART communication with remote transmitter

Digital output

5.6.7 Connection to Remote Mount Design

5.6.8 Cutting the Signal Cable to Length and Terminating It

5.6.9 Connecting the Signal Cable

6 Commissioning

6.1 Safety Instructions

Safety precautions before and during commissioning.

6.2 Checks Prior to Commissioning

Essential checks before starting the commissioning process.

6.2.1 Configuration of the Outputs

How to configure current and digital outputs.

DIP switch on the HART-communication board

Analog input 4 ... 20 mA

Configuration of analog input parameters.

HART Input

Configuration of HART input parameters.

DIP switch on the Modbus-communication board

6.3 Switch on the Power Supply

6.3.1 Checks after Switching on the Power Supply

Checks to perform after powering on the device.

6.4 Checking and Configuring the Basic Settings

6.4.1 Parameterization via the "Easy Setup" Menu Function

Selection of the Menu Language

How to select the language for the device menus.

Selection of the Operating Mode

How to select the device's operating mode.

Configuration of the Current Output

Configuration of the Digital Output

Selection of the Units

How to select units for process values.

Configuration of the Analog- / HART-Input

Configuration of the Parameters Dependent on the Operating Mode

Select the End Value for the Current Output

Setting the end value for the current output.

Setting the Damping Value

Adjusting the damping for process values.

Configuration of the Alarm Signaling via the Current Output

Configuration of the Low Flow Cut-off

Zero Point Adjustment of the Flowmeter

Procedure for adjusting the flowmeter's zero point.

6.5 HART Variables

Selection Options for the HART Variables Depending on the Respective Operating Mode

6.6 Operating Mode

Liquid Volume / NL1

Parameters for Liquid Volume operating mode.

Liquid Volume (temperature compensated) / NL2

Parameters for compensated liquid volume mode.

Liquid Mass (no correction) / NL3

Parameters for liquid mass mode without correction.

Liquid Mass (density adjustment) / NL3

Liquid Energy / NL4

Gas Act. Volume / NG1

Parameters for gaseous volume flow.

Gas Std/Norm Vol. / NG2

Gas Mass (Density under reference conditions) / NG3

Gas Mass (actual density) / NG3

Parameters for gas mass using actual density.

Gas Power / NG4

Bio Act. Volume / NG5

Bio Std/Norm Vol. 9) / NG6

Steam Act. Volume / NS1

Steam/Water Mass (internal density determination) 10) / NS2

Steam/Water Mass (external density determination) 11) / NS2

Parameters for steam/water mass with external density.

6.7 Special Operating Modes

6.7.1 Energy Measurement for Liquid Measuring Medium (except Water)

Functionality for measuring energy flow in liquids.

6.7.2 Energy Measurement for Steam / Hot Water in Accordance with IAPWS-IF97

Measuring energy flow for steam/hot water using IAPWS-IF97.

Calculation of the Net Energy for Steam

Steam Mass Calculation

Density Diagrams

Diagrams showing steam density at different temperatures/pressures.

Calculation of the Density

Saturated Steam

Methods for calculating saturated steam density.

Overheated Steam

Methods for calculating overheated steam density.

6.7.3 Natural Gas Calculation in Accordance with AGA8 / SGERG88

6.8 Zero Point Adjustment Under Operating Conditions

Automatic Zero Point Balancing

Procedure for automatic zero point balancing.

Manual Zero Point Balancing

Procedure for manual zero point balancing.

7 Operation

7.1 Safety Instructions

Safety precautions for device operation.

7.2 Parameterization of the Device

Overview of device parameterization methods.

7.2.1 Menu Navigation

How to navigate the device's menu system.

7.2.2 Process Display

Understanding the information shown on the process display.

7.2.3 Switching to the Information Level (Operator Menu)

7.2.4 Switching to the Configuration Level (Parameterization)

7.2.5 Error Messages on the LCD Display

8 Maintenance

8.1 Safety Instructions

Safety precautions for maintenance work.

9 Additional Documents

10 Appendix

10.1 Return Form

Form for stating contamination of devices for return.
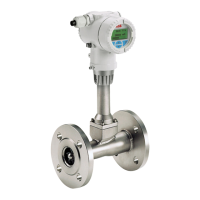
Related product manuals