28
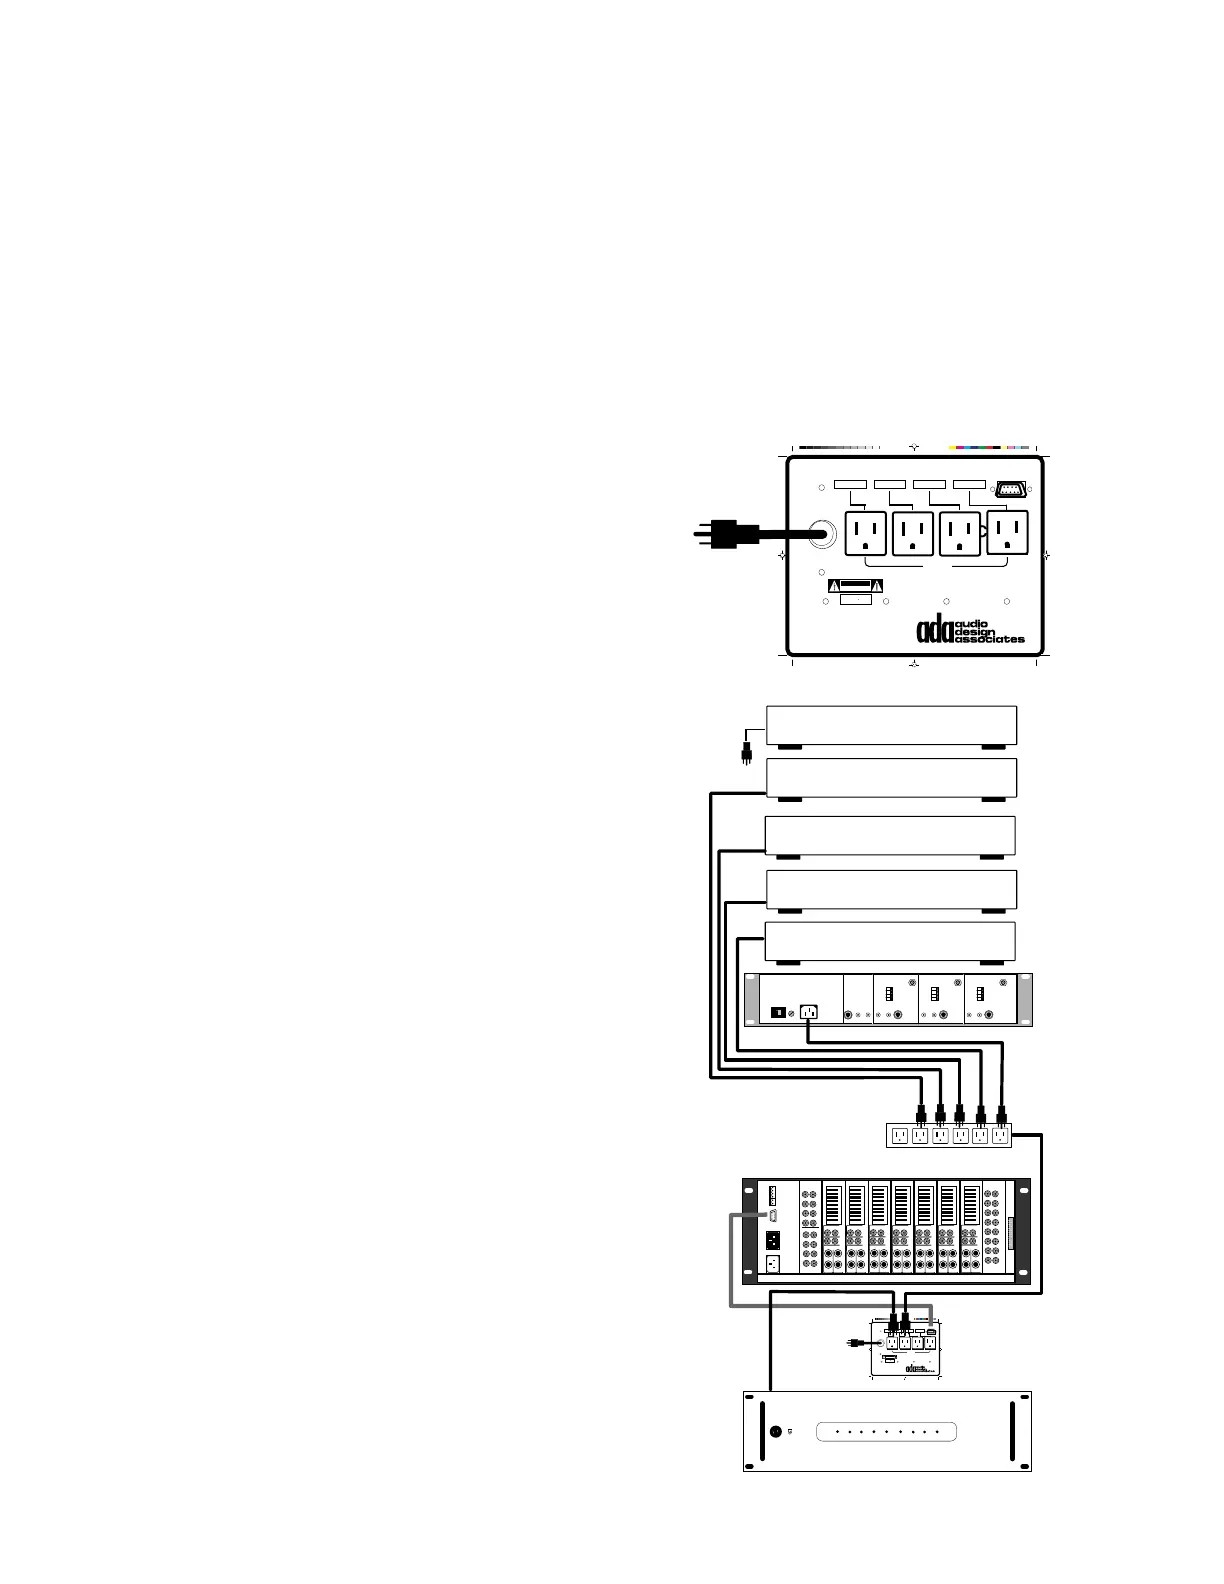
ACC-48 Basic AC Controller
The ACC-48 was specifically designed to operate with the Delta-88 as a basic AC
controller. Its four AC outlets can be set to switch on independently and depending on how
you program the Delta-88, they will engage with a particular room or source. To set the ACC-
48 for your particular system, you must first determine how the ACC-48 is to be used.
Option 1 - Using a Single ACC-48 to Turn On Sources and Up to Three Zone Specific
External Amplifiers - ONLY FOR SYSTEMS WITH A SINGLE DELTA-88
In the most budget oriented system, a single ACC-48 can be
used to turn on all of the sources when any one room is
turned on. This requires the use of a single ACC-48 AC
outlet, leaving three outlets available for turning on exter-
nal amplifiers or home theater systems specific to as many
as three zones. Please note, the ACC-48 is rated at 10 Amps
maximum current draw across all of its four switched AC
outlets. If your amplifiers will draw more than 10 amps of
current, use additional ACC-48s.
Step 1 - Setting the ACC-48's Jumper Pins - Make Certain
the Delta-88 is Off
a. Typically, AC outlet #1 on the ACC-48 is used for
sources although any of the outlets are interchange-
able. In this example outlet #1 will switch the
sources on when any room is turned on. All eight
jumpers associated to the #1 AC outlet should be in
place. These jumpers tell the ACC-48's first outlet
to turn on with each of the eight rooms (1-8).
b. We are also running an external PF-200 Power
Amplifier on zone 2. We have plugged the PF-200
into the ACC-48's #2 outlet. Because we want this
outlet to turn on only with zone #2, the only jumper
pin that should be in place is the #2 jumper pin. If
we had additional power amps for two more zones,
their AC outlets jumper pins would be set to corre-
spond to that zone number.
Step 2 - Connection of the ACC-48 to the Delta-88
Using a 9 pin flat ribbon cable, provided with the
ACC-48, connect one end to the ACC-48 and the
other end to the 9 pin "D" connector on the back of
left side of the Delta-88's rear panel
Step 3 - Plugging in the Sources and External Amplifier
a. The sources should first be plugged into an AC
Source AC Control Connections
ACC-3
12345678
TO 9 PIN "D"
DELTA-88123456781234567812345678
1000 WATTS
MAX TOTAL
Set Shunting Pins To Engage AC With Zone Or Source Numbers 1-8
120-240 VAC
50-60 Hz
QUAD AC CONTROLLER
ACC-48
CAUTION
RISK OF ELECTRIC SHOCK
DO NOT OPEN
ATTENTION!
RISQUE DE CHOC ELECTRIQUE.
NE PAS OUVRIR
MADE IN U.S.A.
1. Delta-88 9 Pin "D" programmed for source AC control. - Set one shunting
pin per AC outlet according to source inputs. Set 3 pins for MT-3000.
2. Delta-88 9 Pin "D" programmed for zone AC control. - Set one shunting
pen per AC outlet according to zone numbers. Set all shunting pins on
one AC Outlet for All-On source AC control when not using an ACC-3000.
3421
ACC-48 w/Holes 1/24/95, 9:09 AM1
115 V
1
2
3
4
1
2
3
4
1
2
3
4
MULTI-TUNER
MT-3000
AUDIO OUT
LR
AUDIO OUT
LR
AUDIO OUT
LR
AUDIO OUT
LR
REMOTE REMOTE REMOTE REMOTE
ANT PRE-AMP
ANT PRE-AMP
ANT PRE-AMP
ANT IN
ANT IN ANT IN
COMBINED
OUTPUT
TUNER 3 TUNER 2 TUNER 1
VOLTAGE SELECT
FUSE
AC POWER
CD CHANGER
LASER
CASSETTE CHANGER
DSS
VCR
VCR
TO
AC
FIX
VAR
SPEAKER
LR
+
-
LINE
RAM-50
1
2
3
4
5
6
7
8
AUDIO
INPUTS
FIX
VAR
SPEAKER
LR
+
-
LINE
RAM-50
FIX
VAR
SPEAKER
LR
+
-
LINE
RAM-50
FIX
VAR
SPEAKER
LR
+
-
LINE
RAM-50
FIX
VAR
SPEAKER
LR
+
-
LINE
RAM-50
FIX
VAR
SPEAKER
LR
+
-
LINE
RAM-50
FIX
VAR
SPEAKER
LR
+
-
LINE
RAM-50
432121
ADA BUS™
MUTE L.V.
ZONE L.V.
OUT
AC INPUT
AC
LOOP OUT
TO DELTA-88
1
2
1
2
3 4
34
5 6
56
7
8
7
8
VSM-8
VIDEO SWITCHER
V
I
D
E
O
I
N
P
U
T
V
I
D
E
O
O
U
T
P
U
T
ON
OFF
POWER
PF-200
F
U
S
E
F
U
S
E
F
U
S
E