37
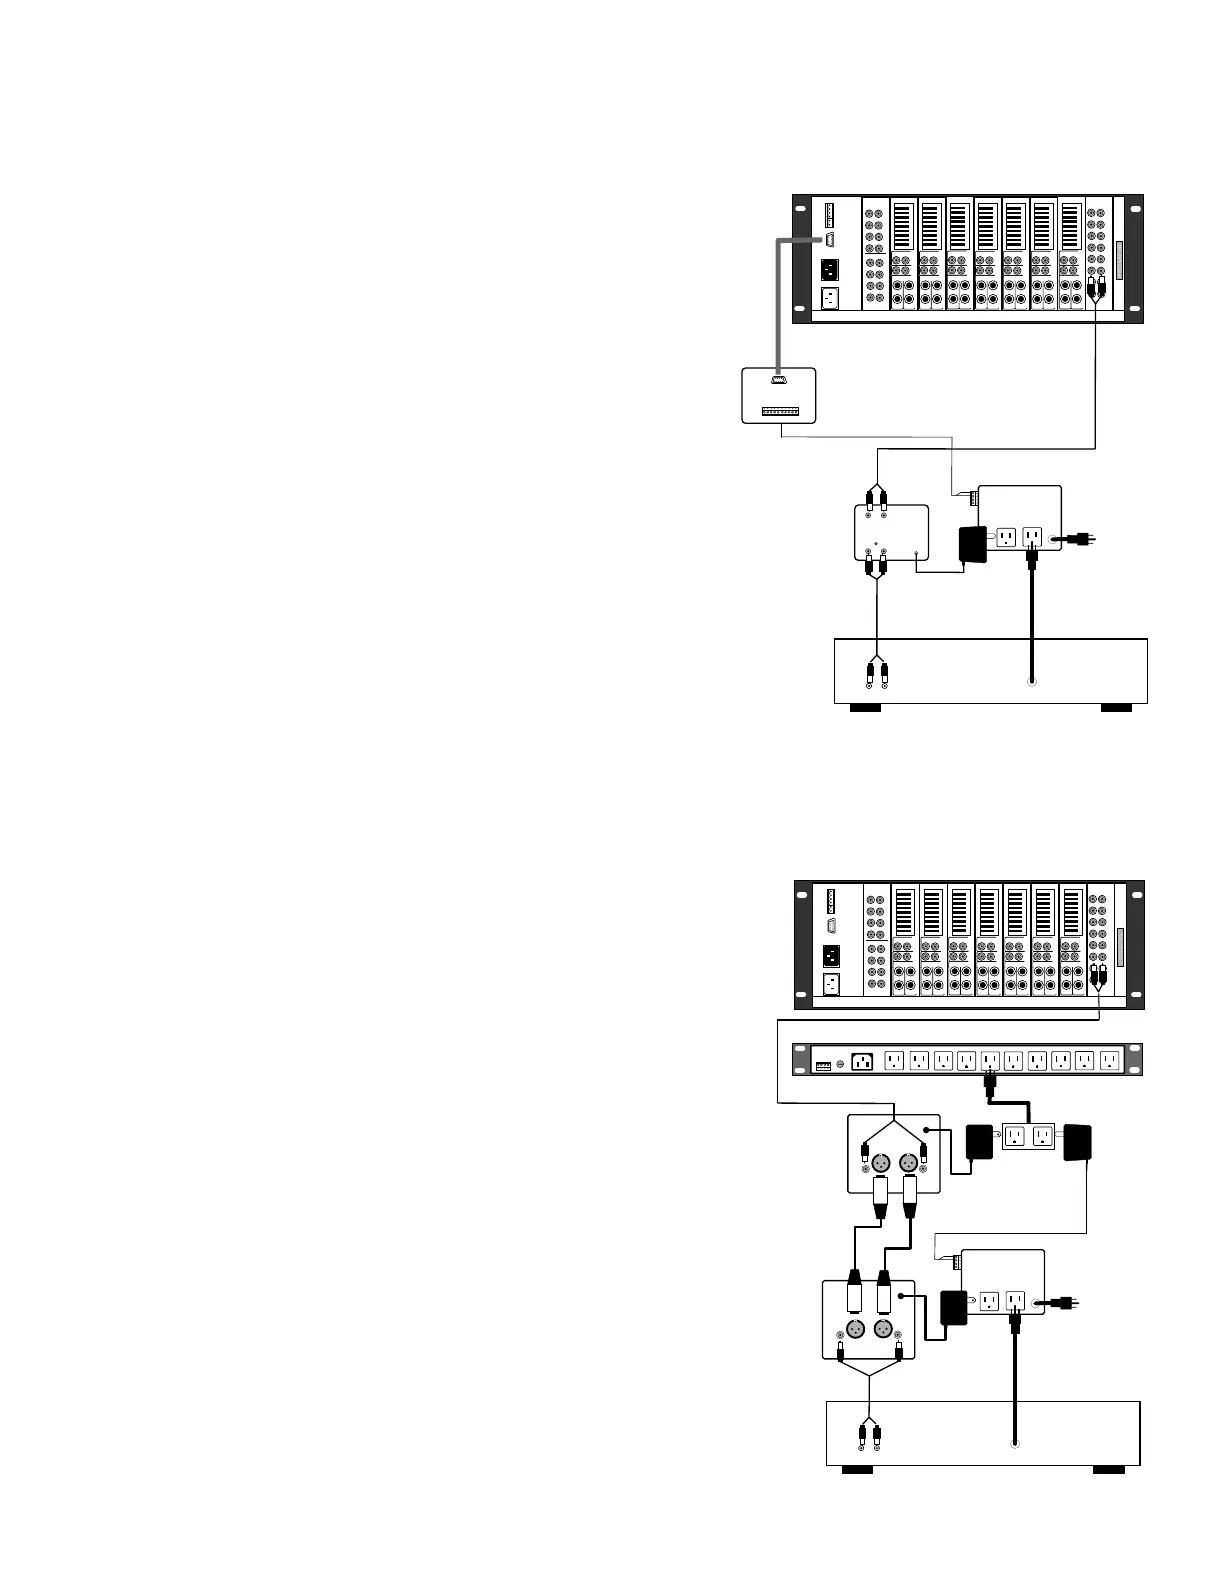
AC Option B - If you are using the Delta-88's 9 pin
"D" connector for source tracking and the 9 pin "D"
connector is wired to a DB-9, the low voltage wire
running to the source's ACC-3 can be directly con-
nected to the DB-9 at the system mainframe.
Line Level Option B - If you have tried Option A and
have picked up a slight hum, using an ISO-2 Line
Level Isolation Amplifier in line with the audio cable
at the source's location, you may reduce or eliminate
the audio hum. The ISO-2 breaks the ground lines of
the source (typically common) and opto-isolates the
source from the lines to the mainframe.
When using the DB-9, the following pin numbers correspond
to theDelta-88's eight sources. Please note, the Delta-88 must
be set for source tracking (see Page 31, Step #4).
Pin 1 - Common Ground (- DC) for All 8 Sources
Pin 2 - Source 4 Positive (+5VDC) When Source 4 Is On
Pin 3 - Source 3 Positive When Source 3 Is On
Pin 4 - Source 2 Positive When Source 2 Is On
Pin 5 - Source 1 Positive When Source 1 Is On
Pin 6 - Source 5 Positive When Source 5 Is On
Pin 7 - Source 6 Positive When Source 6 Is On
Pin 8 - Source 7 Positive When Source 7 Is On
Pin 9 - Source 8 Positive When Source 8 Is On
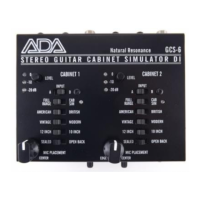
AC Option C - If you are using an ACC-3000 to engage
sources only as needed, a transformer can be plugged
into that source's AC outlet on the ACC-3000. Whenever
that source is selected, the ACC-3000 will turn on the
corresponding source AC outlet. The power transformer
will receive AC and provide low voltage to the source's
ACC-3. You should use an AC power strip on the ACC-
3000 as the power transformer will not fit directly on it.
Line Level Option C - For long line runs, line runs in
electronically noisy homes, or when you want the audio
to be perfect, ADA suggests using the XLRX-1 Unbal-
anced to Balanced Line Convertor at the source location
and the XLRR-1 Balanced to Unbalanced Line Convertor
at the receiving end. The wiring between the two XLR
devices should be a balanced microphone cable for each
channel (2 cables per source). This option is the very best
option in any installation.
ACC-3
1234
-A+ -B+
L
R
L
R
OUTPUT
INPUT
ISO-2
12V AC
TRANS-
FORMER
L
R
OUTPUT
LOCAL CD PLAYER
FIX
VAR
SPEAKER
LR
+
-
LINE
RAM-50
1
2
3
4
5
6
7
8
AUDIO
INPUTS
FIX
VAR
SPEAKER
LR
+
-
LINE
RAM-50
FIX
VAR
SPEAKER
LR
+
-
LINE
RAM-50
FIX
VAR
SPEAKER
LR
+
-
LINE
RAM-50
FIX
VAR
SPEAKER
LR
+
-
LINE
RAM-50
FIX
VAR
SPEAKER
LR
+
-
LINE
RAM-50
FIX
VAR
SPEAKER
LR
+
-
LINE
RAM-50
4321 21
ADA BUS™
MUTE L.V.
ZONE L.V.
OUT
AC INPUT
AC
LOOP OUT
TO DELTA-88
1
2
1
2
3 4
34
5 6
56
7
8
7
8
VSM-8
VIDEO SWITCHER
V
I
D
E
O
I
N
P
U
T
V
I
D
E
O
O
U
T
P
U
T
Low Voltage Out
DB-9
To Delta
DB-9
ISO-2
Source AC Control Connections (cont.)
1234
ACC-3000
FUSE
AC POWER
SWITCHED B
SWITCHED A
8
7
6
5
4
3
2
1
ADA BUS
ACC-3000
FIX
VAR
SPEAKER
LR
+
-
LINE
RAM-50
1
2
3
4
5
6
7
8
AUDIO
INPUTS
FIX
VAR
SPEAKER
LR
+
-
LINE
RAM-50
FIX
VAR
SPEAKER
LR
+
-
LINE
RAM-50
FIX
VAR
SPEAKER
LR
+
-
LINE
RAM-50
FIX
VAR
SPEAKER
LR
+
-
LINE
RAM-50
FIX
VAR
SPEAKER
LR
+
-
LINE
RAM-50
FIX
VAR
SPEAKER
LR
+
-
LINE
RAM-50
4321 21
ADA BUS™
MUTE L.V.
ZONE L.V.
OUT
AC INPUT
AC
LOOP OUT
TO DELTA-88
1
2
1
2
3 4
34
5 6
56
7
8
7
8
VSM-8
VIDEO SWITCHER
V
I
D
E
O
I
N
P
U
T
V
I
D
E
O
O
U
T
P
U
T
ACC-3
1234
-A+ -B+
12V AC
TRANS-
FORMER
L
R
OUTPUT
LOCAL CD PLAYER
LR
XLRX-1
LR
XLRR-1