Physical Installation
20
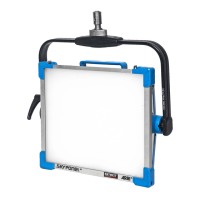
To Mount the Stirrup
• Place the SkyPanel with the lighting aperture facing down-
wards on an even and clean surface.
• Remove two allen screws (4 mm allen key) on each side of
the product.
• Insert both connector elements on both sides of the stirrup
into the holder on each side of the SkyPanel (see Figure 6).
• Mount the stirrup with two allen screws on each side of the
product (4 mm allen key, recommended torque: 5 ft-lb.).
To Mount the Safety Loop Brackets
The stirrup holders can be used to attach the safety loop brack-
ets in conjunction the Center mount yoke (L2.0008078) and
Fixed center mount yoke (L2.0008080). The brackets are in-
tended to be used as an anchor point for a safety cable.
To Dismantle the Stirrup:
• Place the SkyPanel with the lighting aperture facing down-
wards on an even and clean surface.
• Loosen and remove two allen screws on each side of the
product (4 mm allen key, see Figure 6).
• Remove the stirrup.
To Mount the Safety Loop Brackets:
• Place the SkyPanel with the lighting aperture facing down-
wards on an even and clean surface.
• Place one safety loop bracket in the holder on each side of the
SkyPanels (see Figure 7).
• Mount the safety loop brackets with two allen screws on each
side of the product (4 mm allen key, torque: 5 ft-lb.).
Figure 6: To mount the stirrup