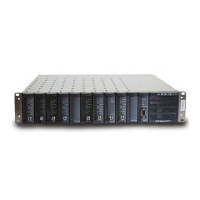
3-14 CHP Max™ Headend Optics Platform Chassis, Controllers and Power Supplies Rev D
Installing the CMM or SMM Module
➤ To install the CMM or SMM
1. Gently insert the CMM or SMM into the slot just to the left of the power supply
module(s). Be careful to align the top of the module’s circuit board with the metal
guides on the top of the chassis.
2. Carefully slide the CMM or SMM into the chassis until it is fully seated in the
backplane. The latch on the front panel locks when the module is fully seated.
Each SMM is shipped with the following default addresses. Refer to the section, To set SMM
addresses on page 5-10 to change any of these addresses.
Fiber Protection Kit Installation
The optional fiber protection kit (P/N CHP-FFTRAY) consists of the fiber management tray
(P/N 862552) and the fiber shield (P/N 862553).
➤ To install the fiber protection kit
1. Position the fiber management tray (P/N 862552) with the “fingers” of the fiber
management tray at the top. Align the two plastic studs on each side of the fiber
management tray with the slots at the bottom of each handle and gently push the
fiber management tray into the slots.
2. The fiber shield (P/N 862553) should be installed after all the application modules
are installed and all the fiber optic cables have been connected and routed through
the fiber management tray. This shield is installed by placing the tab on one side of
the shield into the rectangular hole in the chassis and then positioning the other tab
on the shield into the rectangular hole. Refer to Figure 3.1 on page 3-2.
Note Ensure that the desired Power Supply configuration is installed before
installing the CMM or SMM. The Power Supply module(s) is located behind the CMM
or SMM module.
Address Type Default Address
IP address 192.168.1.1
netmask 255.255.255.0
gateway 192.168.1.1
Note The fiber management tray can be installed now or after all the application
modules are installed. It may be easier to install the application modules without
the fiber management tray installed.