15
SAMPLE INTERFACE
DESCRIPTION
There are two recording modes, Basic Mode and
Loop Mode. Use the [<]/[>] buttons to switch
between them.
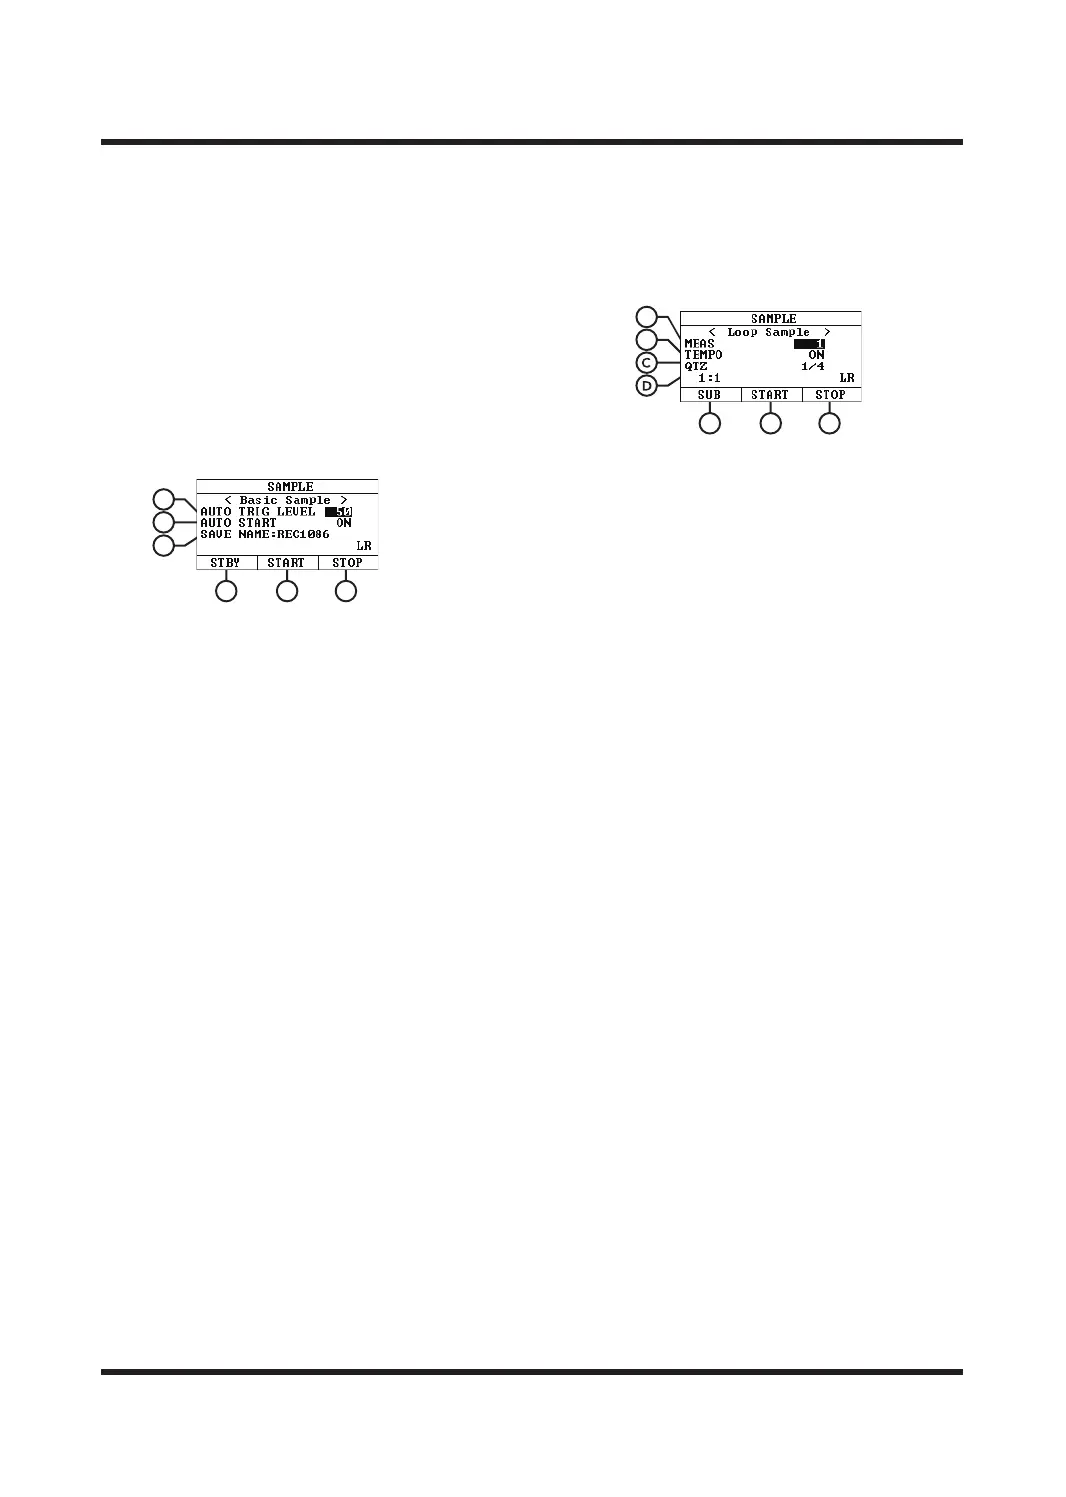
BASIC SAMPLE
The recorded content will be saved to the trigger
selected by the current sound kits. The file is saved
in 48 KHz sampling frequency and 16 bit sampling
accuracy.
A. AUTO TRIG LEVEL
Pre-recording level trigger threshold, needs to
be used with the AUTO START function,
range: 1-100.
B. AUTO START
ON: Enable The pre-recording function;
OFF: Disable this function.
After enabling this function, press [F1] (STPY)
to enter the pre-recording state. When any
trigger or external input audio receives a
volume level exceeding or equal to the set REC
LEVEL input signal, sampling will automatically
begin.
C. SAVE NAME
After the recording is completed, the file will
be saved to the device with this name.
D. STBY [F1]
Pre-ecording switch. When turned on, the [F1]
button is always on and goes out when
recording starts or the function is turned o.
E. Press START [F2]
To start recording and the [SAMPLE] button
light will be on.
F. STOP [F3]
Press to stop recording and save the file to the
PAD selected in the current kit (KIT->).
LOOP SAMPLE
The recorded content will be saved to the trigger
selected by the current sound kits. The file is saved
in 48KHz sampling frequency and 16 bit sampling
accuracy.
A. MEAS
Recording measure number.
Options: 1/2/4/8/16
B. TEMPO
It turns the recording metronome function on
or o.
C. QTZ
Quantization function, automatically corrects
the beat value during recording.
Please set the required quantization accuracy
before starting recording or disable this function.
Options: OFF, 1/4, 1/8, 3/8, 1/16, 3/16, 1/32, 1/64.
D. Meas: beat
The measure of beat Meas is currently running
to the measure number, and the beat of beat is
currently running to the beat number.
E. SUB [F1]
Each press will save the current recording track
and add a new track.
F. START/DELETE [F2]
When START is displayed, press it to start
recording, and the [SAMPLE] button light will
be on;
When DELETE is displayed, press it to delete
the current recording track, and the recording
tracks that have been stored using the [SUB]
button will not be deleted.
G. Press STOP [F3]
To stop recording and save the recording as a
WAV file to the TF card.
Tips:
1. During recording, any operation to jump to other
functions will immediately pause the recording
and clear all the contents of the recording.
Please operate with caution.
A
B
C
D E F
E F G
B
A