1-5
Chapter 1. OVERVIEW
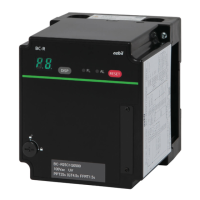
z LED display details
Name Color Description
POWER Green Lights up when the power is turned on
EVENT Orange Lights up when an event occurs
SHUTTER Green Lights up when the shutter is closed
FLAME Green * Lights up when a flame is detected
ALARM Red Lights up when there is an alarm
START Green Lights up when the start contact circuit is closed, and goes off
when an alarm is detected
IG Green Lights up when the ignition transformer output is on
PV Green Lights up when the interrupted pilot valve opening output is on
MV Green Lights up when the main valve opening output is on
* On the device, the color changes to green, orange or red as determined during setup.
The factory settings are green for a flame voltage of 2.5 V or more, orange for 1.6 to 2.4
V, and red for 1.5 V or less. The LED goes off if no flame is detected (K6 is off).
z Subbase (Q241A104) sold separately
13
14
15
16
17
18
19
20
21
22
23
24
1
2
3
4
5
6
7
8
9
10
11
12
2
2
2
2
Q241A104
: Upper and bottom side covers can be
removed when putting in the wiring.
Remove when knockouts are not used.
Mounting hole
: Mounting holes are used when the subbase is
mounted on a panel.
Although there are 5 holes, use the 4 at the
corners to mount the device. Use M4 screws.
Terminal block
: M3.5 screws for connection of external wiring.
Hole for the body-subbase screw
: This threaded hole mates with the body-subbase
screw, which is used to attach the main body to
the subbase.
Knockouts
: Remove knockout discs to run in the wiring.
There are 2 knockout holes on the upper, bottom,
right and left sides and back, 10 holes in total.
The sides, upper, and bottom covers have 2
dierent diameter holes, to respond to any
wiring situation. Remove knockouts as needed.
Note
•
The shape and dimensions of the terminal block are shown below. Wiring will be
easy if crimp type terminal lugs suitable for the dimensions written below.
4
6.3