2-2
Chapter 2. MOUNTING AND WIRING
Mounting posture
Mount the controller so that the display/control panel is vertical, not horizontal,
and its writing is correctly oriented.
POWER
EVENT
SHUTTER
FLAME
ALARM
START
IG
PV
MV
RST
DISP
FLAME
VOLTAGE
ADDRESS
LOADER
RS-485
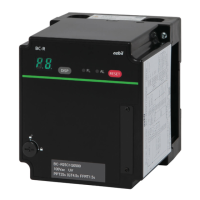
DYNAMIC SELF CHECK
BURNER CONTROLLER
AUR450
POWER
EVENT
SHUTTER
FLAME
ALARM
START
IG
PV
MV
RST
DISP
FLAME
VOLTAGE
ADDRESS
LOADER
RS-485
DYNAMIC SELF CHECK
BURNER CONTROLLER
AUR450
POWER
EVENT
SHUTTER
FLAME
ALARM
START
IG
PV
MV
RST
DISP
FLAME
VOLTAGE
ADDRESS
LOADER
RS-485
DYNAMIC SELF CHECK
BURNER CONTROLLER
AUR450
POWER
EVENT
SHUTTER
FLAME
ALARM
START
IG
PV
MV
RST
DISP
FLAME
VOLTAGE
ADDRESS
LOADER
RS-485
DYNAMIC SELF CHECK
BURNER CONTROLLER
AUR450
Panel
Panel
Panel
Panel
Correct
Incorrect Incorrect
Front of
Panel
MADE IN JAPAN
AC xxxV 50/60Hz
XXXXX XXXXXX
Panel
MADE IN JAPAN
AC xxxV 50/60Hz
XXXXX XXXXXX
AUR450C 000
Panel
Wiring diagram
Front of controller
Correct
Incorrect Incorrect
Mounting the subbase
Mount the subbase on a vertical surface. The threaded hole for the body-subbase
screw should be in the lower portion of the vertically oriented subbase.
(1) Open knockout holes on the subbase as required by the wiring situation.
(2) Connect the wiring conduit(s).
(3) Mount the subbase in the desired location with M4 screws, using the 4 mount-
ing holes.
M4 mounting hole (4 locations)
80±0.2
80±0.2
Handling Precautions
•
Although there are 5 holes, use the 4 holes at the corners, as shown in the
above drawing.
•
Tighten the screws with a torque of 1.5 N·m min. Failure to do so may break
the subbase.
(4) Connect the wiring in accordance with the description of Item 2-2 Wiring.