Do you have a question about the Azbil AUR450C and is the answer not in the manual?
Explains warning symbols, cautionary icons, and specific notations like Handling Precautions.
Covers notes, numbering, and reference symbols for user guidance.
Covers warnings on prepurge, wiring, short-circuits, ignition timing, and electrical hazards.
Details warnings on UV detection, solenoid valve wiring, pilot turndown tests, and gas discharge.
Covers warnings on limited product life, lockout reset procedures, and improper operation.
Details cautions on installation locations, environmental exposure, and required technician skills.
Cautions on terminal load ratings, relay selection, wiring practices, and power supply connection.
Cautions on grounding, preventing false flame detection, and pilot turndown tests.
Cautions on cleaning, transportation, and handling terminal shorts.
Lists and describes various manuals for the AUR450C system and its components.
Describes manuals for compatible flame detectors and accessories.
Summarizes the main chapters: Overview, Mounting, Operation, Trial-Run, Maintenance, and Specifications.
Provides an overview of the AUR450C burner controller.
Details installation, wiring, and check methods for the controller.
Explains the operational aspects, including block diagrams and sequence charts.
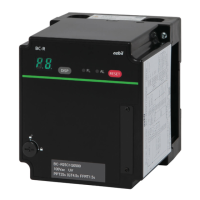
Describes the AUR450C as a flame safeguard controller for ignition and monitoring.
Details safety standards, ignition sequence options, design advantages, and display functions.
Illustrates the AUR450C's integration within a combustion control system.
Explains vital safety features like monitoring, shutdown, ignition timing, and self-checking.
Outlines safety guidelines and critical points for designing equipment using the controller.
Provides a table to assist in selecting the correct AUR450C model based on specifications.
Lists compatible base, detectors, optional parts, and loaders.
Details UL, CE, and FM certifications for the product.
Identifies and describes the functions of the controller's parts like displays, switches, and terminals.
Explains the color and meaning of each LED indicator on the controller.
Details the subbase, including mounting holes, terminal blocks, and knockouts.
Explains sequence codes and alarm codes shown on the 7-segment display.
Provides handling precautions for the DISP switch and display behavior during lockout/reset.
Describes how flame voltage is shown on the 2-digit display.
Details event codes, the EVENT LED, and the need for event setting configuration.
Lists and describes the function and rating of each terminal on the subbase.
Identifies and describes the front panel terminals for flame voltage output.
Provides warnings and cautions for mounting the AUR450C.
Specifies locations and clearances for effective heat radiation and access.
Details the correct vertical orientation for the controller's display panel.
Describes how to mount the subbase using screws and knockout holes.
Explains the steps to securely attach the controller onto the mounted subbase.
Details the procedure for safely detaching the controller from the subbase.
Covers essential warnings and cautions for safe and correct wiring practices.
Cautions on interlock circuits, using surge absorbers, and noise suppression.
Presents the main wiring diagram and how to connect the power supply.
Details how to connect an optional surge absorber for lightning protection.
Explains how to wire the AUD300C/500C flame detector to the controller.
Describes the DC voltage test to confirm correct wiring of the flame detector.
Illustrates correct and incorrect wiring for solenoid valves to prevent hazards.
Details wiring for continuous flame voltage measurement and terminal cover removal.
Explains how to correctly reattach the terminal cover after wiring.
Describes connecting to a PC using the Smart Loader Package for configuration.
Details wiring and communication settings for RS-485 serial communication.
Illustrates connecting the controller in a 3-wire RS-485 system.
Illustrates connecting the controller in a 5-wire RS-485 system.
Shows a diagram of instrumentation for an interrupted pilot system.
Lists safety and design considerations for interrupted pilot systems.
Explains the internal block diagram and how external devices connect.
Illustrates the sequence of operations during normal burner startup and running.
Describes the sequence and display when a false flame error occurs during start check.
Details the sequence and display for self-discharge errors during start check.
Explains the sequence and display when ignition failure occurs.
Describes the sequence and display when a flame failure occurs during the RUN state.
Explains the sequence and display when an interlock fails during the RUN state.
Details the sequence and display for interlock failures during standby.
Provides a detailed instrumentation diagram for intermittent pilot systems.
Lists crucial design precautions for intermittent pilot burner configurations.
Shows internal block diagrams for both pilot and main burners in intermittent pilot systems.
Lists the key tests: flame voltage, pilot turndown, ignition spark, and safety shutoff.
Lists the necessary tools like multimeters and jumper cables for adjustments.
Outlines essential checks before starting trial-run adjustments.
Details how to measure flame voltage using a multimeter or FSP136A.
Explains how to test reliable flame transfer to the main burner.
Guides on checking main burner ignition with minimum pilot flame and troubleshooting.
Details how to test for UV interference from the ignition spark.
Explains tests for pilot ignition failure and flame failure safety shutoffs.
Describes how to check system lockout by activating interlocks.
Provides guidance on determining appropriate maintenance schedules based on equipment and environment.
Lists and describes all alarm codes displayed during lockout conditions.
Provides a step-by-step flowchart for diagnosing and resolving equipment faults.
A checklist form for recording status during inspection and troubleshooting.
Details general specifications like compatible detectors, timings, voltage ranges, and dimensions.
Lists power supply, dielectric strength, transmission modes, and data formats.
Details allowable temperatures, humidity, vibration, and impact resistance.
Shows the physical dimensions of the controller and subbase.
Provides information on hazardous substances in electrical products according to China RoHS standards.
Outlines the warranty duration, what is covered, and exclusions.
Emphasizes user responsibility for ensuring product suitability and incorporating safety designs.
Details restrictions on use, such as for nuclear or medical equipment, and specific purposes.
Advises on product renewal cycles and notes that specifications may change.
| Control Method | PID control |
|---|---|
| Number of Inputs | 1 |
| Communication | RS-485 (optional) |
| Ambient Temperature | 0 to 50 °C |
| Ambient Humidity | 35 to 85% RH (non-condensing) |
| Input Type | Thermocouple, RTD, DC voltage, DC current |
| Output Type | Relay |
| Control Output | Relay |
| Power Supply | 100-240VAC |
| Display | LED or LCD |
| Mounting | Panel mount |