4. Lamp & Lamp House
9Nm
6
7
8
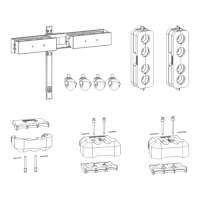
Image 4-16
Tip: Write do wn the serial num ber of the xen on lamp. You will need this while updating the lamp parameters after installation
of the x enon lam p. The serial number of the xenon lamp is engr aved in the ne ck of the xenon lamp.
3. C heck the cathode connection inside the lamp hous e. Use an 22 mm open-end wr ench to hold the first nut while fastening the
second nut on the rod with a torque of 25N m (18.4 lbf*ft) using
a torque wrench with 22 m m hexagon socket. Ensure that there
is a flat washer at both s ides of the wire lug. It’s safer to do this check be fore the xenon lamp is installed to avoid accidental
bumping against the xenon lamp.
Tip: The cathode socket can easily pulled out from the Lam p Hou s
e as a whole to perform this c heck.
Caution: These cathode connections m ust be checked with every lam p chan ge!
25 Nm
Image 4-17
4. R emove the protective packing from the xenon lamp and gently insert the xenon lamp into the Lamp Hous e as illustrated. Lamp
cathode first, M ake sure that the w ire of the lamp anode is upwards oriented. While inserting the lamp, ro tate it slightly, engaging
the pins (reference 11 im age 4-18) of the cathode adapter in the foreseen slots. This is to e nsure the lam p catho de is completely
inserted. Keep su pporting the anode of the lamp with one hand once the x enon lamp is in position.
Caution: Ensure that y ou wear protective clothing, a full face shield and protective gloves.
36
R5905067 DPXK-19B/23B/P 17/09/2012
 Loading...