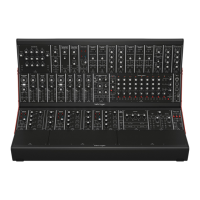
16 PROTON User Manual
1. About the Proton
• • Analog synthesizer with dual VCO design for insanely fat
music creation
• • Paraphonic mode allows both oscillators to be
independently controlled for multi-timbral sounds
• • Semi-modular design requires no patching for
immediateperformance
• • Pure analog signal path based on authentic VCO, VCF and
VCA designs
• • Dual oscillators with 5 waveforms, oscillator sync,
pulsewidth modulation and individual sub-oscillators
• • Oscillator waveform control blends seamlessly between
5shapes (tone mod, pulse, sawtooth, triangle and sine)
• • 2 self-oscillating, multi-mode VCFs can be congured in
parallel or series with linkable CVs
• • 2 ASR envelopes with reverse/inverse/loop/bounce options
to control VCAs and wave folder
• • 2 analog ADSR generators for modulating the VCFs for
unique sound performance
• • Multi-mode wave folder adds rich harmonic content and
massive exibility to the LFOs
• • 2 exible LFOs with 5 waveforms, MIDI clock sync, key sync,
phase and depth controls
• • Noise generator dramatically expands waveform generation
• • External audio can be summed into one or both VCFs to
massively enhance sound generation
• • Utility functions include attenuverters, multiples, signal/CV
mixer and summer for creative patching
• • External audio input with level control and soft clipping
circuit for processing external sound sources
• • 64 patch points for advanced modular connection and
integration with external equipment
• • 68 controls give you direct and real-time access to all
important parameters
• • Complete Eurorack solution –main module can be
transferred to a standard Eurorack case
• • Comprehensive MIDI implementation with MIDI channel
and Voice Priority selection
2. Getting Started
Your Proton was carefully packaged in the factory to guarantee
safe transport. Nevertheless please check the packaging for any
sign of physical damage before opening; and, after opening,
please also check the contents before use. If the packaging or the
Proton are damaged in any way please return to the dealer for
replacement. This does not aect your warrantyrights.
Please ensure that your Proton is used in a suitable environment
that is within its recommended operating temperature range
(5°C to 40°C, 41°F to 104°F), is not over humid and is out of
directsunlight.
Please only use the supplied power adaptor to connect your
Proton to the mains.
This manual is designed to be used alongside the Quick Start Guide
included in your package and goes into your Proton’s features in
much greater depth.
Please ensure that your Proton is powered up before powering up
mixers, ampliers etc. to ensure that your loudspeakers are not
damaged. Switch o your amplier rst at the end of the session.
Your Proton can be controlled from a suitable keyboard or
DAW over 5-pin DIN or USB MIDI, and by CV and gate via its
comprehensive patchbay. It is advised to only use one control
source to avoid unexpected results.
Your Proton is a class compliant USB device and requires no
drivers to work with either Mac OS™or Microsoft Windows™.
It is recommended that you use the SynthTribe app, which is
available as a free download from Behringer.com to check for
rmware updates, as well as for easy access to your Proton’s
additionalfeatures.
The MIDI channel of the Proton can be set using the 4 dip switches
on the rear panel, or, if these are not available (eg when using a
Eurorack case) via the Synthtribe app.
Your Proton can be used as a standalone desktop synth, removed
from its case and mounted in a Eurorack case (see Quick Start
Guide for the correct procedure for achieving this) or mounted
in a standard 19" rack, usingBehringer Model D rack ears
(suppliedseparately).
Throughout your Proton a red LED indicates that the rst of any
dual item is being controlled where controls are shared, with a
white LED indicating that the second is under control. In some
instances there are separate LEDs where both can be controlled
together or individually.
Throughout this manual the use of the abbreviation CW indicates
clockwise motion; CCW indicates counter-clockwise.