6
Installation
Oven Assembly
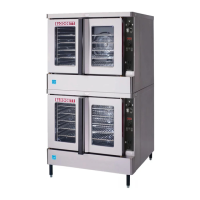
Figure 6
DOUBLE SECTION ASSEMBLY
NOTE: Old style ovens refer to units with painted ex-
posed rear angle. New style ovens refer to units
with rear angle iron enclosed in steel.
The following instructions apply to stacking two new style
ovens.
1. Secure the short legs to the bottom sections as de-
scribed.
2. Place the upper section in position on top of the lower
oven.
3. Attach the stacking brackets using the remaining
5/16” bolts shipped with the ovens.
4. Attach the ue connector.
The following instructions apply to stacking a new style
oven on an old style oven.
1. Secure the short legs to the bottom sections as de-
scribed.
2. Place the upper section in position on top of the lower
oven.
3. Attach the stacking brackets using the remaining
5/16” bolts shipped with the ovens.
4. Drill a clearance hole for a 5/16” bolt in the angle iron
of the old style oven. Use the holes in the stacking
brackets as a pilot.
5. Attach the stacking brackets to the old style oven with
the 5/16” bolts and nuts provided in the kit.
6. Attach the ue connector.
WARNING:
When stacking ovens be sure to remove the
single oven ue boxes prior to attaching
three-piece connector.
OVEN LEVELING
After assembly, the oven should be leveled and moved to
the operating location.
1. The oven can be leveled by adjusting the feet or cast-
ers located on the bottom of each leg.
Flue
Connector