4 - OPERATIONAL CHECK-OUT
4-1
See operation manual for more detailed
instructions.
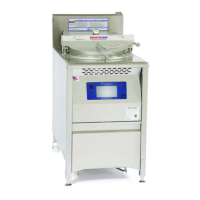
COVER ASSEMBLY
DO NOT force cover open
or closed when pressure
regulating valve is closed. Damage to the
unit may occur.
1. OPEN pressure regulating valve. Be
sure pressure gauge indicates no
pressure in cooking well.
2. To OPEN cover, push down on cover
handle then rotate handle clockwise.
Slide assembly to the rear of the unit
until it stops. Then raise the assembly.
3. Remove basket lifter, envelope and all
other items packed in the food basket.
4. Remove food basket and packing in
bottom of cooking well.
5. To CLOSE cover, lower the assembly,
pull assembly toward the front and
rotate handle counterclockwise.
Cover should raise and lower easily,
slide easily front to back and cover
should lower and raise easily within
the cooking well.
6. CLOSE pressure regulating valve han-
dle.
Handle should slide easily from side to
side and locking pin should move in
and out over the cover.
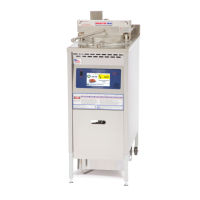
INITIAL STARTUP
ELECTRIC:
DO NOT operate unit with-
out filter pan and filter pan
cover in its proper position. Filter pan cover
must be wiped clean after each filtering
cycle.
1. Clean unit as outlined in the operation
manual.
2. Make sure all controls OFF.
3. Install cover O-ring as outlined under
COVER in CLEANING section of oper-
ation manual.
4. Fill cooking well with cooking oil. See
PRE-COOKING PREPARATIONS in
operation manual.
5. Turn circuit breaker ON or install fuse.
6. Turn cook/filter switch to COOK. The
HEAT ON light will illuminate indicating
the cooking oil is being heated.
7. Set time and temperature controls.
8. Turn pressure regulating valve handle
to CLOSED. The timer will start count-
ing down. At the end of a cook cycle,
an audible alarm will sound until pres-
sure regulating valve handle is turned
to OPEN.
9. If CHEC appears in display, turn unit
off and back to COOK.
broaster.com Manual #15458 5/02 Rev 2/14