7.4. Installation of the analytical
measurement chamber
type 8200
DANGER
Risk of damaging the sensor due to high temperatures or
pressure.
▶ Respect the sensor pressure and temperature ranges.
▶ Close the water inlet ball valve of the analytical measure-
ment chamber type 8200.
▶ Avoid installations that allow air bubbles to enter the
measuring water, because air bubbles must be avoided
on the membrane.
→ Mount the analytical measurement chamber type 8200 with
two screws (recommendation: M4 x 60 mm pan head screw or
hexagon socket head screw) onto a suitable mounting panel.
→ Connect the water inlet of the analytical measurement chamber
with a 6...8 mm hose to the sample water source.
→ Connect the water outlet of the analytical measurement chamber
with a 6...8 mm hose to the drain for example.
For more information, refer to the datasheet of the analytical meas-
urement chamber type 8200, available at: www.burkert.com.
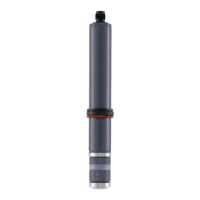
7.5. Installation of the sensor into
the analytical measurement
chamber
→ Depressurise the system.
→ Unscrew the nut of the analytical measurement chamber
type 8200.
→ Make sure the snap ring, the slide ring and the seal are in their
correct position on the sensor.
→ Insert the prepared sensor into the analytical measurement
chamber type 8200.
→ Insert the nut on the sensor and screw it tightly on the analytical
measurement chamber.
→ Carefully open the inlet ball valve so that the float just touches
the upper end of the flow indicator.
→ Wire the sensor according to chap. 7.6.
18
Installation and wiring
Type 8232
english