15
Changing Settings During Play
With Amicus, it’s possible to change some settings for all balls in an exercise at one time. To do so, the
robot must be delivering balls and the red Stop Exercise button must be visible (see Photo 15). Without
stopping play, tap the + or – symbols to adjust the Trajectory, Spin, or Speed for all balls in a drill.
To better understand this function, let’s say Ball 1 has a 20 Trajectory and 20 Speed and Ball 2 has a -10
Trajectory and a 10 Speed. If you tap the Trajectory + symbol twice, Ball 1’s Trajectory changes to 22 and
Ball 2’s trajectory to -8. Tapping the Speed – symbol once results in the Speed for Ball 1 changing to 19
and for Ball 2 to 9.
If all balls in an exercise are the same spin, the Spin adjustment appears and allows you to change the
amount of spin on all balls. If Spin is set to 1 for Ball 1 and 2 for Ball 2, tapping the Spins + symbol once
would change the Spin for Ball 1 to 2 and for Ball 2 to 3.
In addition, you may change the Ball/min setting either by moving the slider handle or tapping the + or –
symbols. Cycle, Random, and Mirror can also be turned on/off or adjusted during play.
Creating A New Exercise & Modifying An Exercise
Touch Exercises ( ) at the bottom of the screen to go to the Exercise List. Touch New at the top right. A
new Play Exercise screen appears with only Ball 1. Tap on the ball symbol and then change the parame-
ters of Ball 1 according to the instructions in the Ball Screen section. Sample the ball if you like.
Then tap the + symbol to the right of Ball 1. This creates Ball 2. It is a copy of Ball 1. Tap its symbol,
change its parameters to your liking, and then sample it if desired. Repeat this process, adding as many
balls as you wish. If you run out of room on the right side of the screen to show all balls, simply touch the
area to the right of the table diagram and slide your finger left to show more balls. There is a maximum of
10 balls per exercise.
When you’re done adding balls, touch Play to test the exercise to see if it plays as expected. If not, tap
each ball that needs correction, change its settings accordingly, and then Sample the ball. After all
balls have been changed, touch Play to play the entire exercise.
Repeat this process until the exercise is as desired.
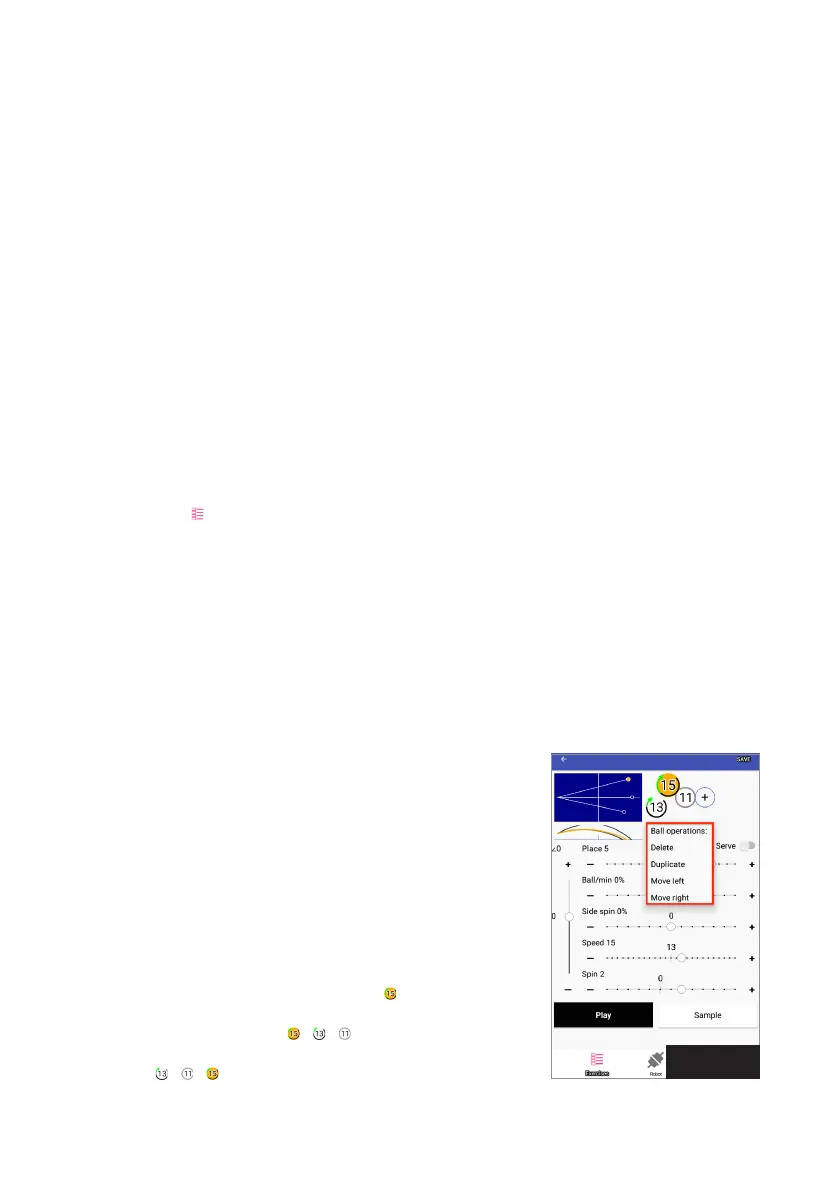
If, during this editing process, you need to delete a ball, or change
the order of balls, touch and hold down on the symbol for the
appropriate ball. In a brief second, the Ball Operations popup menu
appears (see Photo 24). You can now Delete, Duplicate, Move Left,
or Move Right the Current Ball.
Delete is self-explanatory. Duplicate copies all settings of the
Current Ball and places that new ball at the end (furthest to the
right). Move Left and Move Right commands are used to change the
order of balls. In the Photo 24 example, Ball 2 ( ) is selected. If you
choose Move Left, Ball 2 becomes Ball 1, and Ball 1 becomes Ball 2,
and the order of Balls becomes - - . If Move Right is chosen,
then Ball 2 becomes Ball 3 and Ball 3 becomes Ball 2 and the order
changes to - - .
Photo 24