24
5. Amicus robots are designed for use in clean, dry, indoor rooms. Do not use outdoors or in any wet
or damp environment. Avoid leaving your robot in a hot car or trunk.
6. Use only 40 or 40+ balls in your robot. The better ball you use (ITTF-approved 3-star are best), the
more consistent your robot can throw that ball.
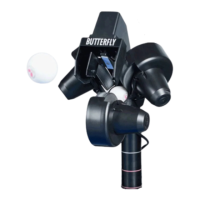
Checking & Adjusting Wheel Clearance
Amicus wheels are very durable (at least 1000
hours). Eventually these wheels will wear down
after long or intense use. As they wear down, the
space among the 3 wheels enlarges, causing the
wheels to lose their grip on the ball. Dropping the
robot or other similar trauma during transport or
use may also cause this. One sign that adjust-
ment is needed is that the machine throws the
balls at irregular lengths at high speed.
To check wheel clearance, place the Wheel
Adjustment Gauge (black tube with 3 fins) among
the 3 wheels, fins first, and so no fin touches
any wheel (see Photo 34A). Move it in and out. If
clearance is correct, the gauge can be moved in
and out easily with the wheels barely touching
the outer surface of the gauge (wheels may turn
slightly as gauge is moved). If the wheels don’t
grip the gauge at all, or conversely, they tightly
grip the gauge, then proceed to the next step.
To adjust the wheels, push the gauge into the end
of the Ball Tube so it is held rigidly in place (see
Photo 34B). Then use the 4 mm hex wrench found
in the Accessory Packet to loosen the hex screw
near the motor cover (see Photo 34C). Move the
motor (gripping its cover) either towards or away
from the gauge until the wheel barely touches
it. Lastly, tighten the 4 mm hex screw to hold the
wheel in place. Do this with all 3 motors.
Please note: The diameter of the Wheel Adjust-
ment Gauge is 35 mm, which is the ideal amount
of space among the 3 wheels. The robot functions
correctly up to a diameter of 37–38 mm.
Replacing The Wheels
When the wheels can’t be adjusted anymore, or the special coating on the wheels has worn off, the
wheels should be replaced. To do so, start with the lower wheel. Using the smaller 2 mm hex wrench,
loosen the small setscrew that holds the wheel onto the shaft of the motor (see Photo 35A). Before
Photo 34A
Photo 34C
Use 4mm hex
wrench to
loosen this
screw
Photo 34B
Stick gauge
into end of
Ball Tube
Fins should
not touch
any wheel
Slide gauge
in and out
among all 3
wheels