ENGLISH
14
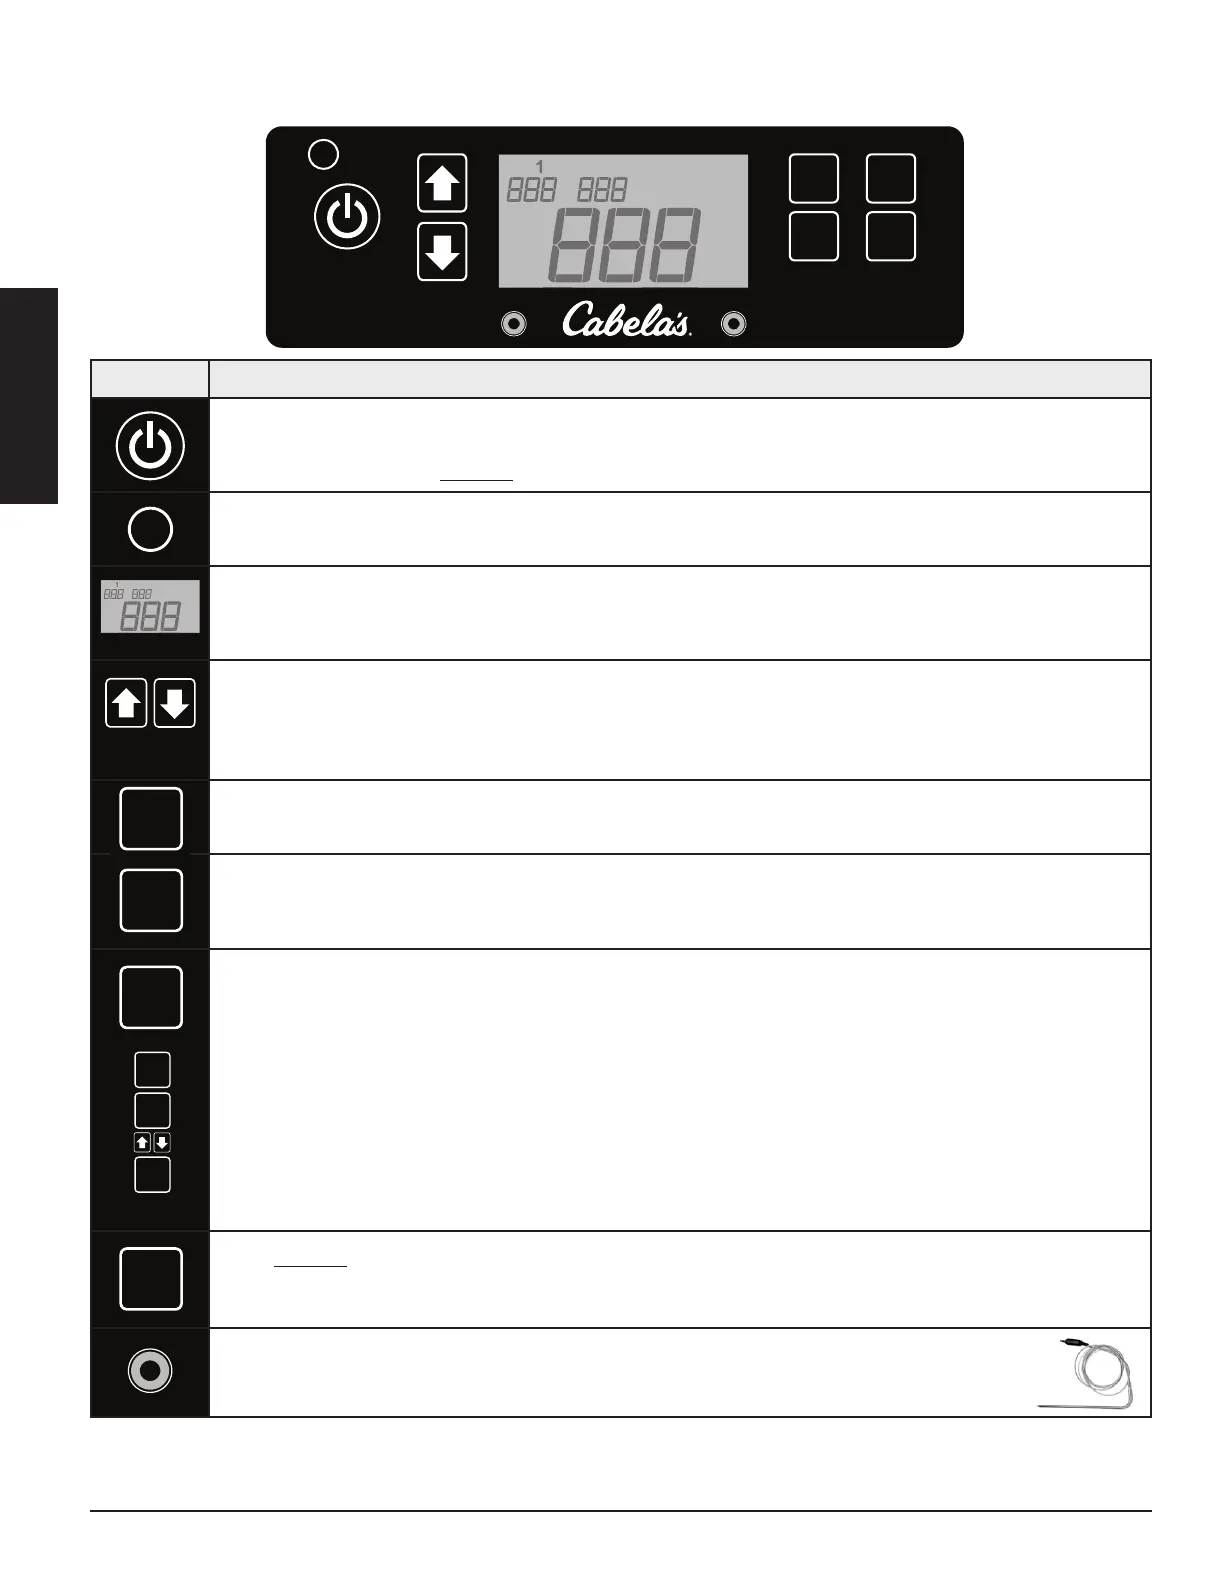
Press the Power Button to power on the unit. When connected to a power source, the light below the power
button will glow blue. Once the Power Button is pressed, the Digital LCD Screen will light up, displaying that it
is ready to operate. Press and hold the button to turn the unit off.
The Temperature Switch Button is used to change the temperature readout on the Digital LCD Screen. Press
the button to switch to Celsius (ºC) or to Fahrenheit (ºF), as preferred. Default is set to Fahrenheit.
The Digital LCD Screen is used as the information center for your unit. The Digital LCD screen will display your
Desired Temperature Setpoint (), Actual Temperature (), Meat Probe Temperature (if connected), and
any error codes. Temperature can be displayed in either Fahrenheit or Celsius.
The Adjustment Arrows allow you to increase or decrease your desired temperature ( on the Control
Board. By pressing the UP or DOWN arrows, the temperature changes by 5 degree increments. Press and hold
the buttons to increase or decrease the value faster. The temperature can be set to a low 82°C / 180°F, and
peaks at a high of 260°C /500°F.
The Button on the Control Board is used
in sequence only
to make adjustments to the setpoint
temperature. Pressing this button by itself does not result in any change.
The Button on the Control Board is used to display the current (ACTUAL) temperature of the grill. This
temperature readout measures the temperature probe, located inside the main barrel. The Digital LCD Screen
shows the ACTUAL temperature by default.
Press the Button on the Control Board to display the desired setpoint (SET) temperature of the grill. After
3 seconds, the display will switch back to the actual (ACT) settings.
1. Press SET.
2. Press TEMP and the temperature readout will begin to flash.
3. Immediately press the UP or DOWN adjustment arrows to set your desired temperature setpoint.
4. Press TEMP again to lock-in new setpoint, or wait 3 seconds for the TEMP to revert back to ACTUAL.
NOTE: If there is no action after pressing TEMP, the temperature readout will automatically revert
back to the ACTUAL temperature readout.
Press and hold the Prime Button to activate an extra feed of pellets to the burn pot. This can be used to add
more fuel to the fire before opening the barrel lid, resulting in a quick heat recovery time. It can also be used
while smoking, to increase the intensity of clean smoke flavor.
The plug-in connection ports on the front of the Control Board are for two Meat Probes. When
a meat probe is connected, the temperature is displayed on the Digital LCD Screen. When not in
use, disconnect the meat probe from the connection port.
F/C
Temp
Prime
Set
Actual
P1 P2
F/C
Temp
Prime
Set
Actual
A
F
F
P1 P2
F/C
Temp
Prime
Set
Actual
P1 P2
F/C
F/C
Temp
Prime
Set
Actual
P1 P2
F/C
Temp
Prime
Set
Actual
F/C
Temp
Prime
Set
Actual
P1 P2
F/C
Temp
Prime
Set
Actual
A
F
F
F/C
Temp
Prime
Set
Actual
P1 P2
F/C
Temp
F/C
Temp
Prime
Set
Actual
P1 P2
F/C
Temp
Prime
Set
Actual
F/C
Temp
Prime
Set
Actual
P1 P2
F/C
Temp
Prime
Set
Actual
F/C
Temp
Prime
Set
Actual
P1 P2
F/C
Temp
Prime
F/C
Temp
Prime
Set
Actual
P1 P2
F/C
Temp
Prime
Set
F/C
Temp
Prime
Set
Actual
P1 P2
F/C
Temp
Prime
Set
Actual
F/C
Temp
Prime
Set
Actual
P1 P2
F/C
Temp
Prime
Set
Actual
F/C
Temp
Prime
Set
Actual
P1 P2
F/C
Temp
Prime
Set
Actual
F/C
Temp
Prime
Set
Actual
P1 P2
F/C
Temp
Prime
Set
Actual
F/C
Temp
Prime
Set
Actual
P1 P2
F/C
Temp
F/C
Temp
Prime
Set
Actual
P1 P2
F/C
Temp
F/C
Temp
Prime
Set
Actual
P1 P2
F/C
Temp
Prime
Set