5-13 62-11863
5.8 REPLACING THE COMPRESSOR
a. Removing the Compressor
If compressor is inoperative and unit still has refrigerant pressure, frontseat suction and discharge service valves to
trap most of the refrigerant in the unit. If compressor runs, pump down the unit (refer to Section 5.4).
1. Slowly release compressor pressure to a recovery system.
2. Remove bolts from suction and discharge service valve flanges.
3. Disconnect wiring to Compressor Discharge Temperature sensor (CDT), Suction Pressure Transducer
(SPT), the wiring to the High Pressure switch (HP) as necessary.
4. Release idler pulleys and remove belts. Then remove the compressor from chassis.
5. Remove the pulley from the compressor.
6. Drain oil from defective compressor before shipping.
b. Installing the Compressor
1. To install the compressor, reverse the procedure outlined for removing the compressor.
The service replacement compressor is sold without shutoff valves, but with blank off valve pads (cast iron
plates with bolts). These bolted plate pads are used to cover the suction and discharge valve locations to
keep the compressor sterile during shipment and until it is ready for replacement during the procedure.
The Customer should retain the original service valves for use on the new replacement compressor. The
blank off valve pads coming in on the new replacement are retained and used on the failed compressor ship-
ping for service. It is still important to keep the interior of the compressor going to service as clean as possible.
Check oil level in service replacement compressor (refer to Section 5.9).
2. Attach two lines (with hand valves near vacuum pump) to the suction and discharge service valves. Dehy-
drate and evacuate compressor to 500 microns (29.90” Hg vacuum = 75.9 cm Hg vacuum). Turn off valves
on both lines to pump.
3. Fully backseat (open) both suction and discharge service valves.
4. Remove vacuum pump lines and install manifold gauges.
5. Check refrigerant level (Refer to Section 5.7.2).
It is important to check the compressor oil level of the new compressor and fill if necessary.
6. Check compressor oil level (refer to
Section 5.9
). Add oil if necessary and check refrigerant cycles.
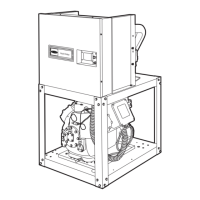
Figure 5.8 Compressor (05G)
1. Suction Service Valve
2. Discharge Service Valve
3. Oil Level Sight Glass
4. Oil Drain Plug
5. Oil Fill Plug
6. Unloader Assembly
- - - - -

 Loading...
