EasyManua.ls Logo

Char-Broil EDGE - User Manual

Char-Broil EDGE
21 pages
Print Icon
To Next Page IconTo Next Page
Loading...
42805399 • 03/14/22
CHAR-BROIL EDGE
TM
ELECTRIC GRILL
MODEL
22652143
PART REPLACEMENT GUIDE
NOTE: Some grill parts shown in the assembly steps may differ slightly
in appearance from those on your particular grill model. However, the
method of assembly remains the same.
Fuse .............................................2
Controller ....................................... 3-4
Top Fascia Panel / Temperature Probe / Control Panel .... 5-8
Heating Element / Reflector Plate Assembly ........... 9-12
Firebox ....................................... 13-17
Power Cord.................................... 18-21
TABLE OF CONTENTS
CAUTION
Some parts may contain sharp edges. Wear protective
gloves if necessary.
Question and Answer IconNeed help?

Do you have a question about the Char-Broil EDGE and is the answer not in the manual?

Summary

Fuse Replacement Guide

Procedure for Fuse Removal and Replacement

Step-by-step instructions for removing and replacing the fuse component.

Controller Installation and Maintenance

Cable Disconnection and Reconnection for Controller

Instructions on how to disconnect and reconnect cables associated with the controller unit.

Controller Unit Removal and Installation

Detailed steps for removing the existing controller and installing a new one.

Control Knob Replacement Procedure

Guidance on how to remove and replace the control knob on the controller.

Top Fascia, Temperature Probe, and Control Panel Service

Grease Pan Removal and Replacement

Procedure for removing and reinstalling the grill's grease pan.

Grates and Baffles Removal

Steps to remove the cooking grate, warming plate, and grease baffle.

Grill Head Assembly Removal

Instructions for detaching and reattaching the main grill head unit.

Top Fascia Panel Replacement

Procedure for removing and installing the top fascia panel, including wire routing.

Temperature Probe Replacement

Steps for safely removing and replacing the temperature probe.

Control Panel Unit Replacement

Procedure for removing and installing the main control panel unit.

Combined Control Panel and Controller Replacement

Steps to replace both the control panel and the controller simultaneously.

Heating Element and Reflector Assembly Service

Grease Pan Removal

Procedure for removing the grease pan as a preliminary step.

Grates and Baffles Removal

Steps to remove the cooking grate, warming plate, and grease baffle.

Grill Head Assembly Removal

Instructions for detaching and reattaching the main grill head unit.

Top Fascia Panel Replacement

Procedure for removing and installing the top fascia panel, including wire routing.

Temperature Probe Replacement

Steps for safely removing and replacing the temperature probe.

Heating Element and Reflector Assembly Replacement

Procedure for removing and replacing the heating element and reflector assembly.

Firebox Component Service

Grease Pan Removal

Procedure for removing the grease pan as a preliminary step.

Grates and Baffles Removal

Steps to remove the cooking grate, warming plate, and grease baffle.

Grill Head Assembly Removal

Instructions for detaching and reattaching the main grill head unit.

Top Fascia Panel Replacement

Procedure for removing and installing the top fascia panel, including wire routing.

Control Panel Assembly Replacement

Steps for removing and replacing the control panel assembly.

Grease Pan Bracket Replacement

Procedure for removing and replacing the grease pan brackets.

Top Lid Assembly Replacement

Steps for removing and replacing the top lid assembly.

Temperature Probe Replacement

Steps for safely removing and replacing the temperature probe.

Heating Element Assembly and Firebox Replacement

Procedure for replacing the heating element assembly and the firebox.

Power Cord Replacement Guide

Controller and Power Box Wiring Disconnection

Instructions to disconnect wiring from the controller and power box.

Power Box Removal

Procedure for removing the power box unit.

Power Box Cover Removal and Installation

Steps to remove and replace the power box cover.

Connector Cover Replacement

Procedure for removing and replacing the connector cover.

Wire Securing and Ground Wire Routing

Instructions for securing wires and routing the ground wire.

Power Cord Nut Removal and Replacement

Procedure for removing the nut to replace the power cord.

Power Cord Removal and Fastening Nut Securing

Steps to remove the old power cord and secure the fastening nut.

Overview

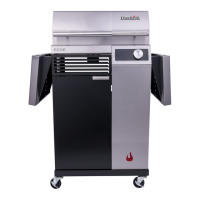
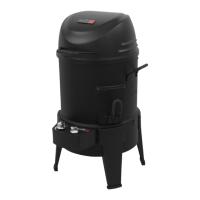
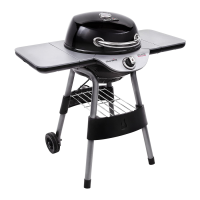
This document is a part replacement guide for the Char-Broil Edge™ Electric Grill, model 22652143. It provides step-by-step instructions for removing and replacing various components of the grill, emphasizing that the steps should be followed in order for removal and then reversed for replacement. The guide also includes important safety cautions regarding sharp edges and proper installation of the grease pan.

Function Description:

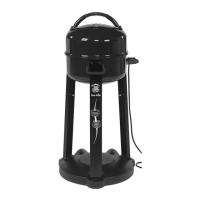
The Char-Broil Edge™ Electric Grill, model 22652143, is an electric outdoor cooking appliance designed for grilling food. It features a controller for temperature management, a heating element for cooking, and a reflector plate assembly to distribute heat. The grill is equipped with a grease pan to collect drippings, a cooking grate, and a warming plate. A top fascia panel and control panel house the user interface and internal components. The entire unit is powered via a power cord, which connects to a power box and controller.

Important Technical Specifications:

The manual does not explicitly list technical specifications such as wattage, voltage, or dimensions. However, it details the internal components that contribute to its operation:

  • Fuse: A safety component designed to protect the electrical system from overcurrent. Its replacement is the first step in the guide, indicating its critical role in the grill's electrical safety.
  • Controller: This is the central electronic unit that manages the grill's functions, including temperature regulation. It connects to the power input, control signal, and the heating element.
  • Temperature Probe: Works in conjunction with the controller to monitor and maintain the desired cooking temperature.
  • Heating Element: The primary component responsible for generating heat for cooking. It is part of a larger assembly that includes a reflector plate.
  • Reflector Plate Assembly: Designed to help distribute heat evenly across the cooking surface and improve cooking efficiency.
  • Power Box: An enclosure that likely houses electrical connections and potentially the fuse, connecting the power cord to the controller.
  • Power Cord: The electrical cable that supplies power to the grill. It includes a fastening nut and connector cover for secure installation.

Usage Features:

The guide outlines the operational components that users interact with:

  • Control Knob: Used to adjust settings on the controller, likely for temperature control.
  • Cooking Grate: The primary surface where food is placed for grilling.
  • Warming Plate: An additional surface, typically located above the cooking grate, used to keep food warm.
  • Grease Pan: A removable tray located beneath the cooking area to collect grease and drippings, essential for clean operation and preventing flare-ups.
  • Top Fascia Panel and Control Panel: These components form the exterior interface of the grill, housing the control knob and potentially indicator lights or displays (though not explicitly mentioned).

Maintenance Features:

The manual is primarily a maintenance guide, detailing how to replace parts. Key maintenance-related aspects include:

  • Step-by-step Replacement Instructions: Each section provides clear, illustrated steps for removing and replacing specific parts, such as the fuse, controller, top fascia panel, temperature probe, control panel, heating element, reflector plate assembly, firebox, and power cord. This systematic approach ensures that users can perform repairs or replacements correctly.
  • Order of Operations: The guide emphasizes following the steps in order for removal and then reversing them for replacement, which is crucial for proper reassembly and function.
  • Cable Management: Instructions for unplugging and replugging cables (e.g., on the controller and power box) are provided, as well as routing wires through holes when replacing panels.
  • Wire Tie Caution: A specific caution advises care when removing wire ties from the temperature probe and heating element wires to prevent damage, highlighting the delicate nature of these connections.
  • Grease Pan Importance: A "CAUTION" note stresses the importance of installing the grease pan to prevent hot grease from dripping and causing fire or property damage, indicating that regular cleaning and proper installation of the grease pan are vital for safety and maintenance.
  • Safety Precautions: The general caution about sharp edges and the recommendation to wear protective gloves underscore the importance of safety during maintenance procedures.
  • Visual Aids: The guide includes numerous diagrams and illustrations to visually represent each step, making the replacement process easier to understand and follow.
  • Component-based Troubleshooting: By detailing how to replace individual components, the manual implicitly supports troubleshooting efforts, allowing users to replace a faulty part rather than the entire grill.

Char-Broil EDGE Specifications

General IconGeneral
BrandChar-Broil
ModelEDGE
CategoryGrill
LanguageEnglish

Related product manuals