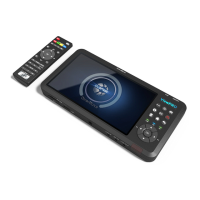
ClonerAlliance ViewPro User Manual
4. During recording process, you can adjust the volume of HDMI IN by pressing the volume left/right button on the
Remote at any time. If you got Mic connected, you also can adjust the volume of Mic during recording by pressing the
volume up/down button on the Remote.
5. Press the Stop button on ClonerAlliance ViewPro remote, check the status of storage indicators, when the LED turns
to solid blue or green, it indicates the videos have been saved.
6. You can playback the recorded files on ClonerAlliance ViewPro directly or on PC or on a smart TV.
Note: DO NOT remove the USB storage drive/SD card from ClonerAlliance ViewPro in the process of recording (Storage
indicator flashing Blue/Green indicates it’s still in the process of recording.)
3.3 Take Snapshots
Method 1. Using the Remote included with ClonerAlliance ViewPro to take a snapshot.
Press on the remote control to take a snapshot.
Method 2. Using the snapshot button on ClonerAlliance ViewPro to take a snapshot. FYI. Image formats: JPG
You can playback the snapshots on ClonerAlliance ViewPro directly or on PC or on smart TV.
3.3. Take Snapshots 21