Page 11
KEYPAD FUNCTIONS
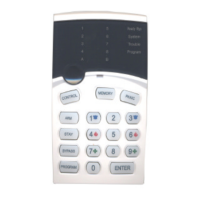
The Elite LED Keypad consists of; an 18 button, backlit silicone rubber keypad, 30 LED indicators and an internal
piezo buzzer housed in a modern white plastic housing. The plastic housing has a hinged front lid to cover and pro-
tect the rubber buttons when not in use. All the electronics are contained on a single circuit board inside the housing.
Because the keypads communicate with the controller using data, the cable run from panel to keypads is secure
against tampering. For this reason there is no tamper switch on the keypad assembly. Access to the keypad electron-
ics will not disarm the panel.
BUTTONS
The 18 silicone rubber buttons are used for the following functions;
a-In normal operating mode the numeric keys are used for entering Access Codes. In Program Mode the
numeric keys are used for entering program addresses & new values.
b-The buttons with text labels are used as function buttons and select the options indicated by the text and
normally precede other button presses, e.g. to enter Bypass Mode press <BYPASS> and a two digit
numeric key entry corresponding to the zone number you wish to be excluded eg “01” for Zone # 1, “09” for
Zone # 9 and “15” for Zone # 15.
c-The PROGRAM Key is used to prefix option selections in the program modes e.g. <PROGRAM> 24
<ENTER> selects User Code 24 when in either of the two program modes. The PROGRAM key is also used
prior to a Master or Installer Code to enter one of the program modes from normal operating mode.
d-The ENTER Key is used after entry of a sequence of numbers (eg entry of a User code to Arm or Disarm
the system). As a User code can be 1-6 digits in length, the panel will not accept a code entry until the Enter
key is pressed.
e-The CONTROL button, if enabled, is used to either turn an output on/off or disable the Day Mode alarms.
The control output can be used to operate other external devices such as garage door openers, door locks,
lights, etc.
LED INDICATORS
The LED indicators are used to display system conditions including Zone status, Battery state, Tamper etc. Please
refer to the LED table on page 13 for a full explanation of the conditional displays.
KEYPAD INSTALLATION
Separate the two keypad halves by carefully inserting a small screwdriver into the release slots on the bottom edge
of the keypad front half and applying a gentle pressure. This will release the bottom edge of the housing enough for
you to unclip the top.
Screw the base to the wall using the mounting holes provided. These holes will match the standard single switch
plate spacing. Ensure the base is mounted right side up. It is marked with the word "TOP" to aid orientation. When
fixing the base to the wall make sure the top of the screw heads will not touch or short out the underside of the PCB
when the top half of the keypad is reinstalled. Bring the cables through the centre of the base.
Connect the 4 or 5 wires to the 5 way terminal block on the rear of the keypad PCB making sure to match the cables
up with the terminals as marked on the control panel's keypad port. The 5th wire is connected from the "LIN" terminal
of the keypad to the "Listen" terminal of the Elite PCB keypad port.
Once the cables have been terminated and the required address allocated (see page 12) clip the front half of the key-
pad onto the base by first engaging the clips at the top edge and then close the front down and clip it in at the bottom.
Now stick the zone list provided to the inside of the hinged lid.
WIRING
The Elite keypad connects to the Elite Controller via a 4 or 5 wire data & power connection. A maximum of 8 LED
keypads can be connected, each wired in parallel. It is advisable that each keypad has a separate cable run from the
keypad to the control panel. If the cable runs are short distances it is possible to connect two keypads at the end of
one cable run but we don’t recommend this. A 5th wire may be used to provide a "Listen-in" facility at the keypad.
The maximum recommended cable length using standard 0.2mm² security cable is 50m. Cable runs exceeding this