This document serves as a Quick Reference Guide for the Datalogic Heron™ D130 Readers, providing essential information for setup, operation, and basic configuration.
Function Description
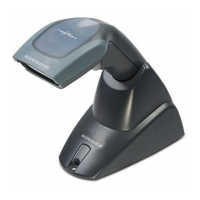
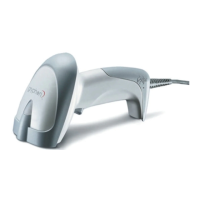
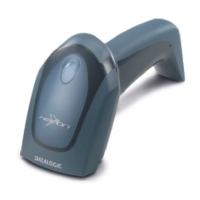
The Heron™ D130 Reader is a barcode scanner designed for efficient and accurate data capture. It operates by emitting a light bar from its reading window, which must cover the entire barcode for successful scanning. The device is capable of automatically scanning barcodes when the trigger is pulled or when placed in its stand for hands-free operation. Successful reads are indicated by an audible tone and a green spot. The reader is designed to prevent consecutive reads of the same barcode without the code being removed from the reading area, ensuring single code reading.
Usage Features
Scanning Operation
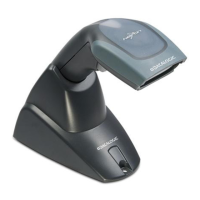
The Heron™ D130 can be used in two primary modes: handheld and presentation. In handheld mode, users aim the scanner at the barcode and pull the trigger. For optimal performance, the scanner should be tilted slightly to avoid direct reflections that can impair reading. In presentation mode, the reader is placed in its stand and automatically reads any barcode presented within its reading area. A continuous green aiming light assists in positioning the barcode for hands-free scanning.
Connectivity
The Heron™ D130 offers various connectivity options to integrate with different host systems:
- RS232: This connection requires an external UL Listed Direct Plug-in Power Unit (Class 2, 5V, minimum 180mA).
- USB: The USB cable allows connection to a UL Listed Power Unit (Class 2) or an LPS power source that directly supplies power to the reader. For IBM USB POS systems, the USB cable connects to a UL Listed computer that provides power.
- Pen Emulation: This connection uses a Pen Emulation cable and requires a UL Listed Power Unit (Class 2) or an LPS power source for direct power supply.
- Wedge/PC Notebook: These cables allow connection to either a UL Listed Computer that supplies power directly or a UL Listed Direct Plug-in Power Unit (Class 2, 5V, minimum 180mA).
Cable Disconnection
To disconnect the cable, users should firmly grasp the cable connector and pull it away from the scanner body in the direction indicated by the arrow on the device.
Stand Installation
The stand for the Heron™ D130 can be mounted using self-tapping screws, double-sided adhesive strips, or rubber feet.
- Self-tapping screws: Mount the stand directly to the surface.
- Adhesive strips: Clean both the stand's bottom and the table surface. Remove the protective plastic from one side of the strips, stick them to the stand, then remove the plastic from the other side and affix the stand to the table.
- Rubber feet: Clean the stand's bottom, remove the protective film from the rubber feet, and place them in the corresponding housings. An optional metal plate can also be fixed.
Insertion into Stand
To insert the reader into the stand, align the handle with the stand clip and push until it clicks into place. A beep will confirm correct insertion, and the reader will then be ready for barcode reading.
Interface Selection and Configuration
The reader supports USB, RS232, Wedge, and Pen interfaces. Configuration involves selecting the appropriate interface and, for USB, ensuring the correct drivers are loaded and sufficient power is supplied.
- USB Interface Configuration: The USB interface is compatible with Windows 98 (and later), Mac OS 8.0 (and later), IBM POS for Windows, and 4690 Operating System. Upon connection, the host performs checks, during which the green LED blinks. The correct USB driver (USB-KBD by default) must be loaded, and adequate power supplied. If power is insufficient, a dialog box will appear, and an external power supply may be required. Once configured, the reader emits a beep and is ready to read. For USB-COM, specific installation software and drivers may need to be downloaded from the Datalogic website.
- USB Keyboard Nationality: Users can select from various keyboard nationalities including Belge, Deutsch, English, Español, Français, Italiano, Svenskt, USA, and Japanese.
- RS232 Reader Configuration: To configure the RS232 interface, users first scan the "RESTORE DEFAULT" barcode, then the specific interface selection code for their application (e.g., Standard, POS Systems like Nixdorf Mode A or Fujitsu, ICL Mode).
- Wedge Reader Configuration: Similar to RS232, Wedge configuration involves scanning "RESTORE DEFAULT" followed by the interface selection code for the specific PC type (e.g., IBM AT or PS/2 PCs, IBM XT, PC Notebook, IBM SURE1, IBM Terminal 3153).
- IBM Terminals (31xx, 32xx, 34xx, 37xx): Users select the KEY TRANSMISSION mode (make-only or make-break keyboard) and KEYBOARD TYPE (advanced or typewriter keyboard).
- ALT Mode: IBM AT - ALT mode and PC Notebook - ALT mode selections allow barcodes to be interpreted correctly regardless of Keyboard Nationality, provided the Num Lock key is ON.
- Wyse Terminals: Options include ANSI Keyboard, PC Keyboard, ASCII Keyboard, and VT220 style Keyboard.
- Digital Terminals: VT2xx/VT3xx/VT4xx is available.
- APPLE: APPLE ADB Bus is an option.
- Wedge Keyboard Nationality: Wedge users can select from Belge, Deutsch, English, Español, Français, Italiano, Svenskt, USA, and Japanese. The Japanese selection is only valid for IBM AT compatible PCs.
- Pen Reader Configuration: For Pen interface configuration, scan "RESTORE DEFAULT" then the PEN interface selection code.
Operating Test
After configuration, users can perform an operating test by scanning provided test codes for EAN-8, EAN-13, Code 39 (Normal), Code 128, and Interleaved 2 of 5.
Maintenance Features
Default Values
The manual provides detailed default settings for each interface, which can be restored using the "RESTORE DEFAULT" barcode. These defaults cover:
- USB Default Settings: Data format (code identifier disabled, no field adjustment, etc.), USB Keyboard (USA keyboard, inter-character/inter-code delays disabled, control character emulation), USB COM (no handshaking, delay disabled, rx timeout 5 sec., etc.), and default headers/terminators for each USB mode.
- RS232 Standard Default Settings: Baud rate (9600), parity (no), data bits (8), stop bits (1), no handshaking, delay disabled, rx timeout 5 sec., etc., and data format.
- RS232 Nixdorf Default Settings: Baud rate (9600), parity (odd), data bits (8), stop bits (1), hardware handshaking (RTS/CTS), delay disabled, rx timeout 9.9 sec., etc.
- RS232 Fujitsu Default Settings: Baud rate (9600), parity (no), data bits (8), stop bits (1), no handshaking, delay disabled, rx timeout 2 sec., etc.
- RS232 ICL Default Settings: Baud rate (9600), parity (even), data bits (8), stop bits (1), RTS always on, delay disabled, rx timeout 9.9 sec., etc.
- Wedge Default Settings: USA keyboard, caps lock off, auto-recognition enabled, num lock unchanged, inter-character/inter-code delays disabled, control character emulation, and data format.
- Pen Emulation Default Settings: Interpret mode, conversion to code 39 disabled, output level normal, idle level normal, minimum output pulse 600 μs, overflow medium, inter-block delay disabled.
- Power Save: Scan rate max, standby disabled, sleep/USB suspended disabled.
- Reading Parameters: Hardware trigger, trigger active level, no trigger timeout, Flash On/Off times, one read per cycle, safety time, beeper intensity/tone/type/length, good read spot duration, stand recognition beep enabled, automatic operation aiming light enabled.
- Decoding Parameters: Ink spread enabled, overflow control enabled, interdigit control enabled, Puzzle Solver™ disabled, decoding safety = one read.
Code Selection
The device supports various barcode symbologies, with some enabled by default and others disabled.
- Enabled codes: EAN 8/EAN 13 / UPC A/UPC E (without ADD ON, check digit transmitted, no conversions), Interleaved 2/5 (check digit control and transmission, variable length code; 4-99 characters), Standard Code 39 (no check digit control, variable length code; 1-99 characters), Code 128 (variable length code; 1-99 characters).
- Disabled codes: EAN 128, ISBT128, Code 93, Codabar, pharmaceutical codes, MSI, Plessey, Telepen, Delta IBM, Code 11, Code 16K, Code 49, RSS Codes.
- Advanced Formatting Parameters: Concatenation disabled, no advanced formats defined by default.
Warranty and Support
Datalogic provides a 5-year warranty against defects in workmanship and materials under normal operating conditions. The warranty does not cover misuse, accidental damage, unauthorized repair, or tampering. Datalogic offers services, software driver downloads, contact information for subsidiaries and quality partners, and authorized repair centers through its website. The DL Sm@rtSet™ utility program is available for Windows-based configuration, including RS232 interface setup and configuration barcode printing.