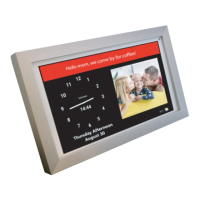
The DayClock is a Plug & Play tablet designed as an aid for senior citizens, helping them with activity planning, time management, and receiving photos and messages. It can be operated both with and without a DayClock subscription, and managed via the DayClock Agenda app or the DayClock website.
Function Description:
Without a subscription, the DayClock functions as a basic clock, displaying:
- Time
- Daypart (e.g., Morning, Afternoon)
- Day of the week
- Day of the month
- Day of the year
With a subscription, the DayClock offers enhanced functionalities, including:
- Creating, managing, and displaying activities through both the DayClock Agenda App and the DayClock website.
- Sending and viewing photos via the DayClock Agenda app or website.
- Video calling (available on DayClock 10 models).
- Synchronization of information from the DayClock Agenda App and website.
The DayClocks app, intended for family and friends of DayClock users, allows remote operation of a DayClock, entering activities, and sending photos and messages. The DayClock can also be connected to various accessories, such as loudspeakers.
Important Technical Specifications:
The manual mentions the DayClock is a "Plug & Play tablet." While specific hardware specifications like screen size, processor, or memory are not detailed, it is clear that the device requires an adapter and a micro USB cable for power. It also comes with a stand. The DayClock has a battery life of approximately three hours when not connected to the adapter, suggesting it contains a rechargeable battery. A Wi-Fi connection is essential for utilizing subscription features. The device supports different models, specifically DayClock 7 and DayClock 10, with the DayClock 10 offering video calling and weather display features.
Usage Features:
Preparation and Activation:
- Unpacking: The package includes the DayClock tablet, an adapter, a micro USB cable, a stand, a user manual, and an optional photo frame (for DayClock 10).
- Language Selection: Users can select their preferred language during the initial setup.
- Wi-Fi Connection: The device guides users through connecting to a Wi-Fi network.
- Activation: The DayClock is activated by pressing and holding the on/off button until the logo appears, then waiting for the time, date, and daypart to display.
- Power Connection: It is recommended to keep the DayClock connected to the adapter, though it has a three-hour battery life for portability.
- Subscription Request: To access advanced features, users must request a free temporary subscription by emailing info@dayclocks.eu with the DayClock type, purchase date, and supplier.
- General Settings:
- Account and Wi-Fi Configuration: Users can enter their account details (User and Password) and configure their Wi-Fi connection. A "Test" function verifies the validity of these details.
- Dim Screen Option: This feature allows the screen to switch off and turn black for a specified period (default: 10 pm to 7 am), similar to a standby mode. Synchronization functions remain active during this period.
- Menu Protection: This can be activated to prevent unauthorized use of the DayClock settings. It can be switched off by restarting the DayClock or via the DayClocks Agenda app.
- Brightness and Volume Adjustment: Sliders allow users to adjust screen brightness and alert volume.
- Language Selection: Users can choose from available languages.
- Clock Settings:
- Date Format: Options for displaying the date (e.g., Day Month, Day Month Year).
- Time Format: Choice between 12-hour or 24-hour format.
- Clock Display: Users can select how the clock is displayed (e.g., Digital, Analog, Analog & Digital, Day view, Week view).
- Daypart, Second Hand, Minutes Display: Options to switch these elements on or off.
- Time Zone Selection: Allows users to select a time zone if the DayClock is used outside the Central European Time (CET) zone.
- Text and Background Colour Modification: Users can customize the text and background colors using a round color disc or a linear color bar. The default text color is white (FFFFFF), and the default background color is black (000000).
- Daypart Times: Users can adjust the start and end times for different dayparts (Morning, Afternoon, Evening, Night, Dim screen). Day sections should be seamlessly connected.
- Weather (DayClock 10 only):
- Weather Display: Can be switched on or off.
- City and Country Entry: Users enter their current city and country (country must be in English).
- Temperature Display: Choice between Celsius (°C) or Fahrenheit (°F).
- Video Calling (DayClock 10 only):
- Requirements: Google Duo app on a smartphone, Gmail accounts for both administrator(s) and the user, and access to the DayClock settings menu.
- DayClock Setup (one-time): Go to "Settings" -> "Extra" -> "Start Duo" and configure Duo with the user's Gmail account.
- Initiating Calls: Video calls can be initiated via the DayClock app or the DayClocks Dashboard by selecting "Today" and then the "video calling" button. The DayClock will display "You will be called soon...". The administrator then starts the Duo app and initiates the call. The user accepts the call via a blue video button.
- Ending Calls: The administrator ends the call in the Duo app, then presses the red button in the DayClock app to return to the clock display.
DayClocks Agenda App Usage:
- Installation: Download from Google Play (Android) or App Store (iOS).
- Login: Log in with user name and password.
- Importing Activities:
- Go to "Planning" in the menu bar.
- Press the "+" symbol and then "Default" to create a new activity.
- Add a description under "Activity" and configure settings like start/end time and date, repeat options, background color, voice/sound, and photos.
- Press "Save" to store the activity, which will be sent to the DayClock within one minute.
- Activities can be deleted by dragging them to the left.
- Checking the Display: View the current DayClock screen on the smartphone by pressing "Today" then "Show" in the app.
- Opening DayClock Settings via App: Press "More" then "Remote" in the app, then "Settings" twice. This is useful when near the DayClock, as the settings menu cannot be viewed remotely.
Maintenance Features:
Software Updates:
- Updates are performed by restarting the DayClock.
- If an update is available, a message "version X+1 is available" will appear.
- The update will install automatically, and a message showing "Clock" and "Launcher3" will appear at the bottom of the screen.
- Users should select "Clock" and "Always" to make the clock visible again. If this dialog doesn't appear, swipe up from the bottom to show the navigation bar and click "O".
Guarantee and Disclaimer:
- DayClocks adheres to legal guarantee requirements.
- Guarantee claims are valid only if the product was purchased from DayClocks or an authorized reseller.
- The guarantee period starts from the purchase date.
- The guarantee is void for improper use, external calamities, professional use of consumer electronics, or defects from dismantling.
- Guarantee is excluded if defects are caused by illegal or incorrect software installation.
- Attempts to repair by third parties (except for essential provisional measures at DayClocks' discretion) will void the guarantee.
- Altering or removing the product's type or serial number cancels the guarantee claim.
- The supplier is not liable for property damage or personal injury due to incorrect actions or non-observance of safety regulations, which also voids the guarantee.