Getting Started Connections Settings Playback Remote ControlMulti-zone Information Troubleshooting SpecificationsSettings
ENGLISH
3
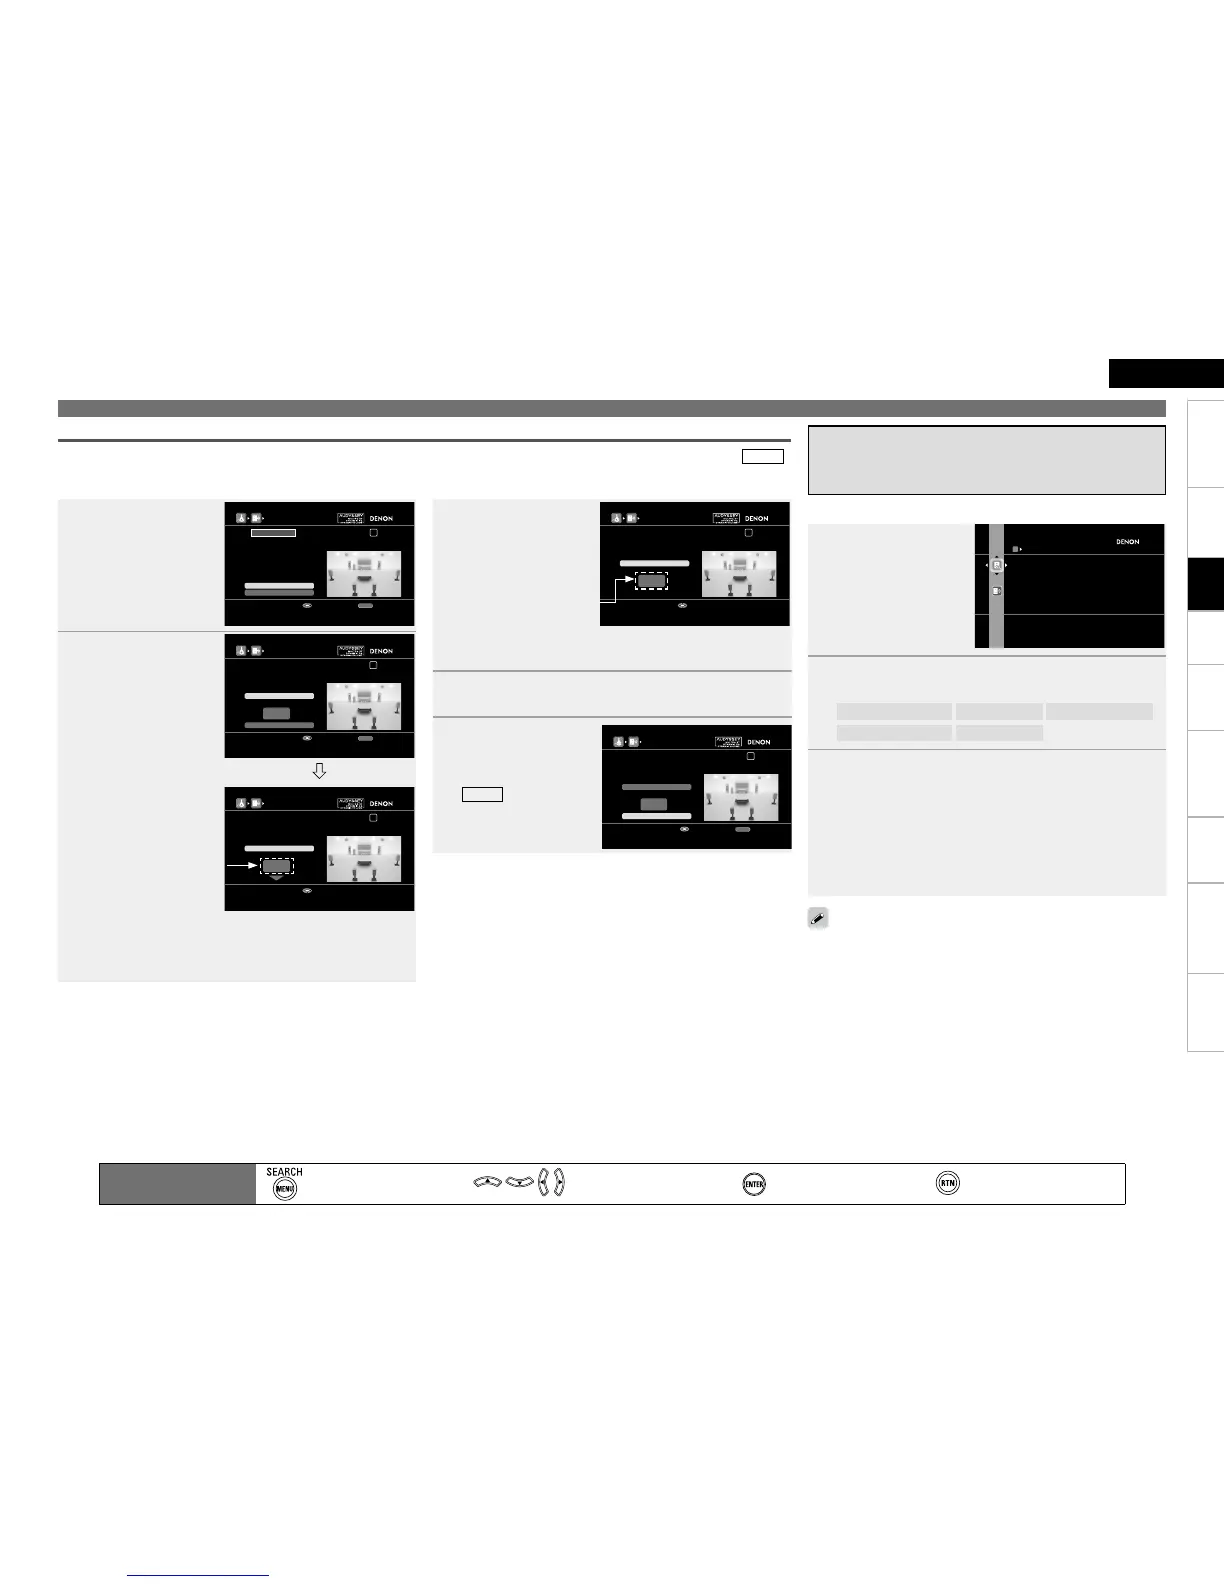
Adjust the volume
control on your
subwoofer so that
the measured level is
within the 72 ~ 78 dB
range.
AUDYSSEY AUTO SETUP
1 2 3 4 5 6
73.9dB
Stop
Subwoofer Level Matching
Please ad jus t t he lev el of you r a cti ve subwoofer unit
so that t he lev el Ind ica tes ap pro x. 75dB
Change from red to blue when level matches
Enter
If the measured level is within the 72 ~ 78 dB range, the level
indicator is blue.
b
4
When the measured level is within the 72 ~ 78 dB
range, press ENTER.
5
Select “Next” and
then press
ENTER
.
Proceed to “d:Perform
Audyssey Auto Setup,
STEP2
: Speaker
Detection” (vpage 34),
1 - w.
AUDYSSEY AUTO SETUP
1 2 3 4 5 6
RETURN
SW Test Start
73.8dB
Next
Subwoofer Level Matching
After adj ust men t, pus h “ Nex t”.
Proceed to next measurement
Enter Cancel
Make the Optimal Speaker Settings, and Correct the Room Acoustics (Audyssey™ Auto Setup)
Main remote control unit
operation buttons
:Displaying the menu
Cancel the menu
:Moves the cursor
(Up/Down/Left/Right)
:Confirm the setting :Return to previous menu
Subwoofer Level Error Message and How to Adjust
The optimal level of the subwoofer channel is 75 dB. During subwoofer level measurement (d:Perform Audyssey Auto Setup, “
STEP2
:
Speaker Detection” (vpage 34), 1 - q), an error message is displayed when the subwoofer level is outside the 72 ~ 78 dB range. When using
a subwoofer with built-in amplifier (active type), adjust the subwoofer volume so that the subwoofer level is within the 72 ~ 78 dB range.
1
Select “SW Level
Matching” and then
press
ENTER
.
AUDYSSEY AUTO SETUP
1 2 3 4 5 6
RETURN
The subwo ofe r’s le vel is to o h igh or low. Please select “SW
Level Mat chi ng” an d a dju st the le vel of your subwoofer unit.
If you do no t w ant to us e t he
subwoofer , s ele ct “Sk ip” .
Proceed to subwoofer volume adjustment item
Enter Cancel
Skip
Caution!
SW Level Matching
2
Select “SW Test
Start” and then press
ENTER.
Subwoofer level
measurement begins.
During measuring, a
“Testing …” message is
displayed.
The measured level
appears on the level
indicator after about 3 ~
5 seconds.
AUDYSSEY AUTO SETUP
1 2 3 4 5 6
RETURN
Next
dB
SW Test Start
Subwoofer Level Matching
Please pl ace th e m icr oph one at ea r h eight at main
listening po sit ion , t hen pu sh ENT ER.
Start measurement Output large test tone from subwoofer
Enter Cancel
AUDYSSEY AUTO SETUP
1 2 3 4 5 6
79.1dB
Stop
Subwoofer Level Matching
Please ad jus t t he lev el of you r a cti ve subwoofer unit
so that t he lev el Ind ica tes ap pro x. 75dB
Change from red to blue when level matches
Enter
If the measured level is outside the 72 ~ 78 dB range, the level
indicator is red.
When measuring stops, press ENTER.
b
b
Red
Blue
This is displayed after Audyssey Auto Setup is completed.
If you set “Restore” to “Yes”, you can return to Audyssey Auto Setup
measurement result (value calculated at the start by MultEQ XT) even
when you have changed each setting manually.
Check the Measuring Results and
Equalizer Type after Audyssey Auto
Setup (Parameter Check)
1
Press i to select
“Parameter Check”,
and then press
ENTER or p.
PARAMETER CHECK
Spkr Config Check
Distance Check
Ch. Level Check
Crossover Check
EQ Check
Restore
Check auto setup measurement results
2
Press ui to select the item you want to check, and
then press ENTER or p.
Speaker Config. Check
Distance Check
Channel Level Check
Crossover Freq. Check
EQ Check
3
Press ui to select the channel you want to check.
The measurement result of each speaker is displayed.
When you selected “EQ Check” in step 2, press ui to select the
Correction curve you want to check (“Audyssey” or “Audyssey
Flat”).
When you want to check another item, press RETURN.
Pressing RETURN returns you to step 2; from there, proceed to
steps 2 and 3.
b
b

 Loading...