PRE Guide
6
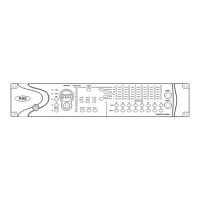
Activity LED
When lit (green), this LED indicates MIDI data is
being received by PRE.
Remote “Lock-Out” LED
When lit (green), this LED indicates PRE is in Re-
mote Lock-Out mode. In this mode, PRE is con-
nected to a remote controller (such as Pro Tools
or a dedicated device), and the front panel con-
trols are locked out.
PRE is placed in Remote Lock-Out mode after
configuring PRE for remote control, by selecting
Remote Lock-Out Mode in the Pro Tools Periph-
erals dialog (Mic Preamps tab).
PRE can be taken out of Remote Lock-Out mode
by unchecking the Remote Lock-Out Mode box
in the Pro Tools Peripherals dialog, or by power-
ing PRE off, and then back on.
For more information on locking and unlocking
PRE front panel controls, see Chapter 3, “Re-
mote Operation.”
Shift Switch and LED
This switch (along with channel Select switches)
is used in Stand-alone mode when grouping
channels in order to control multiple channels
simultaneously.When lit (green), this LED indi-
cates the Shift switch is active.
OSC (Oscillator) Switch and LED
This switch enables the internal oscillator,
which can be used for calibrating the inputs of
audio interfaces (such as Digidesign’s 192 I/O).
When lit, the OSC LED indicates the oscillator is
on.
The oscillator generates a fixed tone of approxi-
mately 1k Hz at +4 dBu (= 1.228 Vrms).
The PRE oscillator signal can be routed to single
or multiple inputs of external devices through
the DB-25 output connector on the back panel,
or to any individual input using the 1/4˝ TRS
OSC output. To send the oscillator signal
through a channel on the DB-25 connector,
press OSC, then a channel Insert.
The oscillator is enabled through the front panel
only, and cannot be accessed remotely through
Pro Tools.
MIDI Chan (Channel) Switch and LED
This switch activates MIDI Channel selection
mode. When lit, the MIDI Chan LED indicates
PRE is in MIDI Channel mode, and the PRE’s
MIDI channel can be changed with the
Gain/Param control.
Gain/Param Display
This three-character, seven-segment LED dis-
plays the input gain for the currently selected
PRE channel, or the PRE’s MIDI channel.
This display can also show the current firmware
version of PRE.
To display the firmware version of PRE in the
Gain/Param display:
1
Press Shift once, then release it.
2
Press OSC.
Calibration can change with temperature.
The output is nominally +4 dBu, but may
vary up to ± 0.3 dB depending upon the am-
bient temperature inside of PRE. Allow the
unit to heat up and thus stabilize the oscil-
lator output before using the output for cal-
ibration purposes.