Chapter 2: PRE Hardware Overview and Stand-Alone Operation
7
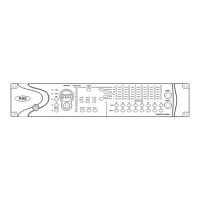
Gain/Param Control
The Gain/Param control can be used to add gain
to the input signal on one or more of the PRE’s
eight channels, or to set the PRE’s MIDI chan-
nel. Changes made with the Gain/Param con-
trol appear in the Gain/Param display.
The gain range for each input (Mic, Line, and In-
strument) is 0 dB to +69 dB, adjustable in incre-
ments of approximately 3 dB (see Table 2 on
page 40).
Peak Meter
These fourteen-segment LEDs indicate input sig-
nal level for any chosen input channel. The
meter is referenced from the clip point of the
amplifier (for example, –22 dB is 22 dB below
the clip point of the amplifier).
Clear Clips Switch
This switch clears Clip indicators on the Peak
meter and Signal indicators.
Peak Hold Switch and LEDs
This switch sets the clip hold action of the SIG
meters atop each of the 8 channels. Clips are
also indicated by a red Clip LED on the Peak
Meter. The amount of time the clip stays lit is
determined by the Peak Hold value, as follows:
Off
When lit, the Peak Hold function is off. Clip
LEDs will light during clipping, then clear
shortly after clipping stops. This is the default
Peak Hold value, on power up.
3 sec
When lit, Clip LEDs are displayed for
three seconds, then automatically clear, as long
as no additional peaks occur.
∞
(Infinity Symbol)
When lit, Clip LEDs will stay
lit until the Clear Clips switch is pressed.
To change Peak Hold (time constant)
performance:
■
Press Peak Hold once to change to the next
setting, or multiple times to toggle through the
three settings. Peak hold is a global command
which sets clip persistence for all channels.
Source Switch and LEDs
This switch sets the active input source for indi-
vidual PRE channels to Mic, Line, or Inst (instru-
ment). The three Source LEDs indicate the active
input.
Input Impedance (Represented as Z)
The Input Z switch sets the input impedance for
a PRE channel to 1.5 k
Ω
, 15 k
Ω
, or 1.5 M
Ω
.
The three Input Z LEDs indicate the current set-
ting:
1.5K
Typically used for microphone inputs, this
is the default setting when Source is set for Mic.
15K
Typically used for line level inputs, this is
the default setting when Source is set for Line.
1.5M
Typically used for instrument inputs, this
is the default setting when Source is set for Inst.
To change input impedance:
■
If the input Source is Mic, press Input Z once
to change to the next setting, or multiple times
to toggle through the three settings.
– or –
■
If the input Source is Line, press Input Z to
change to 1.5K or 15K.
– or –
■
If the input Source is Inst (instrument), the In-
put Z cannot be changed from its default 1.5M
setting.