Rev.: 20141117
Platform: DBALL/DBALL2
Firmware: CHRYSLER7 Range Extender Ready (RXT) Installation
© 2014 Directed. All rights reserved.
Page 3
10
RF
LED
4
14 12 2
HS CAN High: Tan/Black: 3
HS CAN Low: Tan: 4
(-) Ground: Black: 14
(-) Ground: Black, pin 4
(+) 12V: Red, pin 16
(+) 12V: Red: 13
1 8
169
HS CAN High: Gray/White, pin 6
HS CAN Low:
Yellow,
pin 14
OBDII
Diagnostic Connector
With the exception of the OBDII Diagnostic connector, all connectors are displayed from the wire side.
Horn: Gray/Black, pin 30
BCM
under driver dash
(C5 connector)
1 2 3
4 5
6
7
8 9
10 11
12
13
14
15
17 18 19 20 21 22 23 24 25 26 27 28 29 30
31
32
16
[1] (-) EIPS Fail Output: Blue/Red: 12
(+) 12V
30
86 85
87
87a
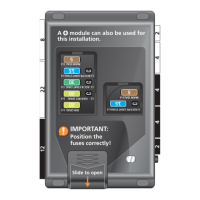
Fuse 20A
Installation without T-Harness
[1] EIPS Feature: Do not connect these wires if you don’t want to activate this feature.
You can connect to either a XL202
RFTD OR a SmartStart module.
Refer to the SmartStart/XL202
Installation Notes for more information.
Prog. Button
DBALL/
DBALL2
N/C: Violet/Brown
N/C: Violet/White
N/C: Blue/Red
N/C: Orange/Black
N/C: Yellow/Red