CM170407AMA
SECTION 3 CONTROL KEYS AND TOUCH SCREEN
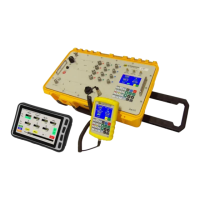
The Operator interacts with the MPS49 via the touch-screen and the 24-element keyboard
(FIG 2) on the front panel.
The color graphical LCD display features a dot matrix of 480x272 pixels.
The MPSRC remote control (FIG 3) provides the same keyboard layout as the front panel,
and a color graphical LCD touch-screen display, featuring a dot matrix of 320x200 pixels.
Four rows of keys provide access to all of the MPS43’s control and operational functions.
Keys are color coded for ease of use. A telephone format 0 to 9 keypad is included for entry
of target values.
All functions can be accessed using the keypad. The touch screen provides faster access
to some functions, depending on the current display mode.
FIG 4 KEYBOARD EXPLANATION
Rightmost – operation keys:
HALT: stops the pressure control and sets the current pressure values as targets. This
actions the stopping of a running test, while keeping the control system enabled and
actively compensating leaks.
MEAS: sets the MPS49 into MEASURE mode. The pressure control system is turned off,
leaving only the pressure measuring system active. This function is used to achieve extra
accuracy, because it avoids any controller-induced effects on the measured pressures.
CNTR: sets the MPS49 into CONTROL mode. The control system reaches and stabilizes
the Ps/altitude, Pt/airspeed and AoA targets.
NOTE MEAS and CNTR are the most frequently used keys in the general operation of the
MPS49.
The and keys are used to change the selection around the Status and Leak screens,
and to navigate inside menus. The numerical keypad is used for data entry into the
D.Marchiori Copyright 16